Wondering how to crop an image in Photoshop without cropping the background? You’re in the right place.
Whether you’re a beginner or looking to sharpen your skills,
I’ll guide you through a simple, step-by-step process to achieve this without affecting the background.
By the end of this article, you’ll not only master cropping but also pick up some handy tips and tricks to refine your edits.
Table of Contents
Detailed Guide: How To Crop Image In Photoshop without Cropping Background
How to crop multiple images while preserving the background can seem tricky, but with the right techniques, it’s quite straightforward.
In this guide, we’ll walk you through the process step by step, ensuring your background layer remains intact. Let’s get started with the first step.
Step 1: Open Your Image in Photoshop
First, launch Adobe Photoshop, photo editing software and open the image you want to edit.
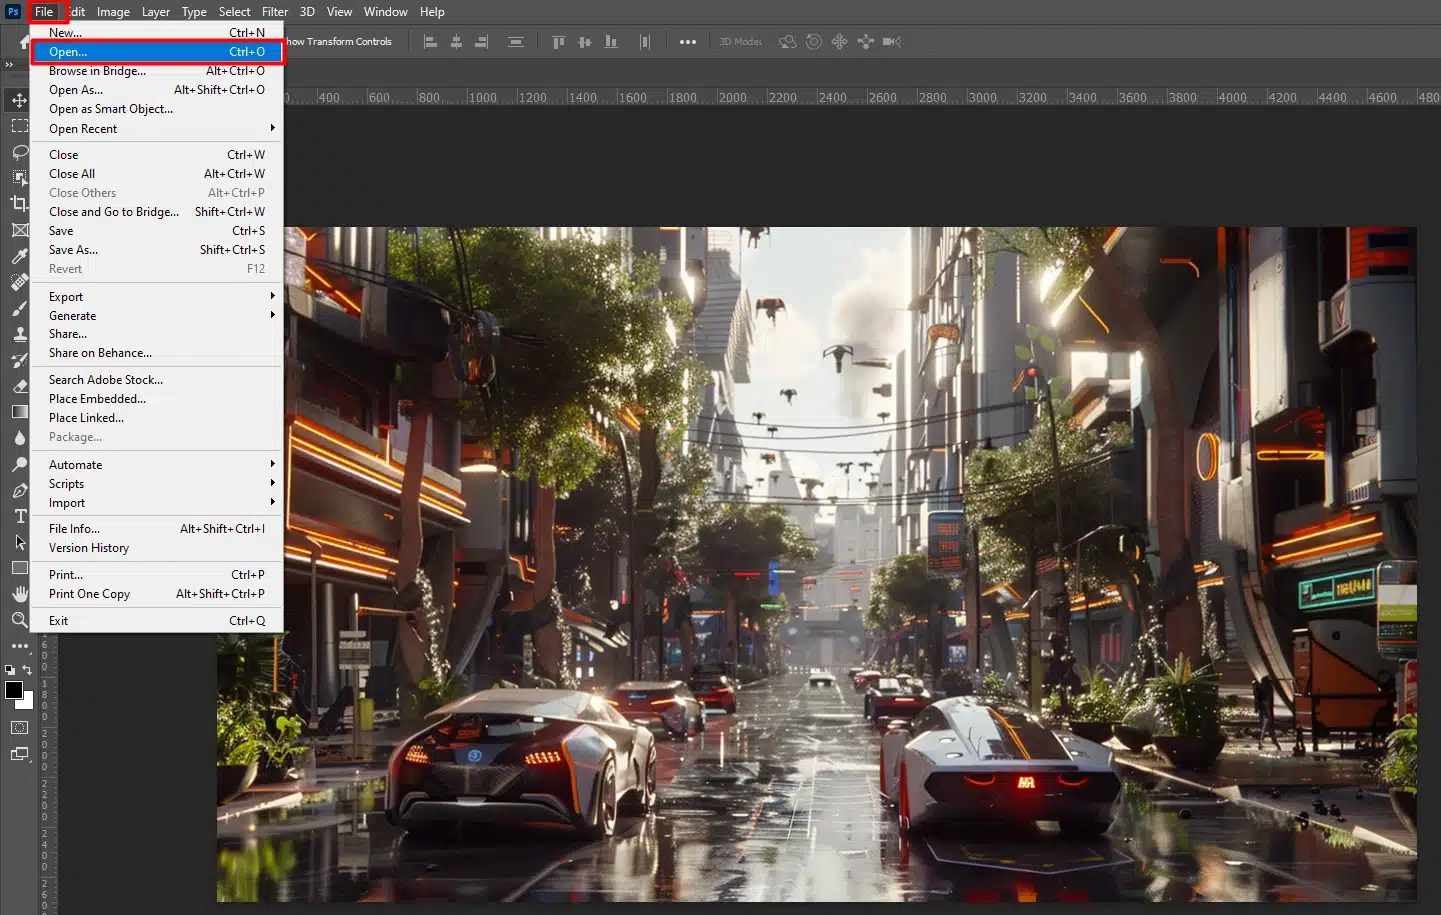
Navigate to File > Open and select your image file. Ensure your workspace is ready for editing.
Step 2: Select the Layer Mask You Want to Crop
Go to the Layers panel on the right side of the screen. Click on the entire layer that contains the image you want to crop.
This ensures you are working on the correct layer.
Step 3: Use the Marquee Tool to Select the Area
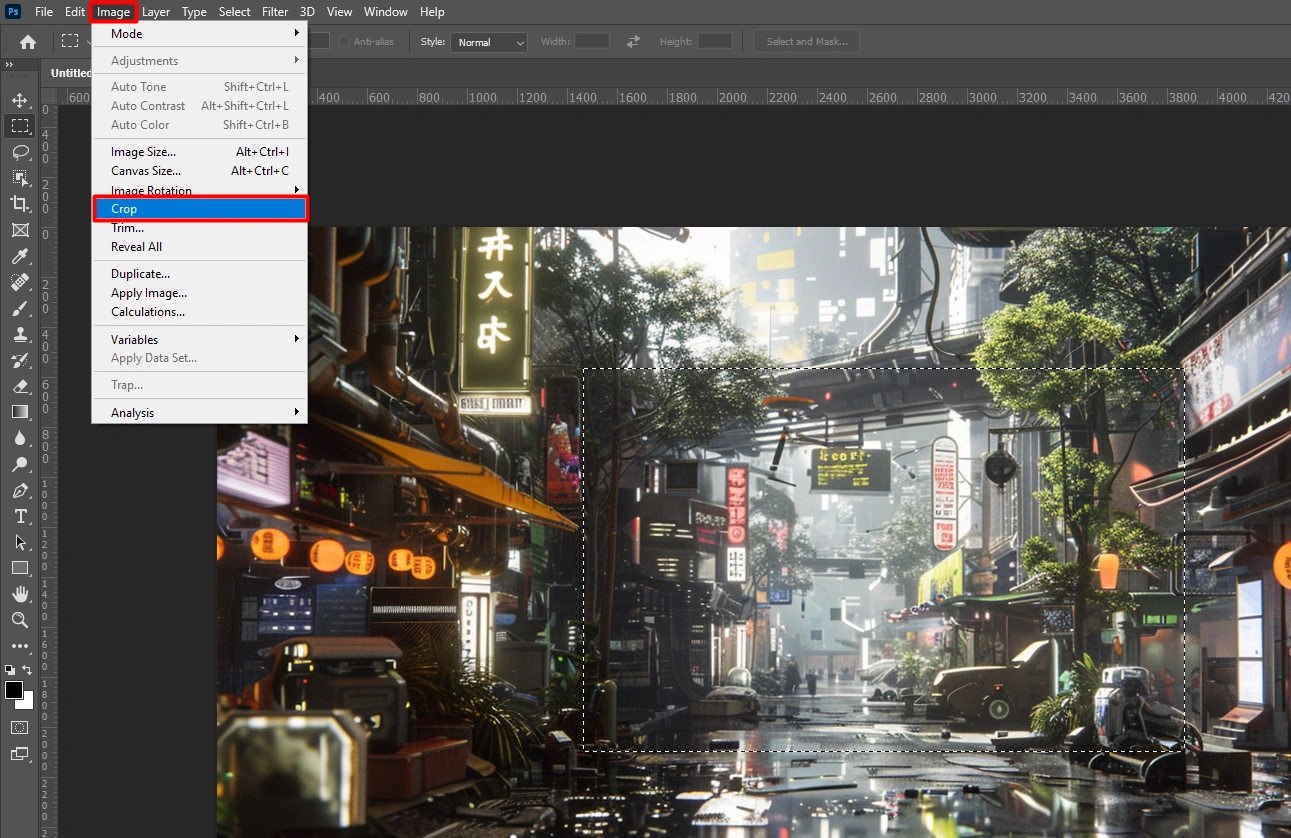
Select the marquee tool from the toolbar on the left.
Click and drag to create a selection around the part of the image you wish to crop. If needed, adjust the selection using the handles on the edges.
Step 4: Crop the Selected Area
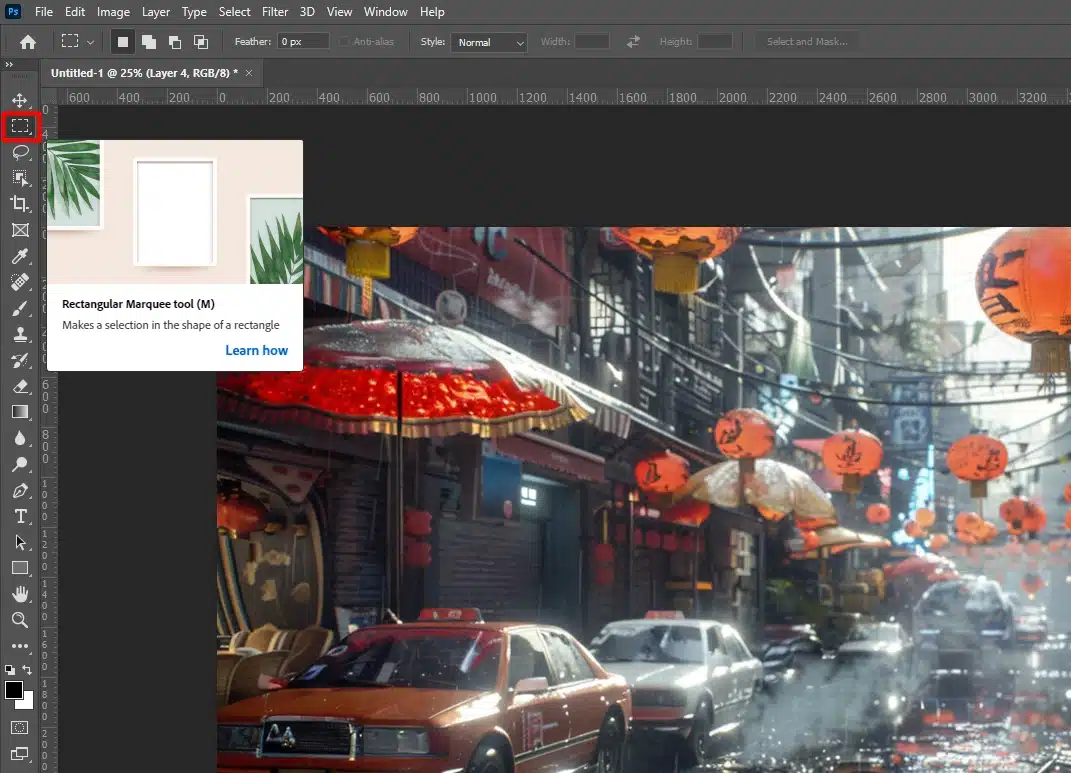
With your selection active, go to Image > Crop. This action will crop the selected area while leaving the background untouched.
If you make a mistake, simply undo and try again.
Step 5: Refine the Edges
Sometimes, cropping leaves rough edges. Use the Refine Edge tool in the Options Bar to smooth any roughness around the crop. Adjust the settings until you get the desired effect.
You can also use the Patch Tool in Adobe Photoshop to further refine the edges if necessary.
Step 6: Save Your Cropped Image
Finally, save your work.
Go to File > Save As and choose the format you prefer.
Maintain a high-quality resolution for the best results.
Pro Tip: When using these advanced techniques, it’s important to work non-destructively. Keep original layers untouched and make use of layer mask thumbnail and adjustment layer.
Always save versions of your work at different stages, so you can go back and make changes if needed.
Exploring these advanced methods and tools will not only improve your Photoshop skills but also enable you to bring a creative and professional touch to your editing projects.
To enhance your editing flexibility, consider using smart objects in Photoshop, as they allow for non-destructive transformations and easy adjustments.
Tips and Tricks for a Better Cropped Layer
When cropping and editing images in Photoshop, various tools and techniques can be used to achieve precise results.
The table below highlights important aspects such as the Marquee Tool and Crop, Layer Mask and Refine Edge, Crop with Aspect Ratio, Clone Stamp Tool, and Adjustment Layer, providing a quick overview of their usage and functions.
| Aspect | Overview |
|---|---|
| Marquee Tool and Crop | Rectangular Marquee Tool, Image > Crop |
| Layer Mask and Refine Edge | Layer Mask, Refine Edge Tool |
| Crop with Aspect Ratio | Crop Tool |
| Clone Stamp Tool | Clone Stamp Tool |
| Adjustment Layer | Adjustment Layer |
Master the Crop Tool
First, let’s talk about the crop tool. It’s right there in your toolbar.
Click it, and your whole image gets a border.
Adjust the sides to focus on what you want.
Using the Rectangular Marquee Tool
The Rectangular Marquee Tool is another handy tool. Draw a rectangle around the area you want. Then go to Image > Crop. Done!
How to Apply and Utilize Layer Masks
Steps to apply Layer Mask:
- Select the new Layer you want to mask.
- Click the Add Layer Mask Icon at the bottom of the Layers Panel.
- Use the Brush Tool to hide or show areas.
A layer mask lets you make changes without messing up the original image layer.
Background Layer Considerations
The background layer can be tricky. Unlock it by clicking the lock icon.
Now you can edit this layer like any other.
Benefits of Non-Destructive Editing
Non-destructive editing means you don’t permanently change the original image layer.
Using a layer mask is non-destructive.
It’s like having a safety net. You can always change or remove it later.
Free Transform Tips
Resize or rotate your cropped layer using the Free Transform tool.
Press Ctrl + T (Cmd + T on Mac). Hold Shift to keep the ratio of your image.
Cropping Multiple Images Efficiently
To crop multiple images, use actions in Adobe Photoshop. Record your steps and apply them to all your images. It’s a real time-saver.
Pro Tip: Always save a copy of your original work before you start editing.
To create precise and clean edges in your designs, using a clipping mask allows you to control the visibility of a layer based on another layer’s content
This way, you can go back if needed.
Common Mistakes to Avoid
Let’s jump into some common mistakes beginners make in Photoshop and Lightroom.
Want to edit like a pro?
Let’s dodge these pitfalls.
Common Mistakes in Layer Usage
Layers are your best friend in Photoshop. They help you edit without touching the original image.
However, some folks tend to work on just one layer.
Big mistake!
Always create a new layer mask before making changes. This way, you can easily undo any errors.
Overlooking the Benefits of Layer Masks in Photoshop
A layer mask can be incredibly powerful. It let you hide parts of a layer effects without deleting them.
Many beginners overlook this feature, using erasers instead. Sounds easier, but trust me, layer masks are way better for non-destructive editing.
- Use the layer mask to hide sections without losing data.
- Try the layer mask thumbnail to see which parts are hidden.
Why Ignoring the Aspect Ratio Can Enhance Your Editing
When discussing photography, it’s important to understand what a crop factor is, as it affects the effective focal length and the aspect ratio of your images, significantly influencing the composition and field of view.
Use the crop settings to lock the ratio. Simple, yet often neglected.
Avoiding Mistakes with Background Layer
The background layer often gets mistreated. Unlock it by clicking the lock icon before making any edits.
This simple step prevents many headaches later on.
Overlooking the Layers Panel
Always pay attention to your layers panel. It shows you all the layers you’re working with.
This helps you stay organized and prevents you from working on the wrong layer.
Poor Cropping Techniques
Some folks crop without care. They forget to use selection tools for accuracy.
For clean edges, use the marquee selection tool before cropping in Photoshop. Cropping should enhance, not destroy.
Using Selection Tools Incorrectly
Initial selection tools are significant.
People who are new to Photoshop sometimes use the lasso tool when the rectangular marquee or quick selection tool would be more efficient.
Selecting poorly can result in a bad crop.
Neglecting Photoshop's Crop Tool Features
Photoshop offers advanced crop features that many overlook.
Adjust the cropped layer or straighten the tool for an enhanced finish.
Don’t just hit crop and hope for the best. Utilize what Photoshop offers.
Pro Tip: Always save a copy of your original image before you start editing. This precaution keeps your original file safe in case you need to start over.
For more tips and to achieve professional-quality results, mastering the essential tools in Photoshop and Photoshop shortcuts is crucial for any graphic designer.
Advanced Techniques to Enhance Your Photos
Once you’ve mastered the basics, you can delve into advanced techniques to bring your photos to the next level.
These techniques will introduce you to some powerful, yet often overlooked, tools and methods in Photoshop that can significantly improve your editing skills.
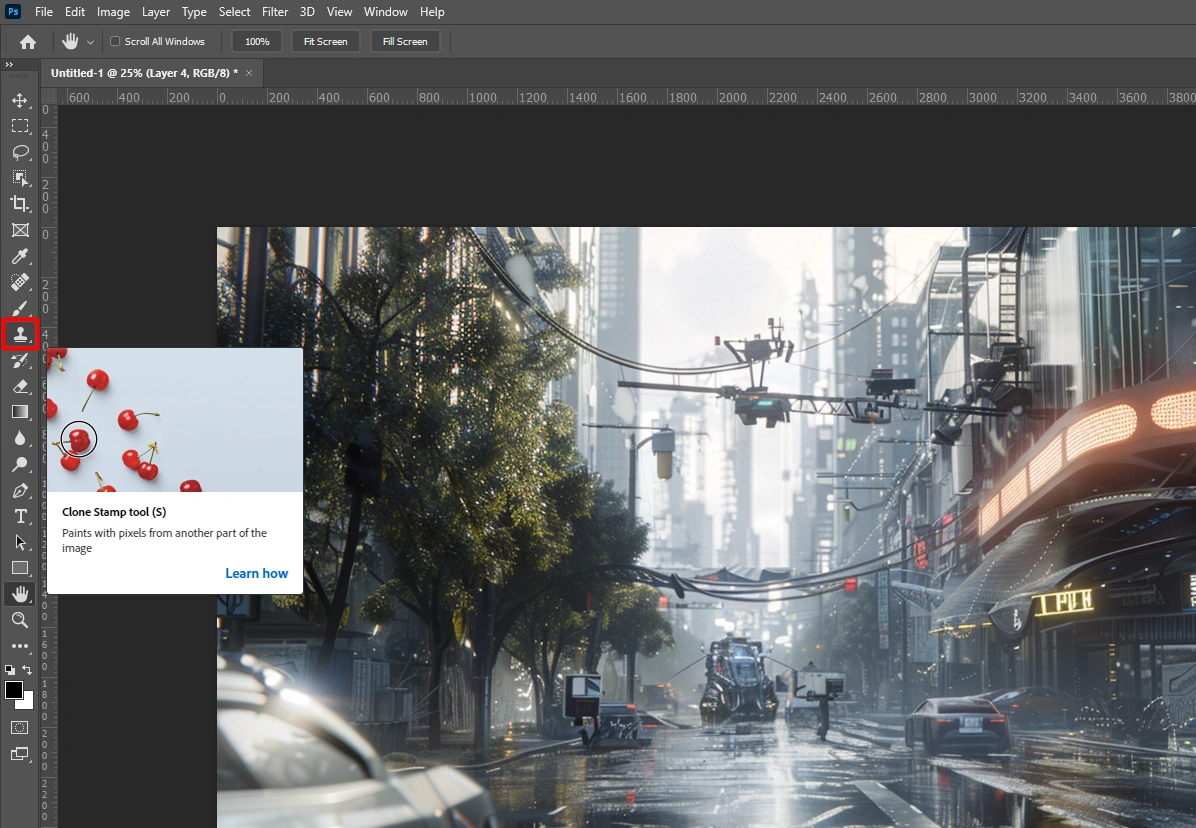
Using the Clone Stamp Tool
The Clone Stamp Tool allows you to duplicate parts of an image layer. This can be useful for removing unwanted objects or replicating textures.
To use it, select the clone stamp tool from the toolbar, choose a brush size, and then press Alt (Option on Mac) and click on the layer you want to duplicate.
After that, paint over the area where you want to apply the clone.
Understanding Channels and Masks
Channels in Photoshop store initial selection as grayscale images, and they can be very useful for creating detailed layer mask.
To view and edit channels, go to the Channels panel.
You can create a new channel or modify existing ones. Using channels, you can make precise selections and masks based on color information in your image.
Creating HDR Images
High Dynamic Range (HDR) photography allows you to combine multiple exposures into a single image with a greater range of tonal detail.
In Photoshop, you can create an HDR image by going to File > Automate > Merge to HDR Pro.
Follow the prompts to select your exposures and adjust the settings to achieve the desired effect.
Using the Liquify Filter
The Liquify Filter is a powerful tool for manipulating and reshaping areas of your image.
Access it by going to Filter > Liquify.
Use the Forward Warp Tool, Pucker Tool, Bloat Tool, and others to push and pull pixels and hiding pixels around. This tool is useful for retouching portraits and creating artistic layer effects.
Photo Merging
Photoshop’s photo merging capabilities can be used to create panoramas or composite multiple images seamlessly.
To start, go to File > Automate > Photomerge crop an image and select with move toll what you want to merge. Photoshop will automatically align and blend them together.
You can then refine the result with masking and blending techniques.
Using Adjustment Layers For Image Layer
Adjustment layers provide a non-destructive way to apply color and tonal adjustments to your image. Examples include Levels, Curves, and Hue/Saturation.
Create an adjustment layer by clicking the adjustment layer icon at the bottom of the Layers panel and selecting the desired adjustment. You can adjust the settings and mask the adjustment layer to apply changes only to specific areas.
Pro Tip: When using these advanced techniques, it’s important to work non-destructively. Keep original layers untouched and make use of layer mask thumbnail and adjustment layers.
Always save versions of your work at different stages, so you can go back and make changes if needed.
Exploring these advanced methods and tools will not only improve your Photoshop skills but also enable you to bring a creative and professional touch to your editing projects.
Frequently Asked Questions

What is the method to crop an image in Photoshop without affecting the background?
- Open your image in Photoshop.
- Select the 'Layer' from the Layers panel that you want to crop an image
- Use the 'Rectangular Marquee Tool' from the toolbar to select the area of the image you want to crop.
- Right-click the selected area and choose 'Layer via Cut' to remove this part from the original layer.
- With the new layer selected, you can move or delete it without affecting the background.
How to crop just an image in Photoshop?
- Open your image in Photoshop.
- Select the 'Crop Tool' from the toolbar.
- Drag to select the area of the image you wish to keep.
- Adjust the handles if necessary to fine-tune your crop area.
- Press Enter or Return to apply the crop.
What steps can you take to crop an image with a transparent background in Photoshop?
- Open your image with a transparent background in Photoshop.
- Select the 'Rectangular Marquee Tool' to choose the part of the image you want to crop.
- Go to Image > Crop to crop to the selection.
- Deselect by pressing Ctrl+D (Cmd+D on Mac).
How can I crop freely in Photoshop?
- Open your image in Photoshop.
- Select the 'Crop Tool' from the toolbar.
- In the top options bar, uncheck 'Delete Cropped Pixels' if you want to keep the cropped areas non-destructively.
- Drag the corners or edges of the crop border freely to adjust the size and shape of your crop.
- Press Enter or Return to finalize the crop.
Conclusion
In conclusion, learning how to crop an image in Photoshop without cropping the background has made my projects look much more professional. By following the simple steps outlined above,
you can keep your background intact while cropping specific areas of your image.
This technique has been a game-changer for me, allowing for precise edits without altering the entire image.
If you want to dive deeper into photo editing, check out my Photoshop Course and Lightroom course. These courses provide detailed tutorials and tips to enhance your skills.
Happy editing!
Read more about Photoshop:


