Bringing Dimensions to Life: The Art and Science of 3D Effects in Photoshop
Bringing Dimensions to Life: The Art and Science of 3D Effects in Photoshop
Have you ever seen images pop out as if they’re reaching towards you, almost touching reality with the 3D effect?
That’s the magic of the 3D effect, transforming flat visuals into dynamic scenes that leap right before your eyes.
This captivating technique, more prevalent in Photoshop than Illustrator, weaves deepness into every pixel and turns ordinary content into breathtaking experiences, showcasing a fundamental difference in the Photoshop vs. Illustrator debate.
Whether in movies, video games, or interactive advertisements, the use of 3D effects has revolutionized how we perceive and interact with digital creations.
In this article, we will explore how these stunning effects are crafted and their growing impact across diverse industries.
Table of Contents
Resizing Images in Photoshop for Enhanced 3D Effects
When working with 3D effects in Photoshop, resizing images properly is important to maintaining quality and achieving the desired deepness and realism.
Adjusting image size can significantly impact the visual impact of your 3D renderings.
Step-by-Step Guide to Resizing Images
Resizing an image in Photoshop is a straightforward process that requires attention to aspect ratio and resolution to avoid any distortion:
Open your image in Photoshop with a double-click on the file in your project folder. This action will launch Photoshop directly with the selected image open and ready for editing.
Click "Image" in the top menu, then select "Image Size."
Ensure the "Constrain Proportions" box is checked to maintain proportions while resizing.
Adjust width, height, and resolution as necessary for your project needs. If you need to decrease the width slightly without dragging the mouse, simply tap the left arrow key while the width field is selected to reduce the size incrementally, allowing for more controlled and minute adjustments.
Use the move tool to position the resized image on your canvas, ensuring that resized layers in Photoshop as necessary for optimal alignment and effect. To finely adjust the position of the image, you can use the left arrow key to nudge it incrementally to the left, ensuring precise alignment with the rest of your design elements.
To better compare the original and resized photos, open two images side-by-side in Photoshop. This allows for a direct visual comparison to ensure the 3D effect maintains consistency across both versions.
Following these simple steps, you can resize any image while preserving important details that enhance your 3D effect.
For better editing, by closely following the guidelines under each section and utilizing side-by-side picture techniques in Photoshop, users will not only refine their skills but also bolster potential outputs considerably.
Influencing viewer perception through subtle yet robust enhancements naturally led by reshaped views.
Learn how to apply this effect to add depth and realism to your designs, enhancing visual appeal and engagement.
Optimizing Image Quality: Focusing on the Blue Channel: Adjusting Green and Blue Channels
Optimizing image quality before applying 3D effects ensures sharpness and clarity in your final product.
Optimize your image quality by leveraging the color profile in Photoshop. Integrating the right color profiles ensures accurate color representation and consistency, enhancing the vibrancy and professionalism of your images.
Here’s how:
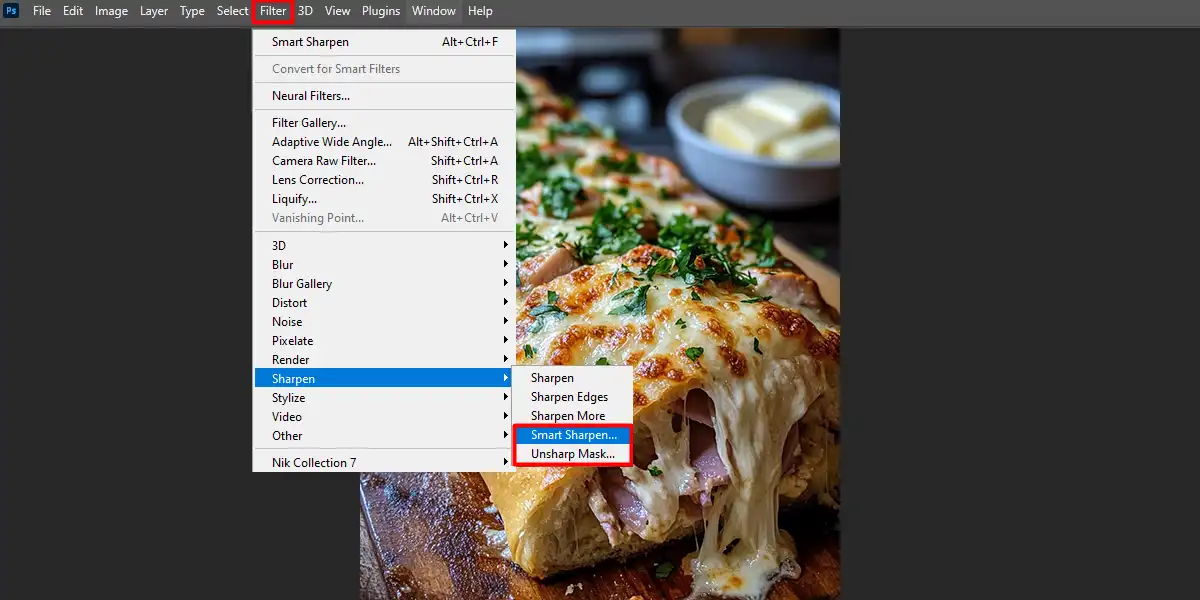
Sharpen Your Image
Slightly sharpen your resized images using filters like unsharp mask or smart sharpen for better edge definition in 3D environments.
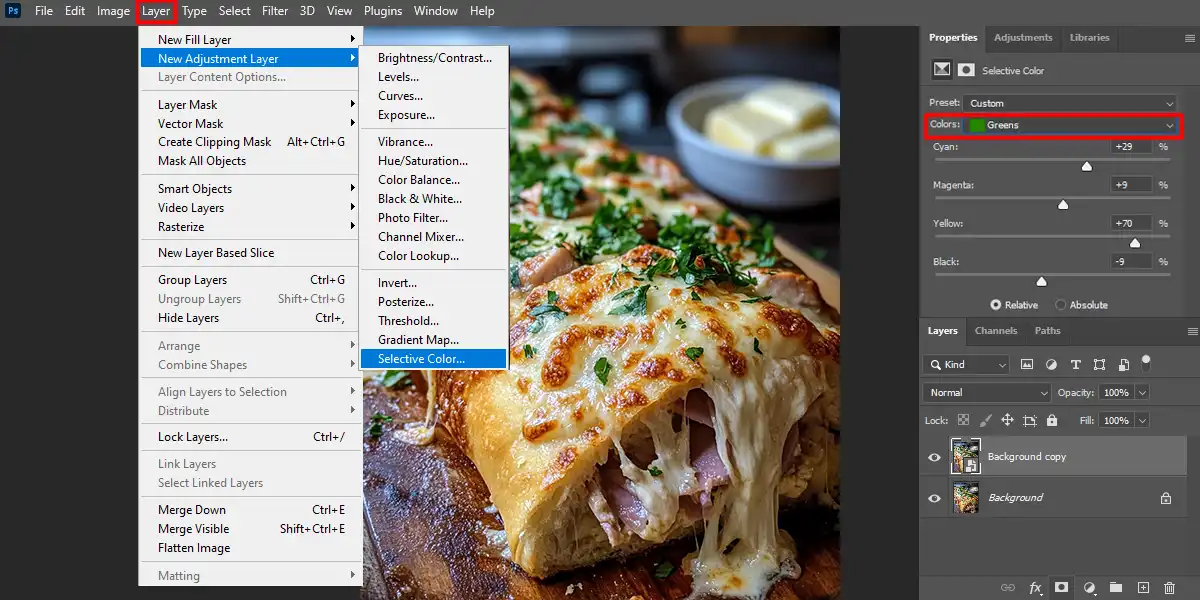
Enhance Color Depth
Manipulate the green and blue channels, using selective color in Photoshop to enhance critical elements when dealing with light and shadow within a 3D space.
Selective Use of Background Layer for Enhanced Depth
Utilize the background layer effectively by adjusting its opacity to provide a strong base without overwhelming the foreground elements. This approach ensures that the background layer contributes to the overall deepness and realism of the 3D effect without dominating the composition.
These techniques allow you to maximize the effectiveness of Photoshop’s tools, enhancing overall quality post-resize.
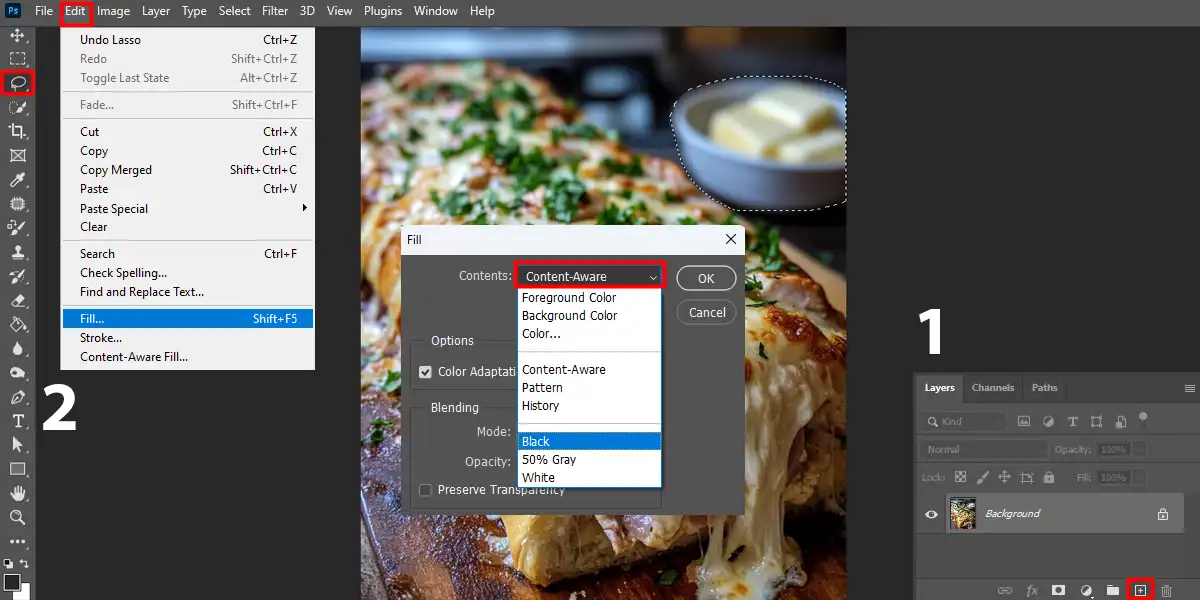
By utilizing Photoshop smart fill, you can effectively focus on the blue channel while adjusting green and blue channels.
This technique enhances depth and realism, making your 3D effects more impactful.
Common Mistakes to Avoid When Resizing
Many encounter common pitfalls that might degrade their image’s integrity during resizing:
Issue
Problem Description
Solution Recommendation
Losing Aspect Ratio
Disproportionate scaling leads to stretched or squashed photos.
Always lock the aspect ratio (background layer) unless the alteration is intentional for creative reasons.
Ignoring Resolution Settings
Low resolutions result in pixelated prints.
Adjust resolution based on the output medium. Use high DPI settings for printing purposes (layer symbol, guide).
Overlooking Compression Artifacts
Highly compressed photos lose detail.
Use optimal compression settings when saving JPGs, or choose lossless formats like TIFF or PNG.
By avoidingthese mistakes, you guard against reducing visual impact and professional integrity, often represented through detailed imagery, especially when combined seamlessly with complex sequences and structures like those found within modeled animations
Carefully following the guidelines in each section will allow users to not only refine their skills but also bolster potential outputs considerably, influencing viewer perception through subtle yet robust enhancements naturally led by reshaped views.
Mastering how to resize image in Photoshop involves knowing the common mistakes to avoid when resizing. By doing so, you ensure your images maintain quality and enhance your 3D effects effectively.
Utilizing Layer Icon for Realistic Shadows and Highlights in 3D Designs
A convincing 3D effect demands creativity and technical know-how. In this guide, we’ll explore fine-tuningshadows and highlights to give your digital creations impressive deepness and reality.
These methods help create depth and enhance the 3D effect in your designs, making your images more lifelike and visually appealing.
Techniques for Realistic Shadow Generation
To start, creating realistic shadows in most images used for 3D designs enhances the scene’s believability.
Effective shadow manipulation is important as it impacts how deepness and dimension are perceived in most images.
Using Photoshop’s refined tools and tips on photography lighting, you can adjust layers and textures to mimic naturallighting better, enhancing the realism of your 3D effects.
Here are the fundamental steps:
Select a background layer where the shadow will appear. To add more control to your shadow effect, click the new layer icon to create a new layer specifically for custom shadow adjustments. This will allow you to manipulate shadows independently without affecting the original background layer.
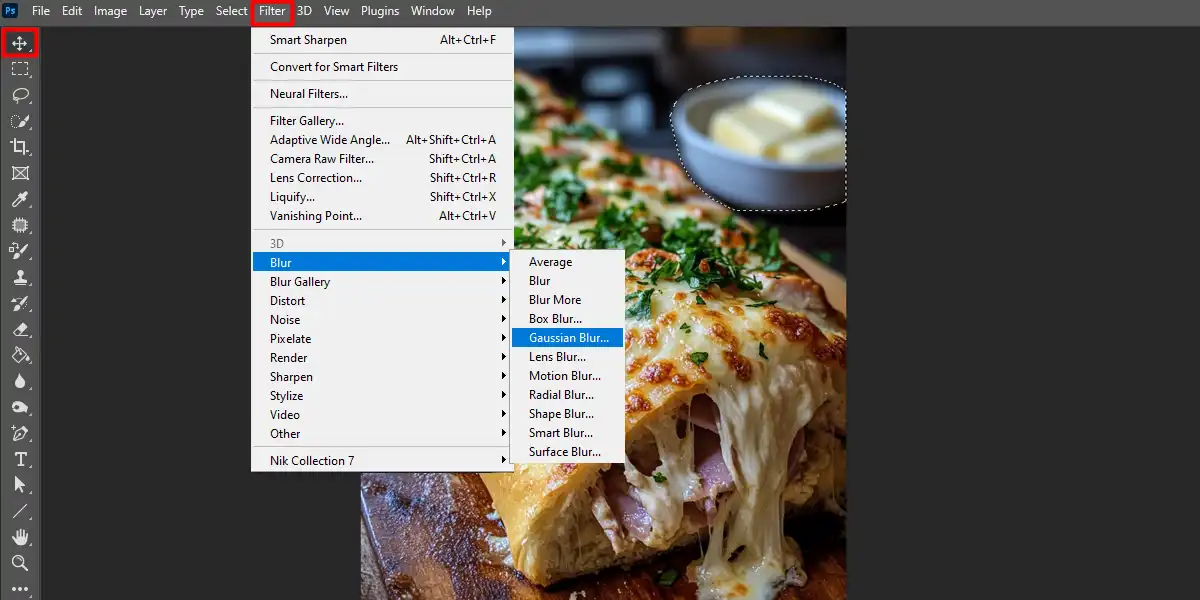
Utilize Photoshop’s Move Tool to position or adjust shadows, including removing shadows where necessary, to align correctly with the light source.
Apply gaussian blur in Photoshop to soften the edges of the shadow, making it blend naturally with the environment.
It’s imperative not to neglect subtleties in the blue channel, which can deepen certain areas’ hues, subtly affecting how light diffuses across them.
The careful manipulation of the bluechannel is important as light behaves differently depending on its interaction with color, impacting the overall 3D effect.
Mastering how to remove shadows in Photoshop is important to understanding how shadows work, where to apply them, and how to remove them. These techniques are important for realistic shadow generation.
By effectively manipulating shadows, you create depth and realism in your designs.
Enhance your skills with proven techniques for realistic shadow generation to elevate your 3D effects seamlessly.
Lighting Techniques for Enhanced 3D Effects
To create realistic 3D effects, use different colors such as blue, green, yellow, and cyan across multiple layers.
For example, applying a blue layer to one side of boxes creates deepness, while a green layer on another side enhances realism.
Offset each layer slightly so that the boxes appear three-dimensional. Using yellow and cyan layers on different sides ensures that each box appears vibrant.
Create layers with blue, green, yellow, and cyan to add dimension.
Another instance: offset a blue layer and a green layer on one flank, and apply yellow and cyan layers on the opposite side.
This dynamic interplay of different colors makes boxes appear lifelike and enhances the overall 3D effect.
Adjusting Highlights for Depth Perception
Highlights play a pivotal role in conveying deepness; by adjusting these carefully, you encourage a viewer’s eye to journey through your photo in directed paths, appreciating fully formed dimensional aspects:
Use layers effectively: An often overlooked technique involves manipulating each layer symbol and adding slight glow effects around high points.
Enhance throughColor Channels: subtle tweaks within the 'Color Balance' settings can contribute significantly towards differentiating finer detail - adjustments made to green or red channels majorly influence perceived sharpness.
Understanding how light interacts in Lightroom with various materials helps; sometimes, highlighting metallic objects requires smoother transitions between colors, specifically through adjustments in the green channel using ‘Refine Edges’.
Manipulating the green channel allows for more nuanced control over how light and shadow play across different surfaces, ensuring the 3D effect is realistic and visually compelling.
This techniques is called anaglyph 3D effect, which is only done with colors.
Blending modes in Photoshop are important for adjusting highlights for depth perception. These blending modes create seamless highlights, enhancing depth and realism in your 3D designs.
Creating Deepness with Layer Offset
To create a realistic 3D effect, create multiple layers and offset each layer strategically. Create deepness by offsetting layers at different intervals.
Use layeroffsets to create shadows and highlights, enhancing the overall scene.
By creating and offsetting each layer, you can create a dynamic and immersive 3D appearance.
Integrating Shadows and Highlights for Natural 3D Effects
Integration is important for avoiding discordant visuals in the art of perspective mastery in Photoshop; shadows must harmonize with highlights, reflecting their corresponding surfaces correctly:
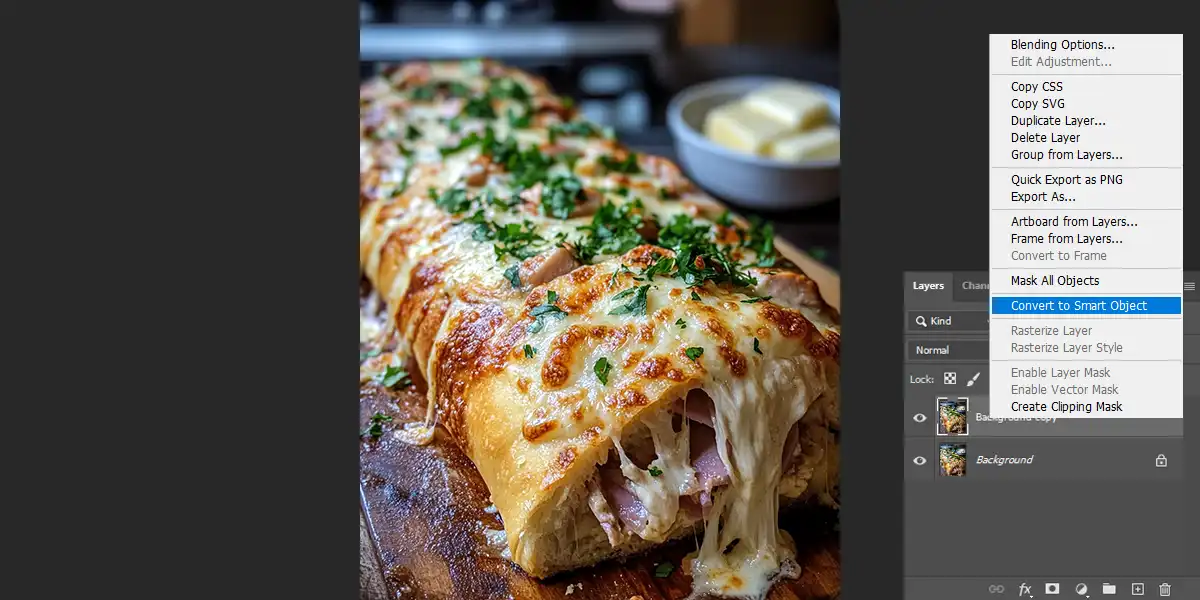
Consistency Across Textures: combine newly applied shadows/highlights across all visual elements, maintaining stylistic alignment using Adobe’s innovative features like (Smart Filters in Photoshop).
Layer Merging Techniques: once individual elements have been adjusted accordingly, merging multiple adjustment layers into coherent units increases workflow efficiency while maintaining finer control over each tweak made
When one masters both highlights and shadow casts, a judicious blend of science and artistry results; refining this skill set opens up endless possibilities for creating vibrant, lifelike three–dimensional renderings that effortlessly captivate viewers attention.
Master removing shadows in Photoshop to seamlessly integrate shadows and highlights for natural 3D effects. This technique enhances depth and realism, ensuring your designs achieve a balanced, professional look.
Frequently Asked Questions
What is the 3D effect?
The 3D effect adds depth and realism to photos, making objects appear as if they are out of the screen. It simulates three-dimensional space, enhancing visuals with a lifelike quality.
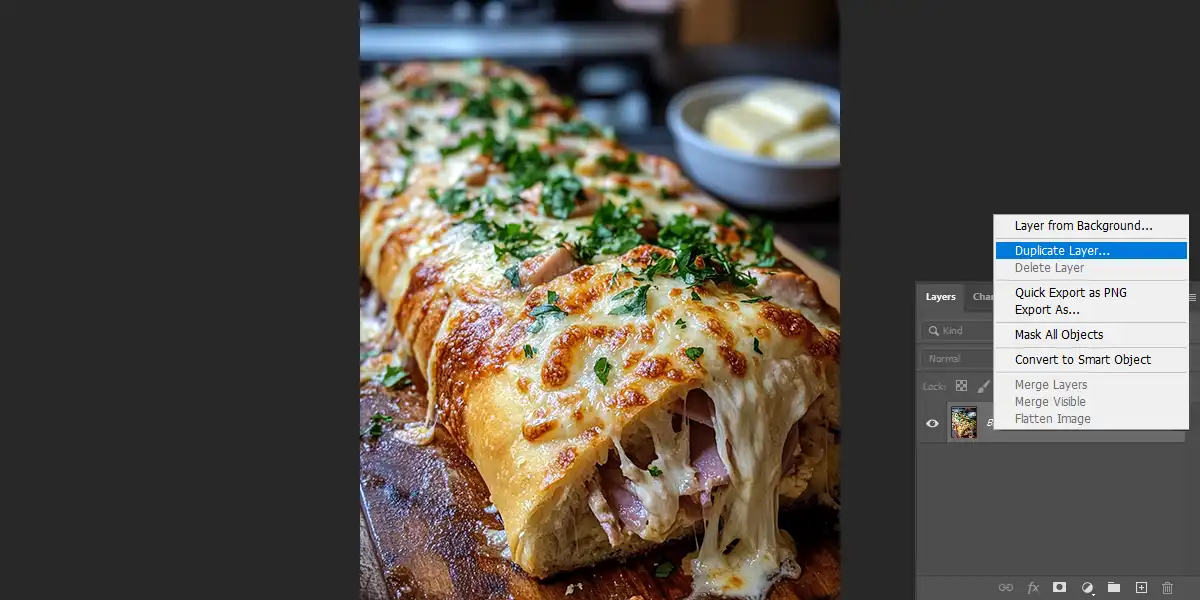
How to make a 3D effect picture?
To create a 3D effect picture in Photoshop, copy your photo layer. Set your workspace to ensure your image is visible on the screen.
After separating the color channels, click the new layer icon to create a new layer for each adjustment.
This allows for individual manipulation and blending of each channel, enhancing the 3D effect's depth and realism.
Adjust your display settings if necessary to get the most accurate representation of the changes you make.
Then, apply color channel adjustments, ensuring the red channel is separate from the green and blue channels. Adjusting the red channel effectively can add a dynamic contrast, enhancing the 3D illusion.
To enhance the visual separation, add a red outline to the layer with the red channel so that it is easy to identify and manipulate during adjustments.
Offset these layers slightly to achieve depth. Use the move tool for precise alignment for a stunning 3D look.
How to make a TikTok 3D effect?
TikTok offers a built-in 3D effect filter for users to quickly turn their videos into holographic-like experiences.
Open the effect gallery, choose the 3D effect filter, and apply it to your video before posting. It instantly brings your content to life with engaging depth.
Why does an object appear to have a 3D effect?
Due to the manipulation of light, shadows, and perspectives, an entity appears to have a 3D effect, creating an illusion of depth.
This visual trick persuades the brain to see flat images as three-dimensional, amplifying realism and making the entity stand out.
Creating a 3D effect in Photoshop has truly transformed the way I approach my designs. When I first started, getting the shadows and highlights just right was challenging.
However, with practice and the right techniques, I began to see my images come to life, making them look more realistic and engaging.
For example, adding subtle shadows helped my designs appear three-dimensional, adding depth and interest.
These courses provided me with step-by-step guidance and valuable tips that made mastering the 3D effect much easier.
Using tools like Adobe Photoshop and Adobe Lightroom has been important in creating these effects. These programs offer powerful features that make it easier to add depth and dimension to your images.
Overall, mastering the 3D effect has opened up new creative opportunities for me. I encourage you to try these techniques and explore the courses to take your designs to the next level.
If this article has helped you, then Like and Share it with your friends
$2,061.00Original price was: $2,061.00.$1,061.00Current price is: $1,061.00. 27584
Download Your Free Guide Now!
Discover the secrets of photography with our printable guide! Master essential techniques like aperture, shutter speed, and ISO to create stunning images. Get your free printable PDF now and start turning your snapshots into masterpieces!