Tone Curve Lightroom: Master the Tool for Perfect Photo Edits

Tone Curve Lightroom is a powerful tool for editing photos. It helps adjust brightness, contrast, and colors with precision. Photographers use it to fine-tune highlights, shadows, and midtones. With the right adjustments, images can look more vibrant and professional.

This article will guide you on how to use the Tone Curve in Lightroom. You will learn how to access it, adjust points, and make the most of its features. Let’s dive in and unlock the full potential of this amazing tool!

Table of Contents

Why Use the Tone Curve in Lightroom?

The tone curve is one of the most powerful tools in Lightroom for editing photos. It lets you adjust brightness, contrast, and colors with great control. Unlike the basic panel, which applies changes to the entire image, the tone curve panel allows you to adjust specific areas. This helps create a strong contrast, a soft matte look, or a balanced medium contrast.

1. What Makes the Tone Curve Panel Special?

The tone curve panel gives you more control than basic sliders. It helps adjust tones and colors in a way that makes other images stand out.

Why Most Photographers Use the Tone Curve?

2. How the Tone Curve Line Works

This curve line represents the brightness levels in a photo. Each section of the curve affects different parts of the image. You can draw curve line adjustments to fine-tune brightness and enhance details.

Understanding the Curve Sections:

3. Using the Point Curve for Precise Edits

The point curve is an advanced way to make tone curve adjustments. Unlike the region curve, it lets you control each point on the tone curve line.

Steps to Adjust the Point Curve:

4. Adjust Colors with the Red, Green, and Blue Curves

The Lightroom tone curve isn’t just for brightness. It also helps alter colors using the red, green, and blue channels.

How Each Channel Affects the Image:

Example of Adding a Cool Blue Look

5. Using Tone Curve Presets for Quick Edits

If you don’t want to make manual changes, you can use this curve presets in lightroom. These pre-made tone curve adjustments help speed up editing.

Best Presets for Different Looks

Preset Effect
Medium Contrast Adds a balanced S curve for a natural look.
Strong Contrast Deepens shadows and brightens highlights.
Matte Look Lifts shadows for a faded, vintage effect.
Film Tone Adjusts the red, green, and blue curves for a cinematic style.

The Lightroom tone curve is a powerful tool for creating more contrast, balanced mid tones, and artistic color effects. Whether you use the region curve for simple edits or the point curve for precise control, mastering this tool will help you improve your final image. Applying these adjustments and mastering Color Image in Photoshop will take your edits to the next level.

How to Access the Tone Curve in Lightroom

The tone curve in Lightroom is one of the best tools for adjusting contrast and brightness in an image. It helps fine-tune highlights, shadows, and colors with precision. To get the best results, knowing how to find and use the tone curve is essential.

1. Where to Find the Tone Curve in Lightroom?

A screenshot of Lightroom’s Develop module with red arrows pointing to the Tone Curve section, showing users where to access the tool for photo editing.

The tone curve is located in the Develop module in Lightroom. It is found below the basic panel, where you adjust exposure, contrast, and color balance. Steps to Access the Tone Curve:

Once open, you will see a graph with a diagonal line. This is where you can start making adjustments.

2. Understanding the Tone Curve Interface

A screenshot highlighting the four adjustable regions: Shadows, Darks, Lights, and Highlights.

The tone curve graph is divided into four regions:

When you adjust the curve, you control how each of these sections appears in your photos.

3. Using the Point Curve for Quick Edits

A screenshot of the Point Curve in Lightroom with an anchor point set, demonstrating how to manually adjust brightness and contrast.

The point curve allows you to manually control how different parts of the image look. Unlike the standard settings, the point curve gives you full flexibility. Steps to Use the Point Curve:

To reset, right-click the point and select reset point.

4. Adjusting Color Channels with the Tone Curve

A screenshot of the Tone Curve in Lightroom, with the red channel selected and adjustment points placed on the curve to modify color tones.

The tone curve is not just for brightness adjustments. You can also modify colors using the red channel, green channel, and blue channels. Example of adjusting the Red Channel for a Warmer Look:

This method is useful for color correction and creative edits.

5. Creating an S Curve for More Contrast

A screenshot of the Tone Curve in Lightroom with an S-shaped adjustment, demonstrating how to increase contrast by adjusting shadows, mid-tones, and highlights.

One of the most common adjustments is the S curve. It makes an image look more dynamic by increasing both brightness and darkness.

The final image will have a deeper, more dramatic look.  This technique is great for making photos pop with deeper contrast.

The lightroom tone curve is a great tool for enhancing photos. Whether you want to add contrast, fix shadows, or modify colors, this feature gives you complete control. You can also use these techniques to Edit Portraits in Lightroom, making skin tones smoother and lighting more balanced. 

How to Set and Adjust Points on the Tone Curve

The tone curve is an important tool in Lightroom for making precise adjustments to shadows, highlights, and overall brightness. It helps improve contrast and enhances colors in photos. By placing and adjusting points on the curve, you can control how different parts of the image look.

1. Understanding Points on the Tone Curve

The tone curve adjustments are based on placing and moving points along the curve. Each point represents a different part of the image’s brightness.

Sections of the Tone Curve:

Adding a point allows you to make specific changes to certain areas of the image without affecting others.

2. How to Set Points on the Tone Curve

To manually adjust the tone curve, you need to place points at different positions.

Steps to Set Points on the Curve:

Each point gives you the ability to fine-tune how different tones appear in your photos.

3. Adjusting Points for an S Curve

The S curve is a popular technique for making images pop by adding depth and contrast.

Steps to Create an S Curve:

The tone curve is an important tool in Adobe Lightroom for making precise adjustments to shadows, highlights, and overall brightness. It helps improve contrast and enhances colors in photos. By placing and adjusting points on the curve, you can control how different parts of the image look.

4. Using the Green Channel for Color Adjustments

Besides brightness, you can also use the green channel to add a color effect to your photos.

Enhancing Green Tones

This adjustment enhances the greens in certain areas, making landscapes or nature shots look more vivid.

5. Comparing Before and After Adjustments

Making tone curve adjustments can completely change the look of an image. It’s useful to compare your edits to the original.

Steps to Compare Before and After:

This helps you decide if the adjustments are working or if further fine-tuning is needed.

By placing and adjusting points, you can take full control over how your photos look. Now that you know how to set and adjust points, experiment with different styles to create stunning edits!

Common Mistakes to Avoid When Using the Tone Curve

Photoshop-Masterclass-Advanced-Editing-Layer-Manipulation

The tone curve is a great way to improve photo tone, but it can be tricky to use. If not handled correctly, it can make photos look unnatural. Many beginners struggle with this tool and end up with edits that don’t work well.

Here are the most common mistakes people make when they use the tone curve and how to fix them.

1. Overusing the Tone Curve and Losing Detail

One big mistake is making too many extreme changes. If you push the curve too high or too low, the image can lose important details.

Overbrightening an Image

How to Fix It:

2. Ignoring the Balance Between Lights and Shadows

A well-balanced edit in Lightroom keeps lights and darks working together. Many people brighten their images too much, making them look washed out.

Signs You’ve Gone Too Far:

How to Fix It:

3. Not Using the Tone Curve for Adding Contrast

The tone curve is one of the best ways to add contrast to a photo. Some people only use the basic sliders and miss out on the extra control the tone curve provides.

How Adding Contrast Improves a Photo

How to Fix It:

4. Forgetting to Check Edits on Different Screens

Sometimes an edit looks great on one screen but bad on another. If you don’t check your work on different devices, you might end up with a strange-looking image when you share it.

Here is How to Avoid This Problem:

5. Copying Tone Curve Settings Without Adjusting for Your Image

Using the same tone curve settings for every photo won’t always work. Each image is different, and what looks good on one picture may not work on another.

Why Copy-Pasting Edits Can Be a Mistake

How to Fix It:

6. Using the Opposite Effect Without Intention

Some people accidentally move the curve in the wrong direction, making the image look strange. This can happen when adjusting lights and shadows without understanding how they work.

Opposite Adjustments That Ruin a Photo

How to Fix It:

The lightroom tone curve is a great way to fine-tune your photos, but it needs to be used carefully. Making small, smart changes will help you improve the tone without ruining your image. By avoiding these common photo editing mistakes, you can create better edits that look professional and natural.

Understanding the Difference: Basic Panel vs. Tone Curve

When Editing in Lightroom, there are two main ways to adjust light and dark areas in a photo: the Basic Panel and the Tone Curve. Both are useful, but they work in different ways. The Basic Panel is simple and quick, while the Tone Curve gives more control for detailed changes. The table below compares these two tools to help you understand when to use each.

Feature Basic Panel Tone Curve
Ease of Use Simple sliders for quick edits. Requires more precision for fine-tuning.
What It Controls Adjusts brightness and contrast in large areas. 
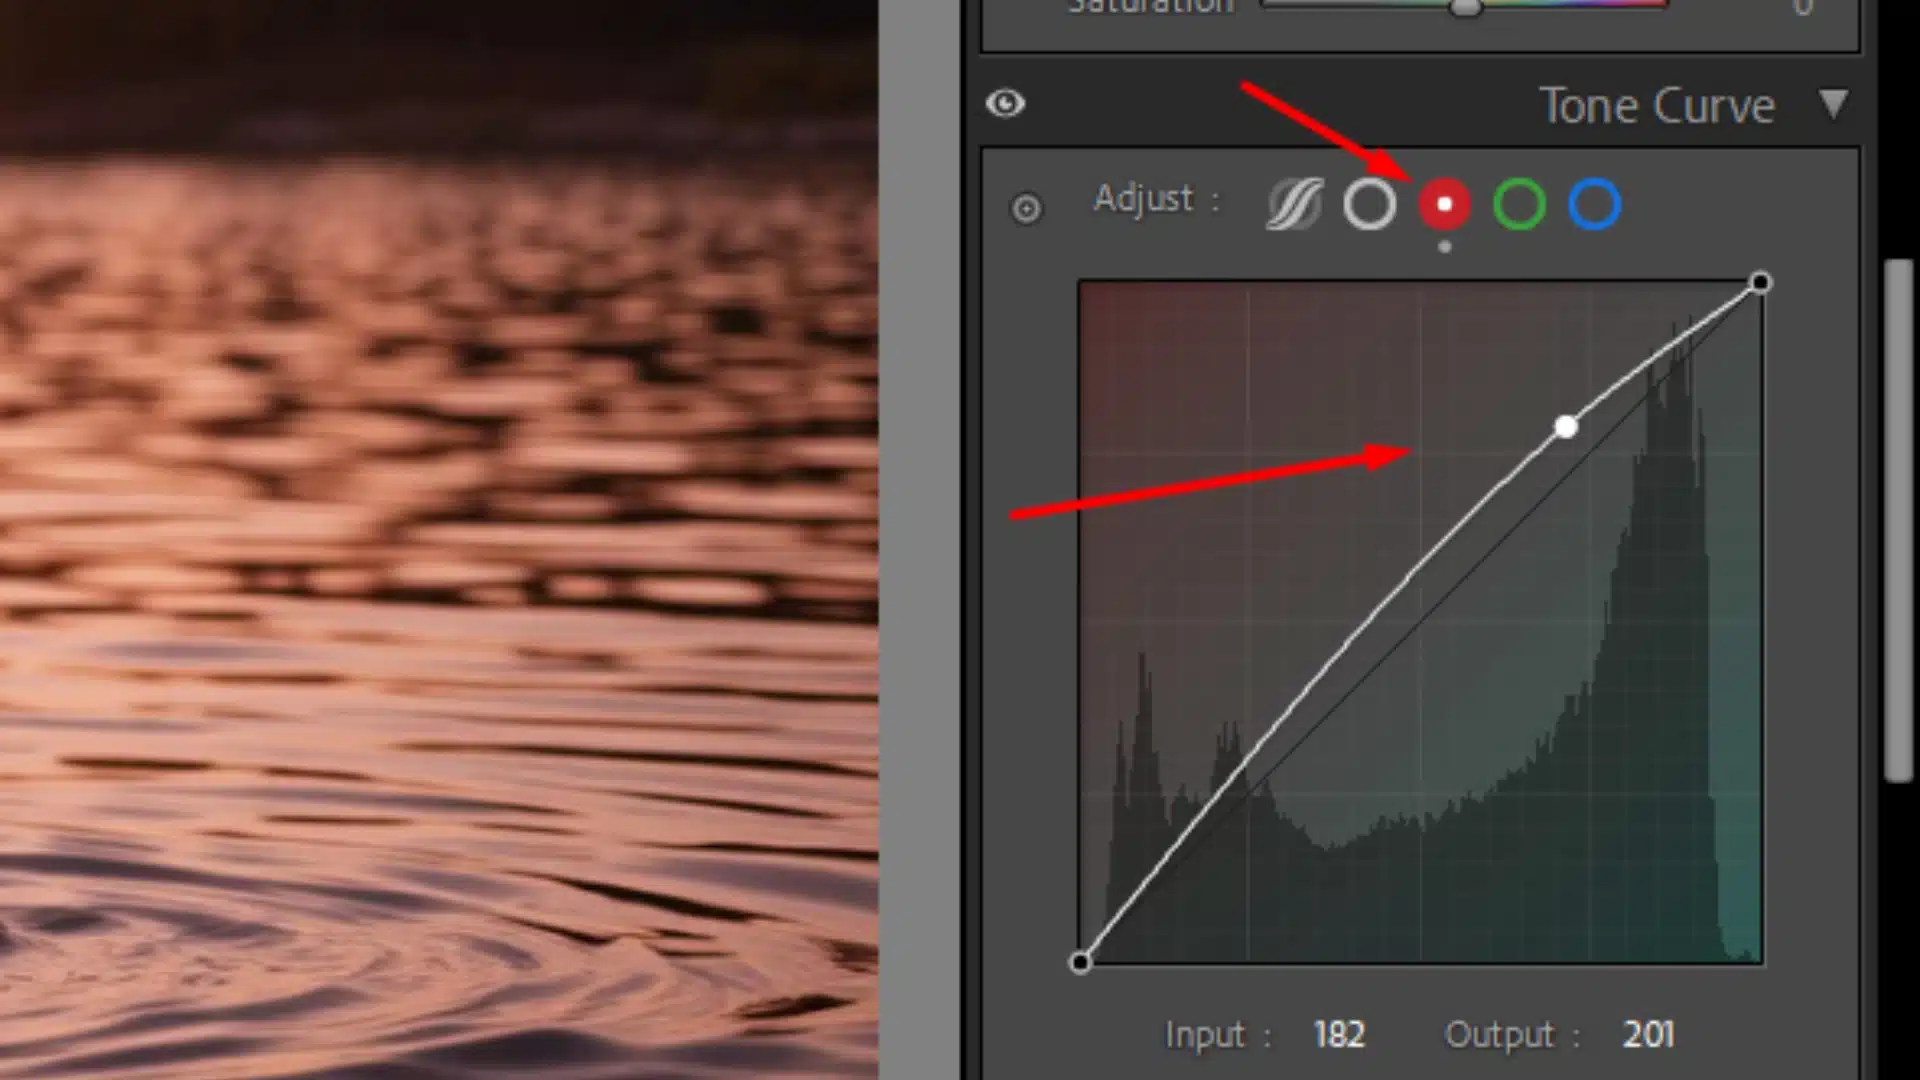
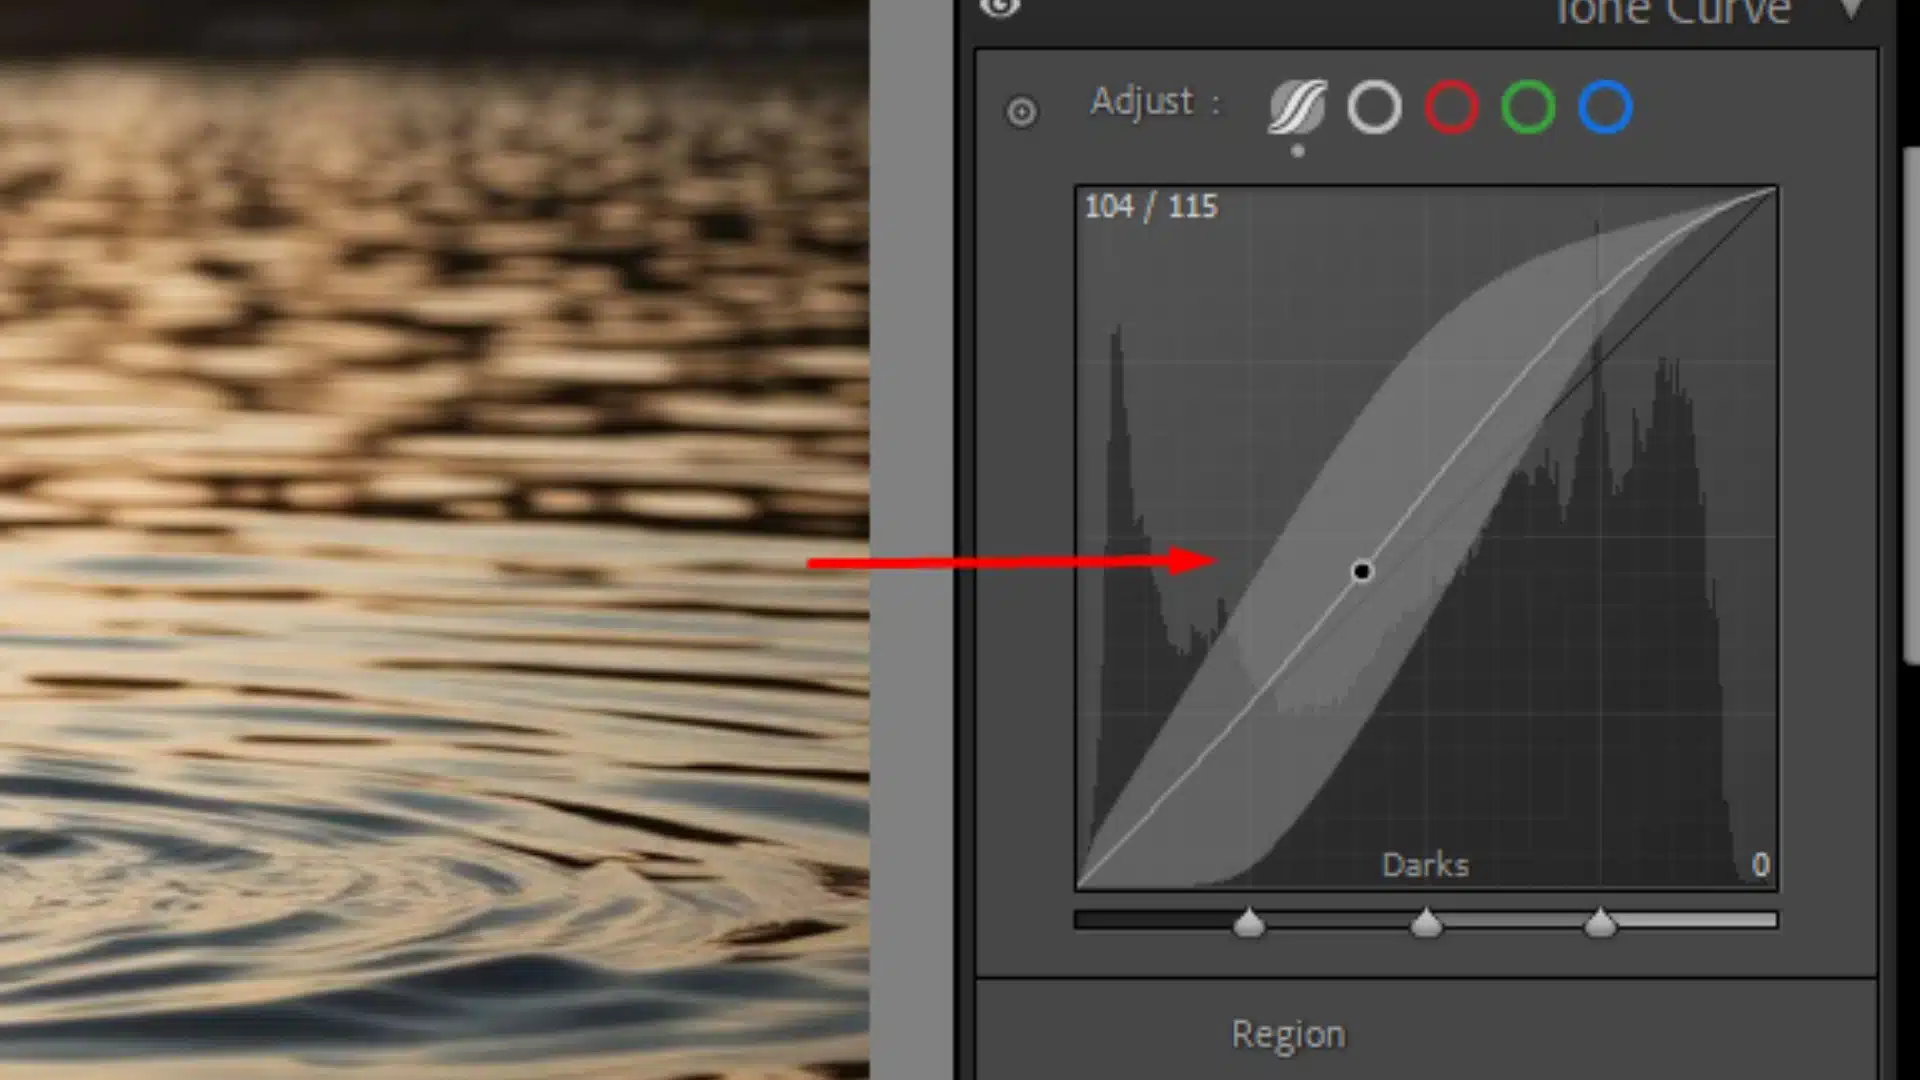
Changes specific tones in small sections.
Best For Fast adjustments for beginners. Detailed changes for experienced users.
Control Over Light & Dark Areas Limited control using sliders. Full control by shaping the curve.
Color Adjustments Limited options. Can target reds, greens, and blues separately.
Editing Speed Quick and easy. Takes more time but gives better results.
Impact on Photos Good for small changes. 
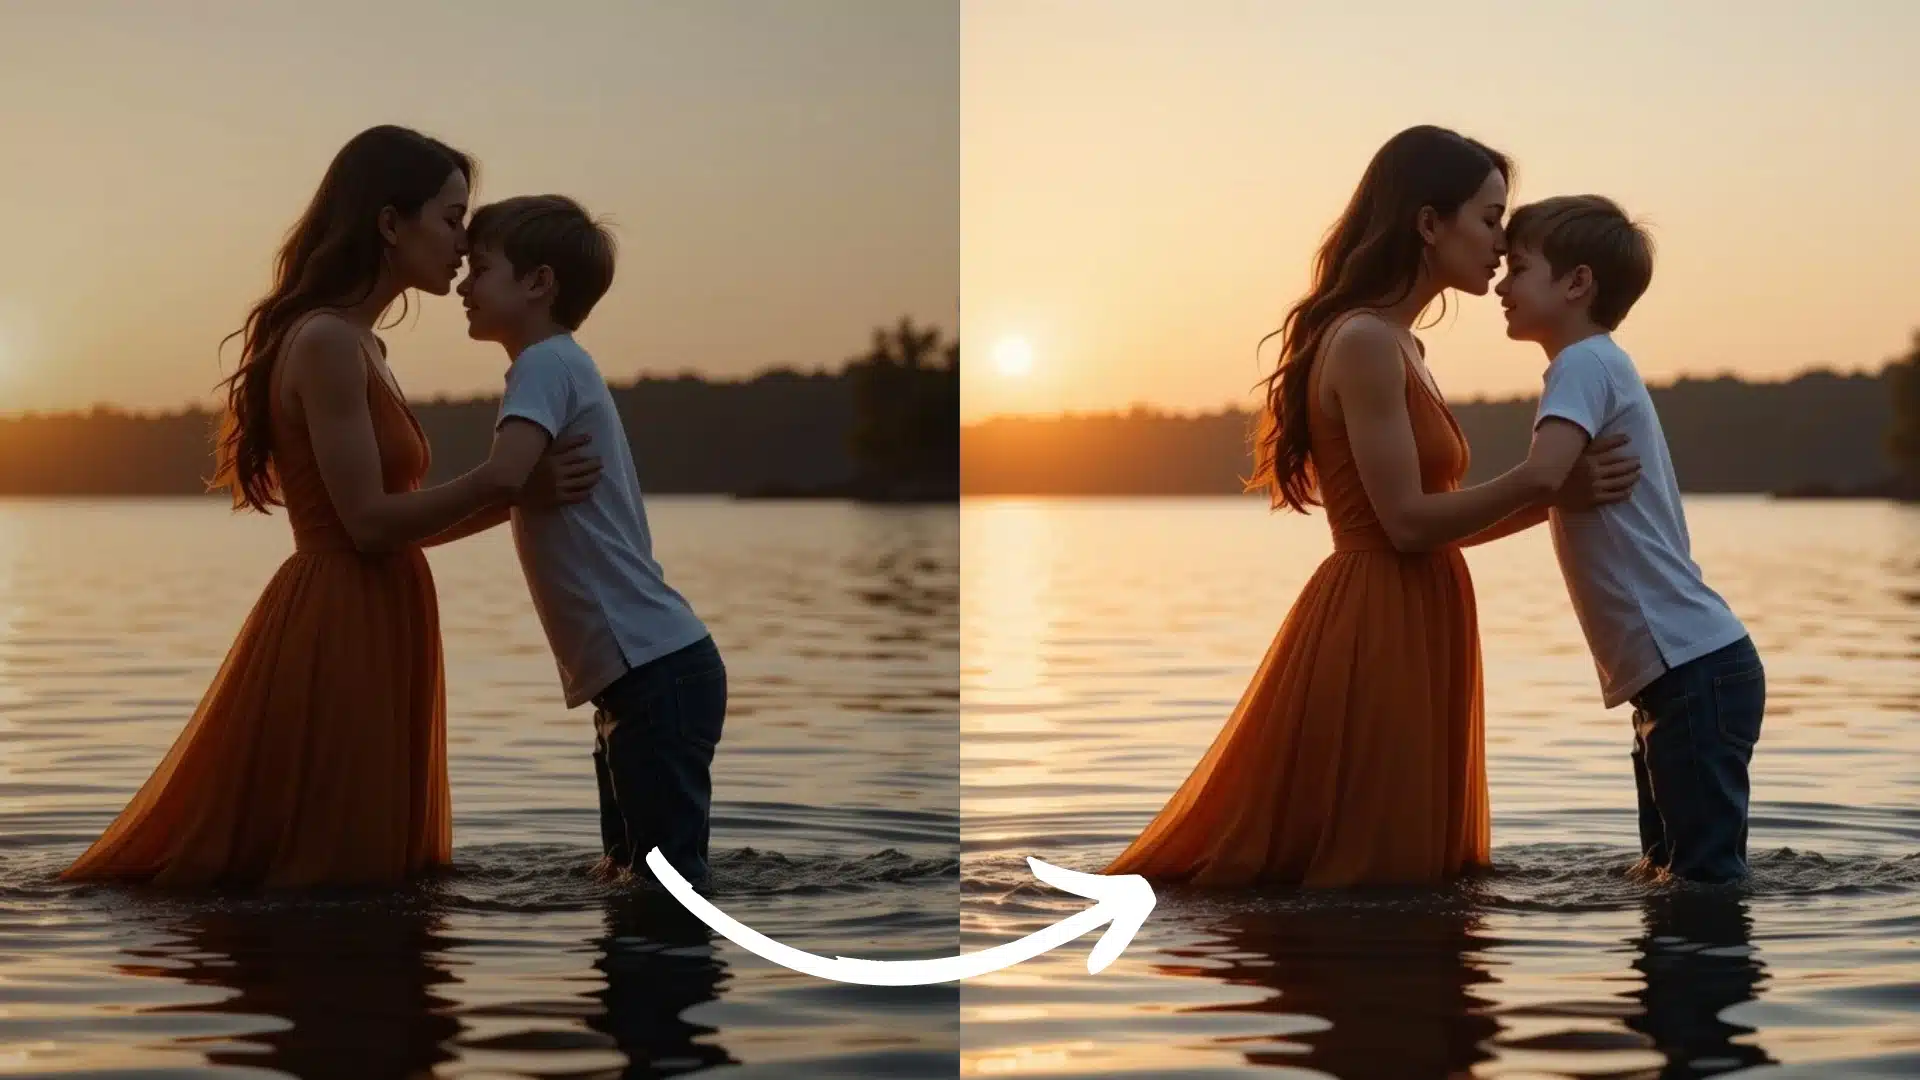
Can create dramatic effects.
When to Use When you need fast and simple changes. When you need precise adjustments.

By understanding these differences, you can choose the right tool for each edit and make your photos look better!

Frequently Asked Questions

Ultimate-Lightroom-Course-Detailed-Image-Adjustments

How to get tone curve in Lightroom?

What is the difference between basic and tone curve in Lightroom?

The Basic Panel is simple and uses sliders to change brightness and contrast across large areas of a photo. It works well for quick edits. The Tone Curve gives more control. It lets you adjust specific parts of an image, like dark areas or bright spots, without affecting the whole photo. It is better for fine-tuning details.

How to set points on tone curve in Lightroom?

What does editing a tone curve do?

Editing the tone curve changes the brightness and contrast of different parts of a photo.

This tool helps improve the depth, color, and overall look of an image.

Conclusion

A side-by-side comparison of a photo before and after using the Tone Curve in Lightroom, showing enhanced brightness, contrast, and colors.

When I first started editing, I relied only on basic sliders, thinking they were enough. But once I learned how to use the tone curve, my photos completely changed. I could brighten dark scenes without washing them out and fine-tune colors for a more professional look. It was a game-changer!

If you want to master Lightroom and Photoshop, understanding the tone curve is just the beginning. Our Lightroom Course and Photoshop Course will teach you everything step by step. Take control of your edits and create stunning images today!

If “Tone Curve Lightroom” article has helped you, then Like and Share it with your friends

Facebook
Twitter
LinkedIn
Pinterest

Have a nice photoshoot!

Read more about: Photo Editing with Lightroom and Photoshop

Download Your Free Guide Now!

Discover the secrets of photography with our printable guide! Master essential techniques like aperture, shutter speed, and ISO to create stunning images. Get your free printable PDF now and start turning your snapshots into masterpieces!