Imagine you’ve just returned from a beautiful vacation with your camera packed with stunning shots, only to find your pictures are slightly tilted, no worries, using Photoshopto straighten an image has never been simpler.
No worries, to straighten an image has never been simpler.
With a few tweaks using Photoshop to straighten an image, your memories can look just as perfect as the moments felt.
In this easy-to-follow guide, we’ll explore how quick and effective it can be to straighten images in Photoshop, making it a great starting point for anyone interested in learning Photoshop.
You can show off those picture-perfect snaps with confidence!
Let’s dive in!
Table of Contents
How to Straighten and Finish an Image in Photoshop
When you have a crooked image that distracts from its visual appeal, using the straighten tool in Adobe Photoshop can quickly bring it back to its best form.
Here’s how you can precisely adjust angles and finalize your images like a pro.
To achieve perfectly aligned photos, understanding how to use Photoshop’s alignment tools is crucial. This guide on how to straighten and finish an image in Photoshop will help you master essential techniques.
Accessing the Straighten Tool with the Crop Tool Selected
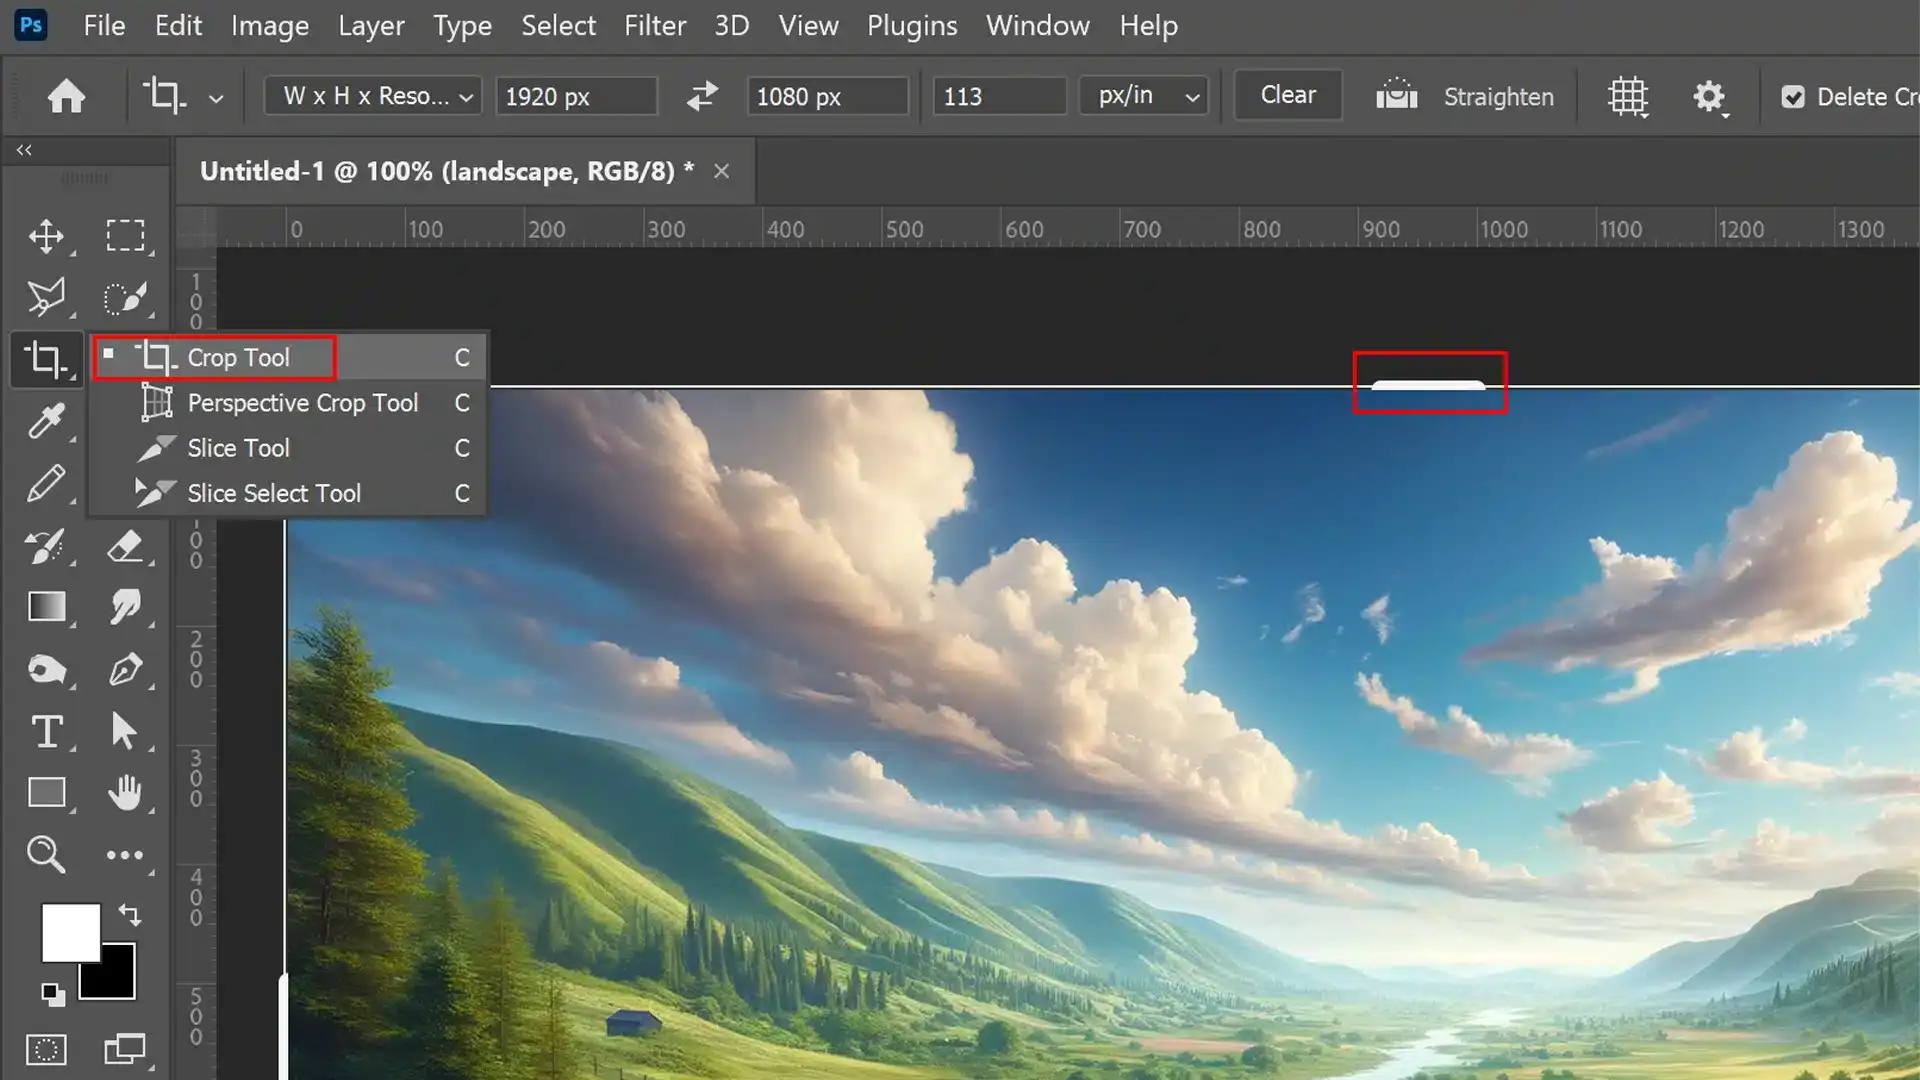
The Straighten Tool is part of Photoshop’s crop tool, which can be easily accessed from the tools palette.
When working with this feature, first select the crop tool, which often automatically includes the straightening option.
Once selected, look for the ‘straighten’ icon, typically represented by a small level.
Master the Photoshop workspace by exploring its tool palette. Understanding how to navigate these tools enhances your workflow, allowing for more efficient and creative design projects.
Open Photoshop.
Select the Crop Tool from the Tools Palette.
Note: If your version supports it, activating the croptool will also enable the straightening functionality.
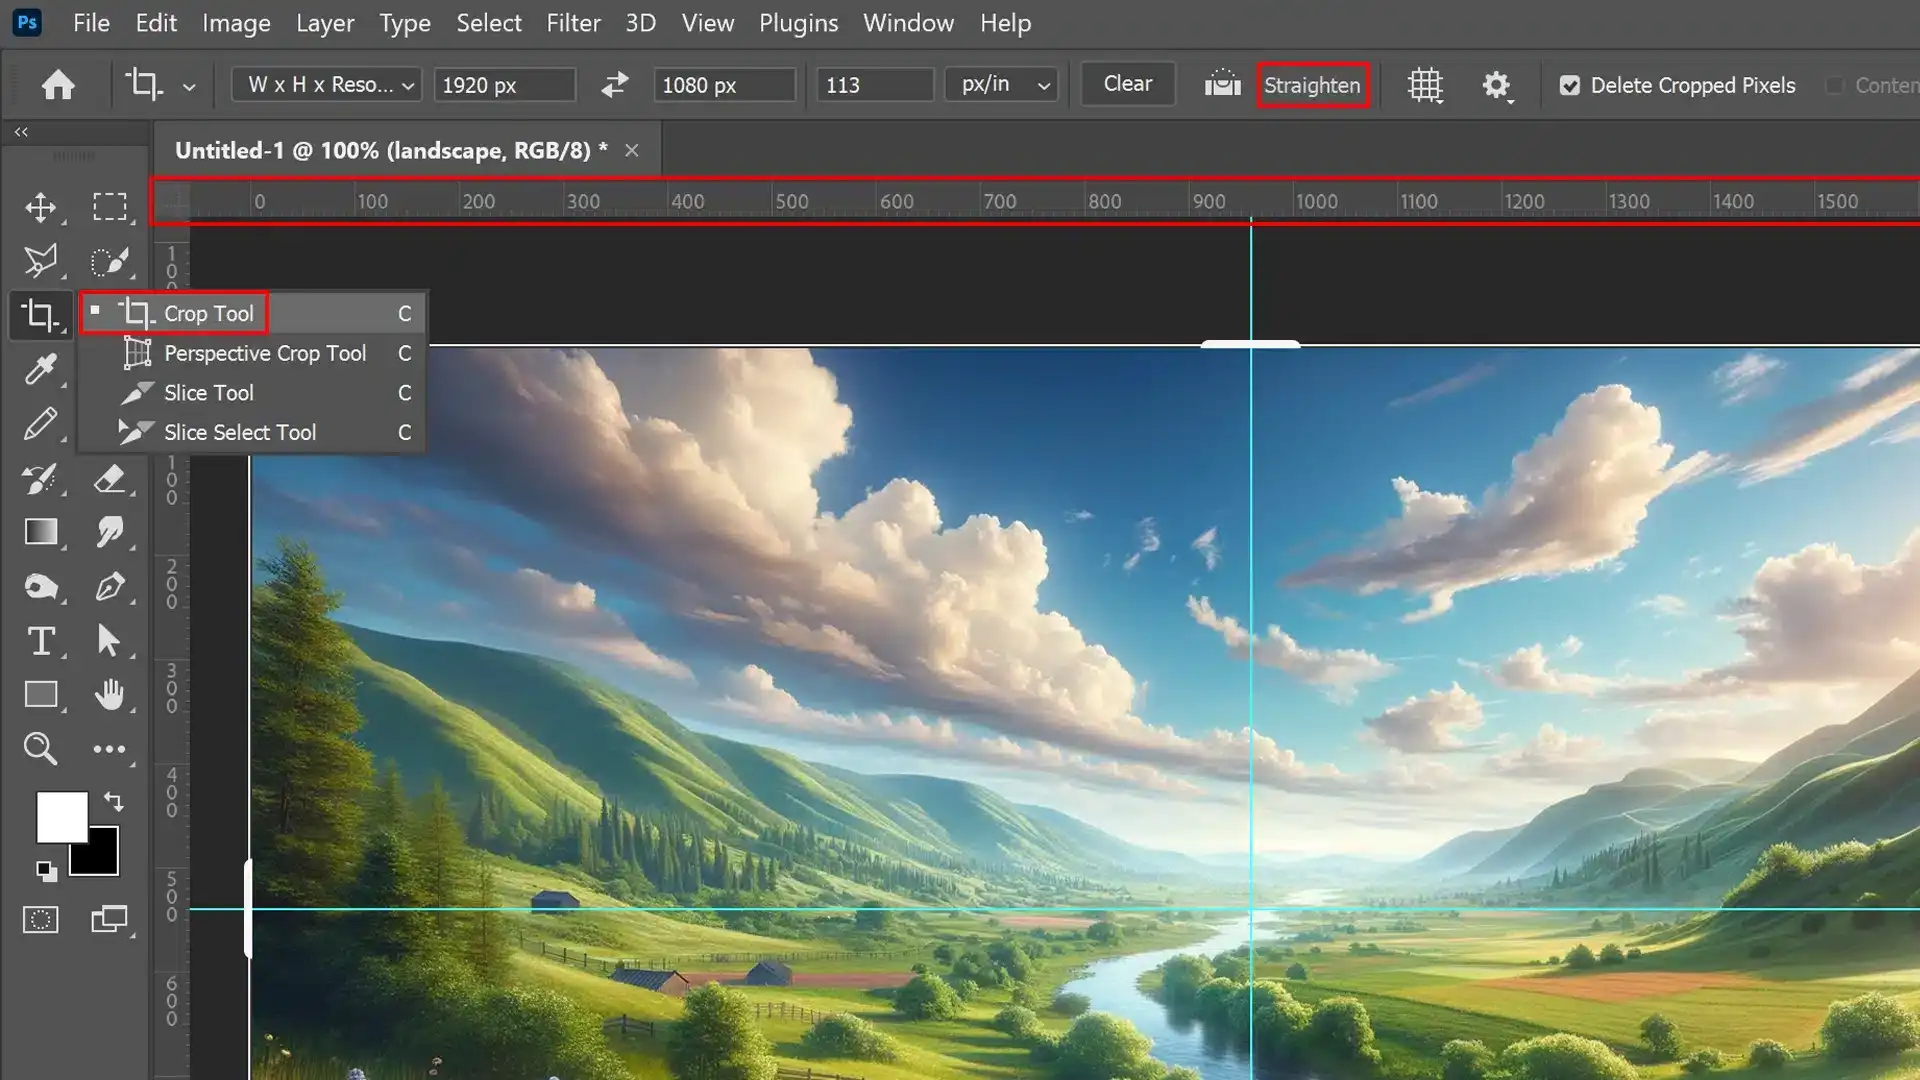
Utilizing the Crop Tool for Precise Angle Adjustments
Turning an uneven photo into a perfectly aligned masterpiece involves using the crop tool with features like the ruler tool.
Start by selecting this tool to straighten an image by drawing a reference line across what should be horizontally or vertically straight, such as the horizon.
Here’s how to adjust:
Select the Ruler Tool from the Tools Palette.
Drag to make a reference line along what should be a straight axis on your image.
Once the reference line is drawn, activate the crop tool and let Photoshop automatically straightens the image based on the drawn line, or you can choose to manually click on 'Straighten' in the options bar if further adjustments are needed.
This process rotates your entire canvas so everything aligns with your drawn line.
Mastering the Photoshop crop tool is essential for precise angle adjustments. Our guide on utilizing the crop tool for precise angle adjustments will show you how to refine your images effectively.
Finalizing and Saving Adjustments
After you straighten an image, ensure any excess canvas doesn’t ruin your composition by using content aware fill or manually cropping out unnecessary edges:
Confirm all adjustments are perfect.
Use Content Aware Fill if there are empty areas after rotation.
Use the crop tool to trim any unwanted edges, ensuring a clean finish with precise boundaries.
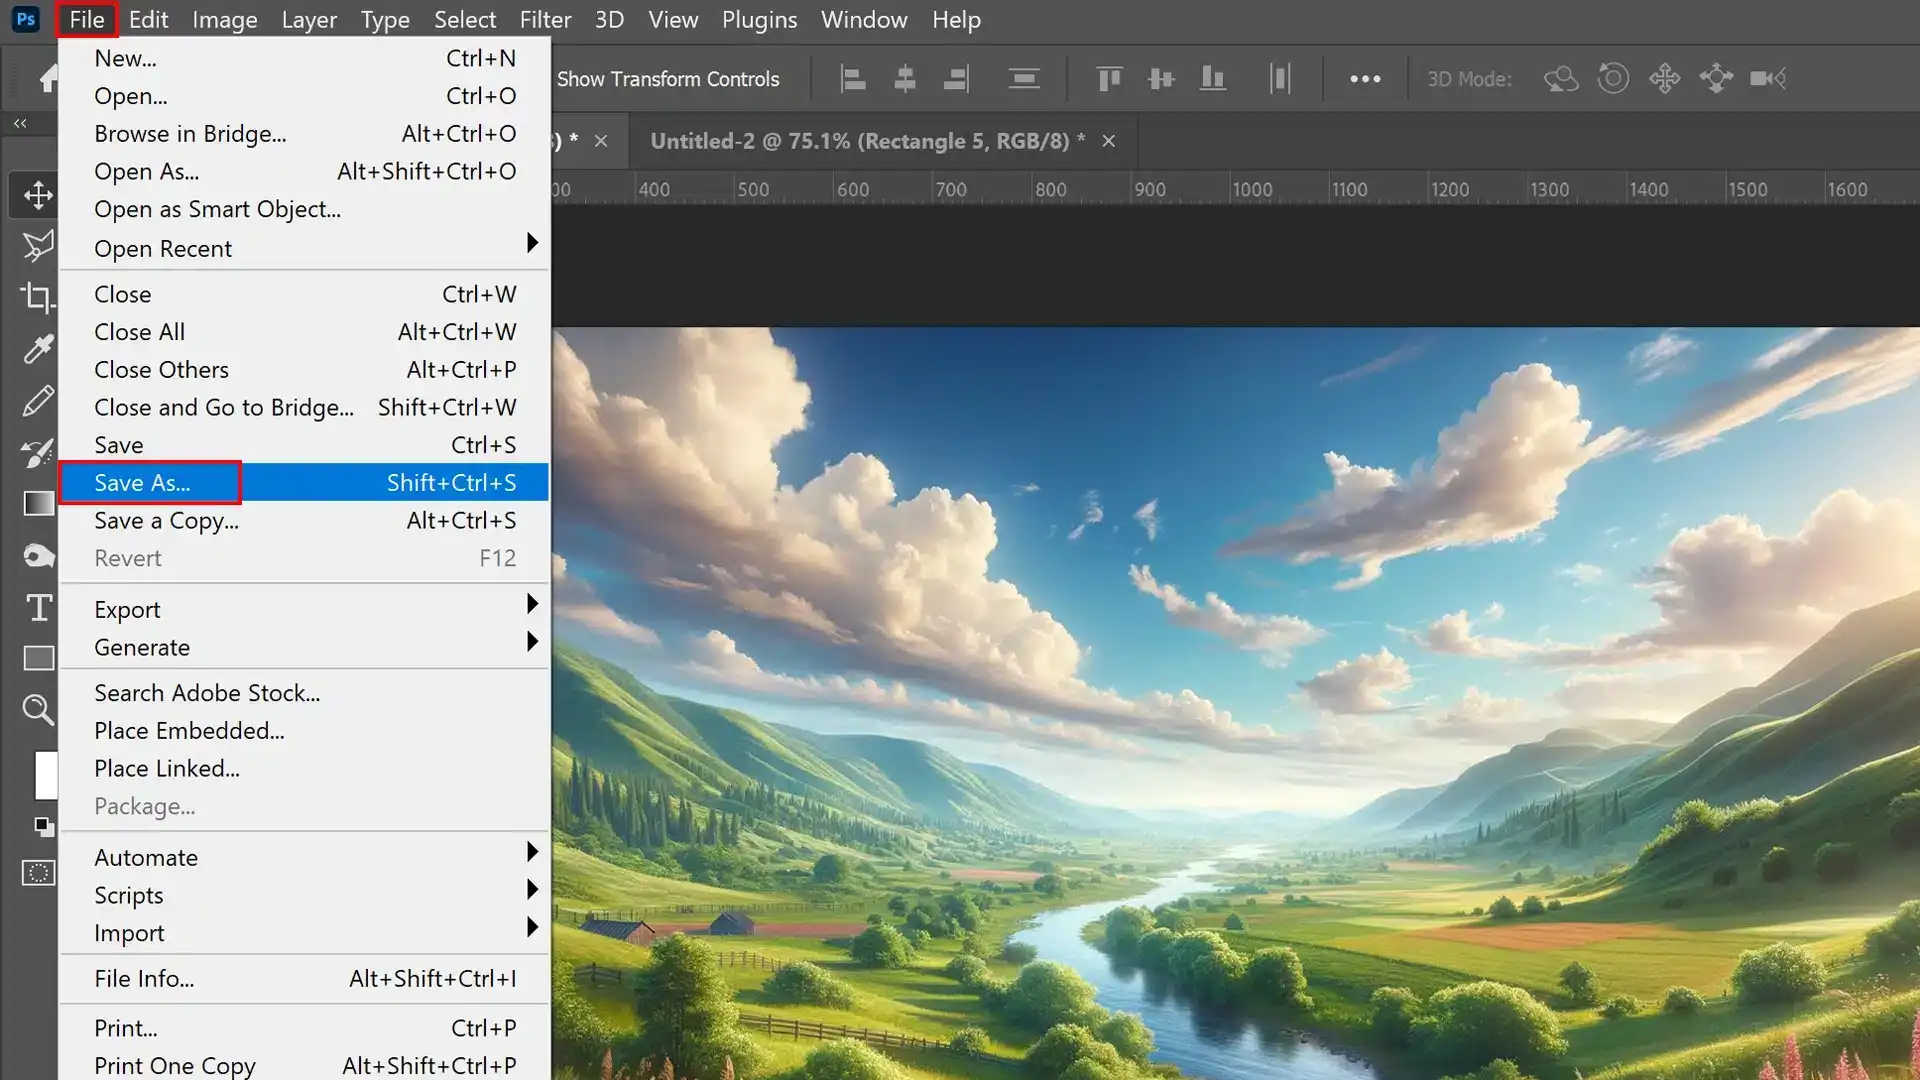
To save:
Click on File > Save As
Choose the desired file format and location.
Hit Save.
Exploring the free crop Photoshop feature can significantly aid in finalizing and saving adjustments. This guide on finalizing and saving adjustments will enhance your editing workflow.
Resizing Images in Photoshop: Step-by-Step Guide
Resizing images is a fundamental skill in photo editing that allows for better composition, improved load times on websites, and compatibility across different platforms.
Enhance your photos with Lightroom. Its powerful features streamline editing and organization, helping you achieve professional-quality images with ease.
Opening Your Image File
Initiate the process by opening your image within Photoshop.
This straightforward first step sets you up for successful adjustments.
Click on ‘File‘ and select ‘Open,’ then choose the desired image from your computer’s files.
Once selected, the image in Photoshop appears ready for modifications.
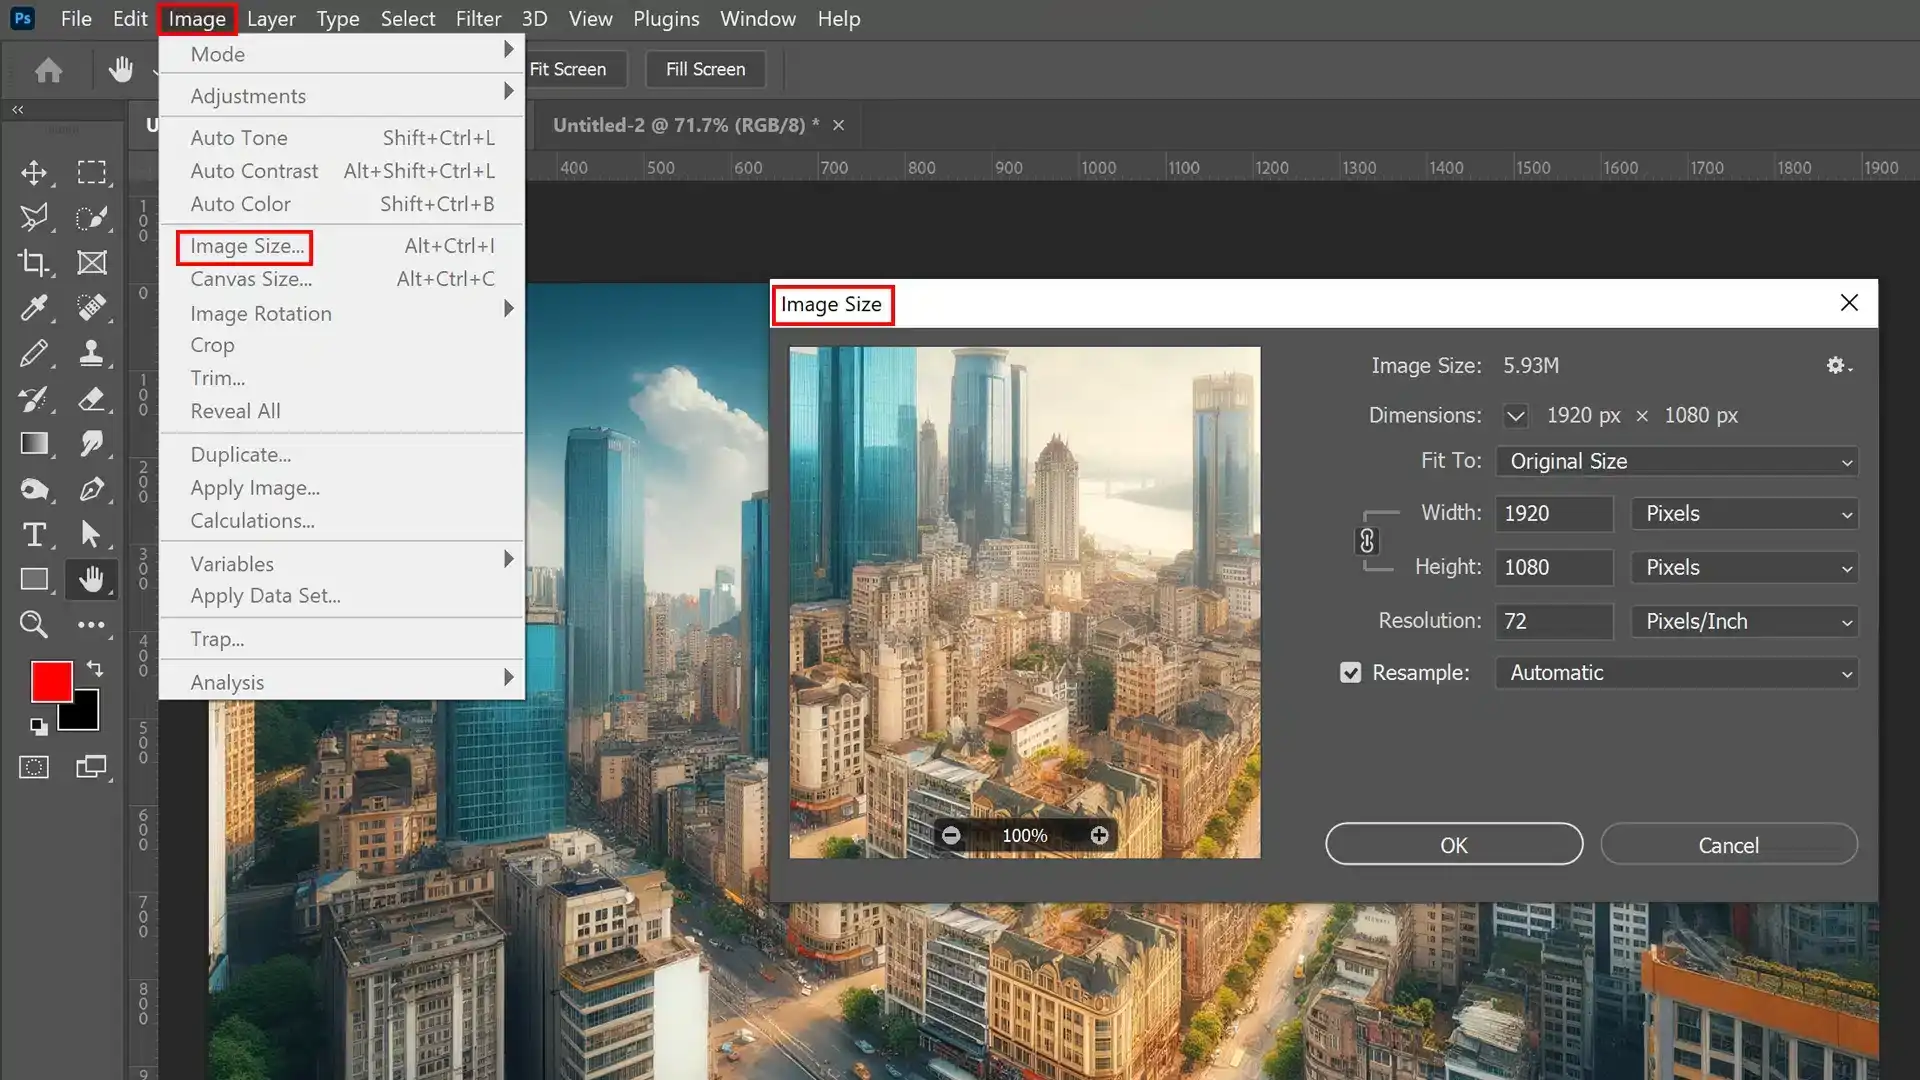
Navigating to the Resize Tool
With your image open, navigate to “Image” on the top menu and then select “Image Size” from the dropdown list.
This action opens a dialog box fundamental for adjusting both pixel dimensions and document size.
Within this box, you have powerful control over how your final image will present itself.
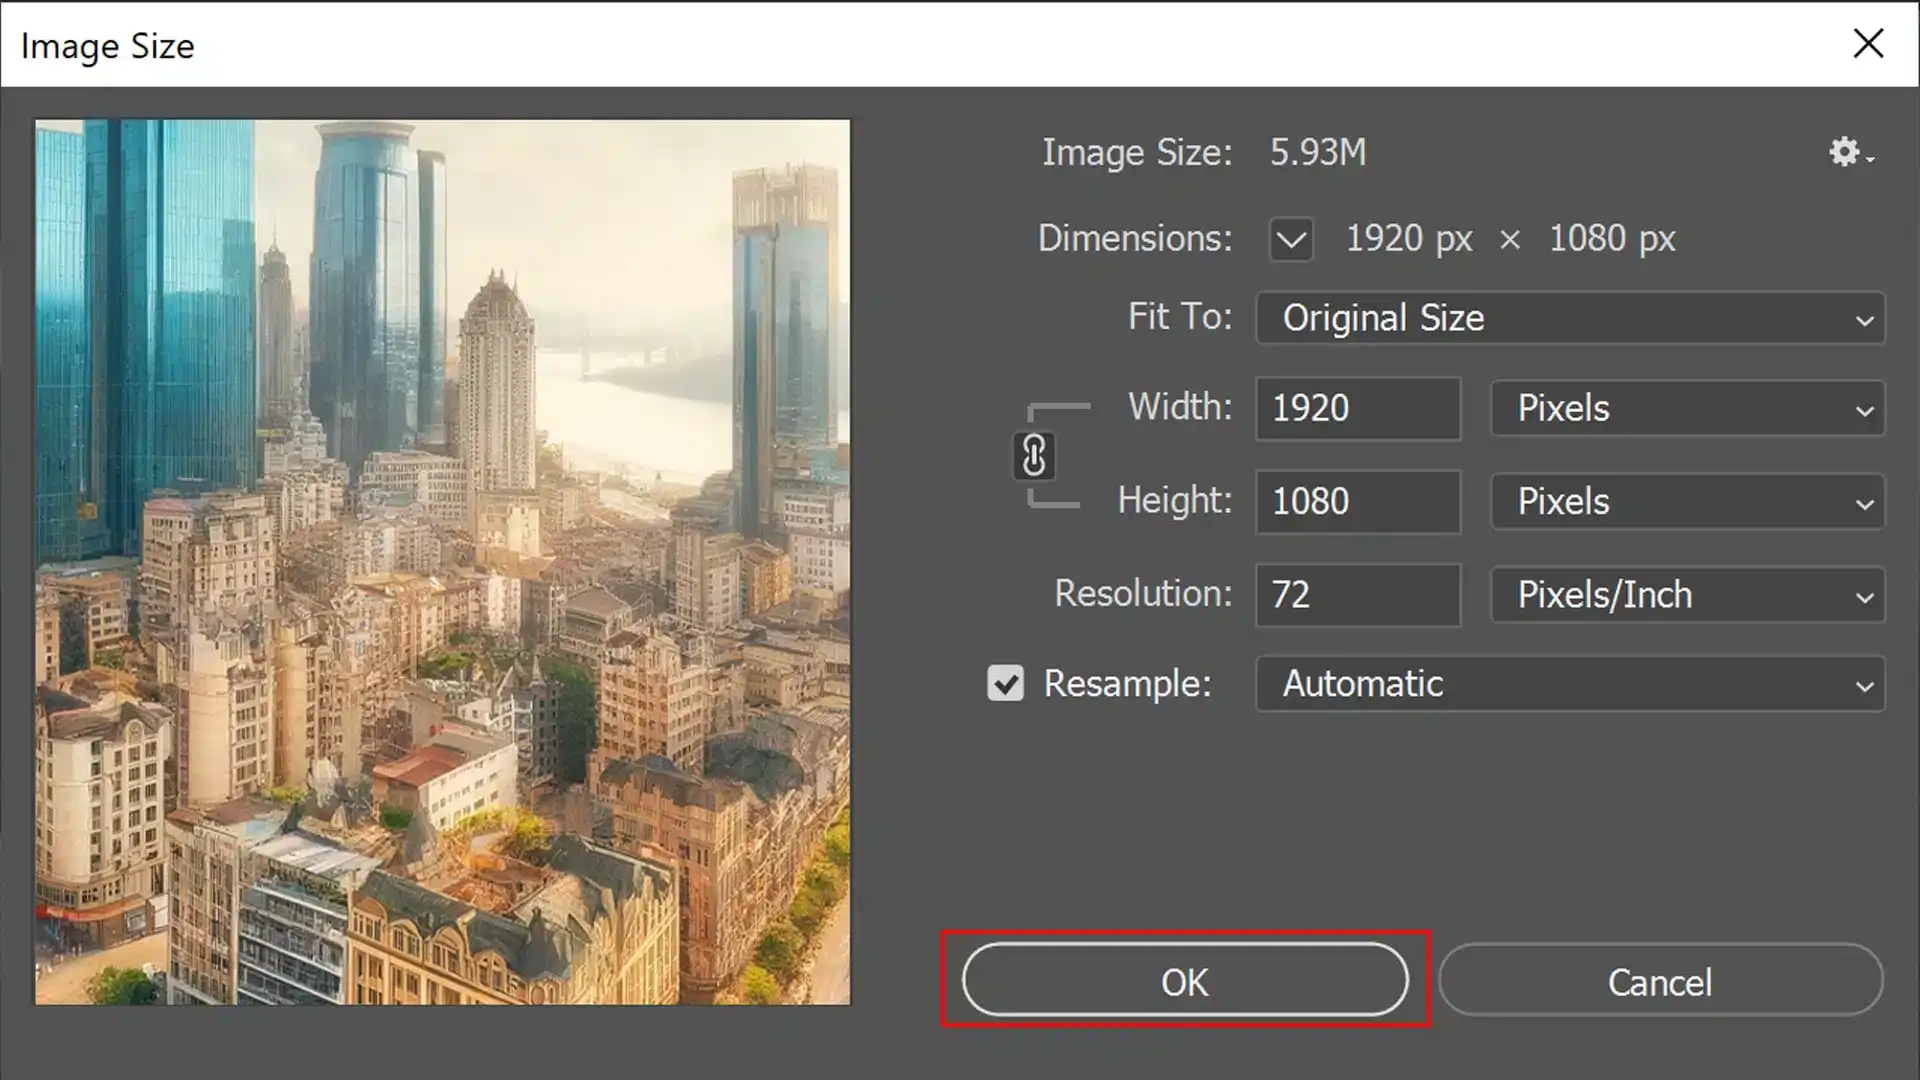
Setting the Correct Resolution and Dimensions
For web display, resolutions of around 72 pixels per inch are sufficient, whereas printing materials typically require 300 pixels per inch for high quality results.
Adjust the width and height fields to achieve your target size or use percentage scales to proportionally adjust dimensions while maintaining original aspect ratios.
Ensure these settings underpin your project’s requirements before proceeding.
Choosing the best resolution for web images is essential for setting the correct resolution and dimensions. Optimize your images to ensure fast loading and high quality, enhancing your website’s visual appeal seamlessly.
Understanding the composition rules in photography is crucial when setting the correct resolution and dimensions before straightening an image.
Proper composition ensures your adjustments enhance the overall quality and visual appeal seamlessly.
Applying and Confirming Changes
After setting your desired resolution and dimensions, it’s time to apply these changes.
Click “OK” to confirm adjustments.
This resizing method offers a reliable way to quickly adapt an image’s scale without complicating its quality or aesthetic value in projects such as website design or print media.
Learn how to resize image for printing to enhance your print media. Proper resizing ensures your printed materials are sharp and professional, perfectly suited for any project.
Enhancing Image Quality Post-Straightening
After successfully using the straighten tool to adjust your crooked image, you must further enhance its quality.
This can ensure your photo not only appears perfectly horizontal but also visually striking.
Improve your photography by enhancing image quality after straightening. Once you’ve straightened your shots, refining resolution and details keeps your photos sharp and well-composed. Adjusting perspective in Photoshop can also help align and perfect the overall composition, making your images truly captivating.
Using Adjustment Layers
Adjustment layers are powerful tools in Photoshop CC that let you fine-tune the colors and exposure of your straightened photo without altering the original image layers.
Here’s how you can leverage them:
Open the Layers Panel and click on the ‘New Adjustment Layer’ icon.
Select an adjustment layer type, such as Curves or Levels, to manage contrast or brightness.
Adjust the properties until you're satisfied with how they accentuate the details in your photo.
Using adjustment layers ensures that any enhancements made to color balance or saturation do not permanently alter the original image data.
For effective image editing, exploring Photoshop layering tutorials is crucial. Our focus on using adjustment layers will enhance your skills.
Sharpening the Image
Sharpening is essential after straightening because the process might soften some details.
To regain clarity:
Go to 'Filter' then select 'Sharpen.'
Choose 'Unsharp Mask' or 'Smart Sharpen' for more control over sharpening settings.
Adjust Amount, Radius, and Threshold levels to emphasize texture without introducing noise.
By carefully adjusting these settings, you’ll restore sharpness to key areas like edges, making your photo look crisp and ready for display or print.
Rotation Tools vs. Straighten Tools in Photoshop
Photoshop offers a suite of tools designed to enhance and correct image orientation through rotation and straighteningfunctionalities, each suitable for different scenarios and user needs.
Differences and Use Cases
Rotation tools in Photoshop are primarily utilized when you need to adjust the angle of your entire image or specific elements within it.
Common uses include correcting slight tilts or achieving a desired compositional balance.
One popular tool for this purpose is the ruler tool, which allows users to define a line that should be horizontal or vertical; Photoshop then rotates the entire image in Photoshop accordingly to align with this line.
A standout aspect of using the straighten tool is its simplicity and effectiveness in quickly correcting commonly encountered issues like crooked images.
Here’s how you might decide which tool to use:
Feature
Rotation Tools
Straighten Tools
Purpose
Adjust the angle of the entire image or specific elements
Correct crooked or unbalanced images
Flexibility
Rotate by any degree for precise alignment
Typically used for horizontal or vertical alignment
Use Cases
Achieving compositional balance, rotating elements
Straightening horizons, buildings, and other verticals
Ease of Use
Requires manual adjustment for desired angles
Simple and quick correction with built-in functions
Assessing Image Requirements: If your image has noticeable misalignment but doesn't require rotation around any axis other than horizontal or vertical, using tools like the Photoshop straighten image function is appropriate.
Fine-Tuning Image Orientation: For more controlled adjustments where you need to consider other composition elements, manual rotation might be necessary.
Using Photoshop’s Ruler Tool to Straighten an Image
The Ruler Tool in Photoshop is a quick and effective method to correct misaligned photos.
It provides precision and ease, especially for images that need a subtle tweak to enhance their visual impact.
Finding the Ruler Tool
To locate the Ruler Tool in your toolbar, it typically nests under the Eyedropper tool set.
If you can’t find it directly, right-click on the Eyedropper icon, and a fly-out menu will show additional tools, including the Ruler Tool.
This tool is essential when you have an image in Photoshop that’s slightly askew or if you’re dealing with a crooked image.
Selecting this can help establish a reference line that defines how the image should be aligned.
Straightening an Image Using the Ruler
Once you’ve selected the RulerTool, click and drag along a line that should be horizontal or vertical.
After drawing this line, go to the Options bar and click on the “Straighten Layer” button.
This command makes use of the straighten feature:
Select your image layer: Ensure that your original image layer is active.
Draw a line with the Ruler Tool: Click with your mouse button at one end of what should be straight in your image and drag to the other end, holding down the mouse button to maintain the line.
Straighten: With your line drawn, press the 'Straighten’ option.
Activate the crop tool in Photoshop, which will automatically rotate and crop your canvas based on the ruler’s angle, immediately realigning that crooked element.
When working with complex projects involving multiple layers, aligning each layer precisely can significantly enhance the overall visual output.
This section delves into advanced techniques for straightening multiple layers, ensuring both individual attention and synchronized adjustments.
Handling Layers Individually
To handle each layer individually, first, select the straighten tool from your Photoshop toolbar.
Typically, you’ll find this option under the crop tools section.
Once selected, activate the tool by clicking on the straighten icon in your options bar.
Here’s a step-by-step approach:
Selecting the Layer: Click on the specific layer you want to adjust in your layers panel.
Choosing the Straighten Tool: Locate and click the straighten icon.
Applying Adjustment: Click and drag along a line within your image that should be horizontal or vertical as a reference point; this tells Photoshop how to realign this particular layer.
Remember, using the crop box is crucial when you need to constrain adjustments without affecting other layers.
Dragging outside of it while holding down a mouse button, allows rotating freely without altering layer dimensions too drastically.
Synchronizing Adjustments Across Layers
Synchronizing adjustments across different layers ensures uniformity in their alignment, which is essential, especially in composite imaging or when preparing layouts for animations or responsive design configurations.
To synchronize, follow these steps:
Match Reference Points: Before applying changes globally, ascertain that all individual alignments use consistent reference points.
Link Layers Temporarily: In your Layers Panel, shift-click to select all layers needing re-alignment, then right-click to link them temporarily during adjustment.
Apply Adjustments Using the Crop Tool: With all layers linked, activate the crop tool from its dialogue box in Pro mode. This crop tool allows for precise control settings, including angles and axis restrictions, which is crucial for maintaining uniformity across all layers.
Ensure that "Use Classic Mode" is unchecked so that newly available functionalities, such as automatically straighten based on content-aware settings, are utilized effectively.
Unlink once aligning is complete by right-clicking selected layers again and choosing ‘unlink‘ making sure each maintains perfect alignment yet retaining independent flexibility necessary for continued editing without constraints imposed by synchronization itself.
Master how to draw curved lines in Photoshop to elevate your designs. Our step-by-step guide helps you create smooth, precisecurves, perfect for logos, illustrations, and creativeprojects.
Enhance your Photoshop skills today!
Frequently Asked Questions
How do you straighten a tilted picture?
To straighten an image that’s tilted, use any basic photo editing tool that offers a straightening feature.
Typically, this means selecting a straighten tool and rotating the image to align it horizontally or vertically as needed.
Save the image, and enjoy a straightened picture!
How do you straighten a bent picture?
Straightening a physically bent picture involves a careful scanning process. Scan the image into a computer and use software like Adobe Photoshop.
Once digital, use the straighten tool to adjust angles and correct bends for a pristine look.
How do I straighten a distorted image in Photoshop?
In Adobe Photoshop, mark a horizontal or vertical line with the ruler tool. Then, select the crop tool, and Photoshop automatically suggests a straightened frame.
Confirm the adjustments, and Photoshop straightens the crooked image.
Which tool is used to straighten in Photoshop?
The straighten toolin Photoshop’s crop options efficiently aligns images with a simple drag.
In my experience, using the straighten tool in Photoshop was pivotal, especially for enhancing the photos I sell online.
For instance, a slightly tilted shot of the Golden Gate Bridge became a professional-grade image with a simple adjustment, dramatically increasing its appeal and my sales.
If you’re looking to enhance your photo editing skills, I highly recommend taking a specialized course.
$2,061.00Original price was: $2,061.00.$1,061.00Current price is: $1,061.00. 27584
Download Your Free Guide Now!
Discover the secrets of photography with our printable guide! Master essential techniques like aperture, shutter speed, and ISO to create stunning images. Get your free printable PDF now and start turning your snapshots into masterpieces!