When I first discovered how to work with Lightroom NEF files, it completely transformed my workflow and image quality.
Imagine effortlessly enhancing every detail of your photos, making each one a stunning masterpiece.
In this article, I’ll walk you through the significant tips and techniques to master editing NEF files in Lightroom. Whether you’re a seasoned photographer or just starting out, you’ll find actionable advice that will elevate your skills.
Let’s get started and unlock the true potential of your images!
Table of Contents
Understanding Lightroom NEF File Format
NEF stands for Nikon Electronic Format. It’s a type of RAW file specific to Nikon devices. This file format captures every bit of data from the camera’s sensor.
Unlike JPEG files, which compress and lose some data, NEF files store all the information, offering greater flexibility in editing.
NEF files are like a digital film negative, preserving the original scene details. Photographers value NEF because it provides control over exposure, white balance, and other parameters, even after the photo is taken.
Using NEF ensures higher image quality and more options during the post-processing stage.
Why Use NEF Files in Lightroom?
Lightroom NEF workflows allow photographers to fully exploit the image data captured by their Nikon devices.
Adobe Lightroom reads NEF files directly, providing a seamless editing experience.
While shooting JPEG offers convenience, NEF offers creative freedom. It gives access to every detail the sensor records, making it easier to recover shadows and highlights or adjust the white balance without losing quality.
Benefits of NEF Files
- Higher Dynamic Range: NEF files capture a broader range of tonal values compared to JPEG, offering more detail in shadows and highlights.
- Lossless Compression: NEF files use lossless compression, meaning no data is lost during saving, keeping all original image details intact.
- Edit Flexibility: With NEF, you have complete control over every aspect of your photo. Adjust exposure, white balance, and other settings even after the shoot.
NEF Files vs Other RAW Formats
- File Size: NEF files are generally larger than JPEGs but smaller compared to some other RAW formats, balancing quality and storage space well.
- Camera Compatibility: NEF is specific to Nikon device, unlike DNG files which are more universal and can be generated by other camera manufacturers.
Importing NEF Files into Lightroom
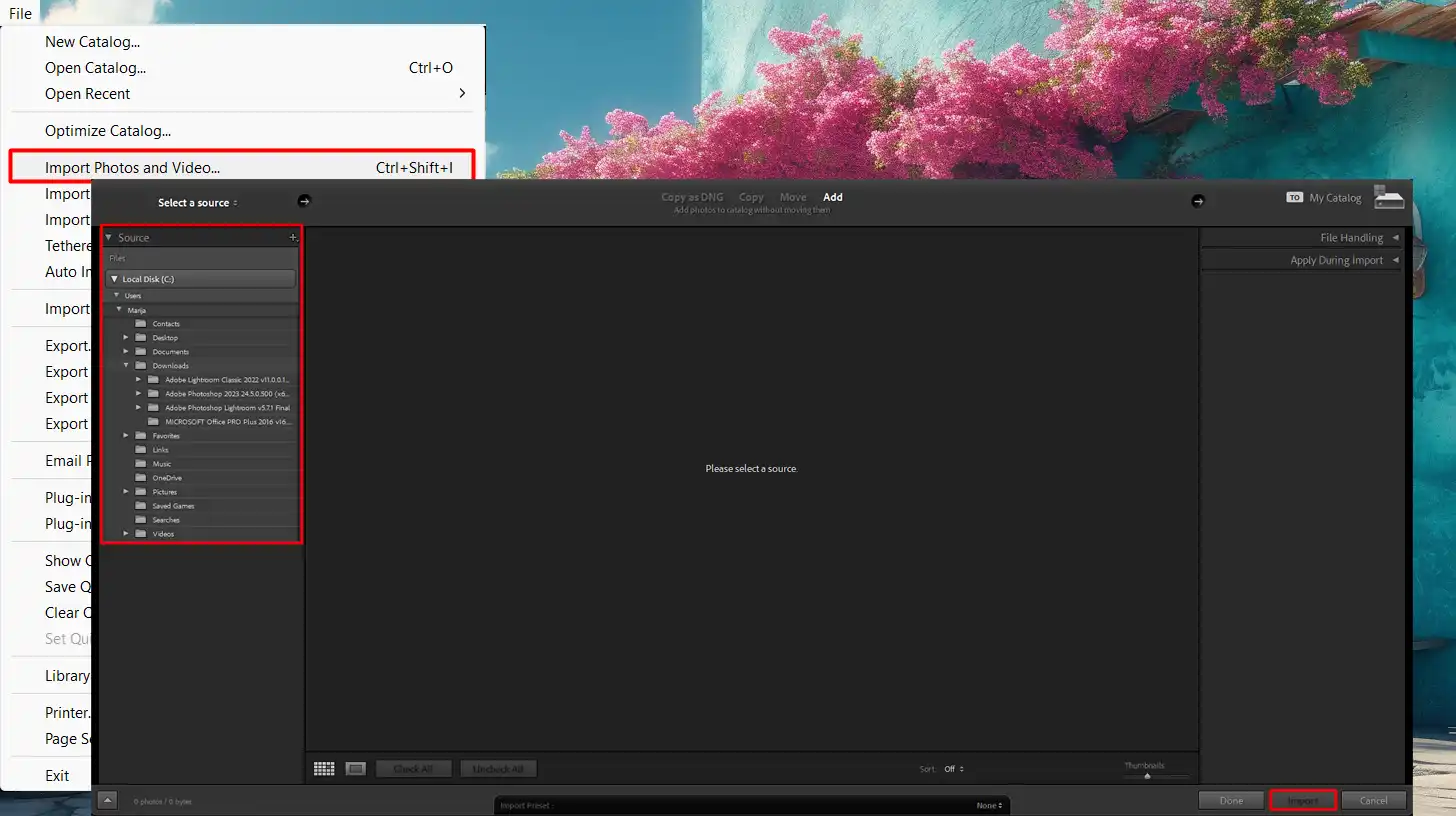
To import NEF files into Lightroom, follow these steps:
- Open Adobe Lightroom.
- Go to "File", then "Import Photos and Video".
- Choose your NEF files from your hard drive or memory card.
Use Lightroom’s catalog system to keep your NEF files organized. You can tag, rate, and add keywords for easy searching later.
Fixing Common Issues
- Can't Read NEF Files: Ensure your Lightroom version supports your camera model. Install necessary updates or check community guidelines for specific solutions.
- Slow Performance: Large NEF files can slow down Lightroom. Optimize your catalog, increase your computer RAM, or consider using proxies for smoother editing.
Pro Tip: Always back up your RAW files before editing. This keeps your original image data safe while experimenting with different edits!
Supported File Formats in Lightroom
Discover the supported file formats in Lightroom, including Photoshop format, ensuring compatibility with your original post and card reader in the latest version.
Overview of Supported Formats
Lightroom supports a wide range of file formats. You can import JPEG, TIFF, and DNG files without a hitch.
The most common imports include RAW files, which preserve all the details captured by your camera.
Within the realm of RAW files, Lightroom reads data from different camera manufacturers, including NEF format (Nikon), CR2 (Canon), and ARW (Sony), among others. Accessing and editing these formats allows users to unleash the full potential of their digital cameras.
Camera RAW formats present the greatest advantage due to their lossless nature, allowing for comprehensive post-processing adjustments.
These RAW images hold more details compared to a compressed image file like JPEG, making them ideal for serious photography work.
Moreover, Lightroom’s interface ensures smooth interaction even with varied RAW file types, providing flexibility across camera settings and preferences.
Managing Nikon NEF Files in Lightroom
Importing NEF files into Lightroom is straightforward.
Follow these steps:
- Open Lightroom and select "File" from the top menu.
- Click "Import Photos and Video".
- Locate your NEF files on your hard drive or memory card and select them.
Lightroom will then process the Nikon Electronic Format (NEF) and add it to your Lightroom catalog with all the necessary data intact.
Managing NEF files in Lightroom offers Nikon users significant advantages. The considerable detail retention of RAW files means you can adjust exposures, tweak white balance, and correct shadows or highlights efficiently.
Ensuring proper management in the import stage aids in project organization and expedites the editing workflow, saving time and enhancing productivity.
For those struggling with large file sizes or performance issues, consider using proxies or increasing RAM. These steps ensure Lightroom runs smoothly, even with multiple NEF files loaded simultaneously.
Following the community guidelines will also help by offering practical tips from seasoned photographers.
Pro Tip: Always back up your RAW files before editing. Keep original image data safe and retrievable!
When selecting the best cameras for wildlife photography, it’s important to consider features that enhance your shooting experience.
To explore top choices that combine exceptional performance with advanced settings, check out our guide on the best cameras for wildlife photography.
How to Import NEF Files into Lightroom
Welcome to your ultimate guide on importing NEF files into Lightroom. Whether you’re using a Nikon camera or another brand, the process is straightforward.
Let’s break it down.
Step-by-Step Guide
- Open Lightroom: First, launch Lightroom on your computer. You need it running to import any file format, including NEF files.
- Select "File": Navigate to the top left corner and click on "File." A dropdown menu appears. This step isn't very glamorous, but it's necessary.
- Click "Import Photos and Video": In the dropdown menu, find and click "Import Photos and Video." The import window will open up.
- Locate Your NEF Files: Now, navigate through your folders to find the NEF files you want to import. If you're unsure where they are, check the folder where your camera raw images are normally saved.
- Select and Import: Click on the files you want to import (you can select multiple files if needed) and hit "Import." Voilà! You've successfully imported your NEF files into Lightroom.
Common Issues and Solutions
Sometimes, you may face some bumps in the road.
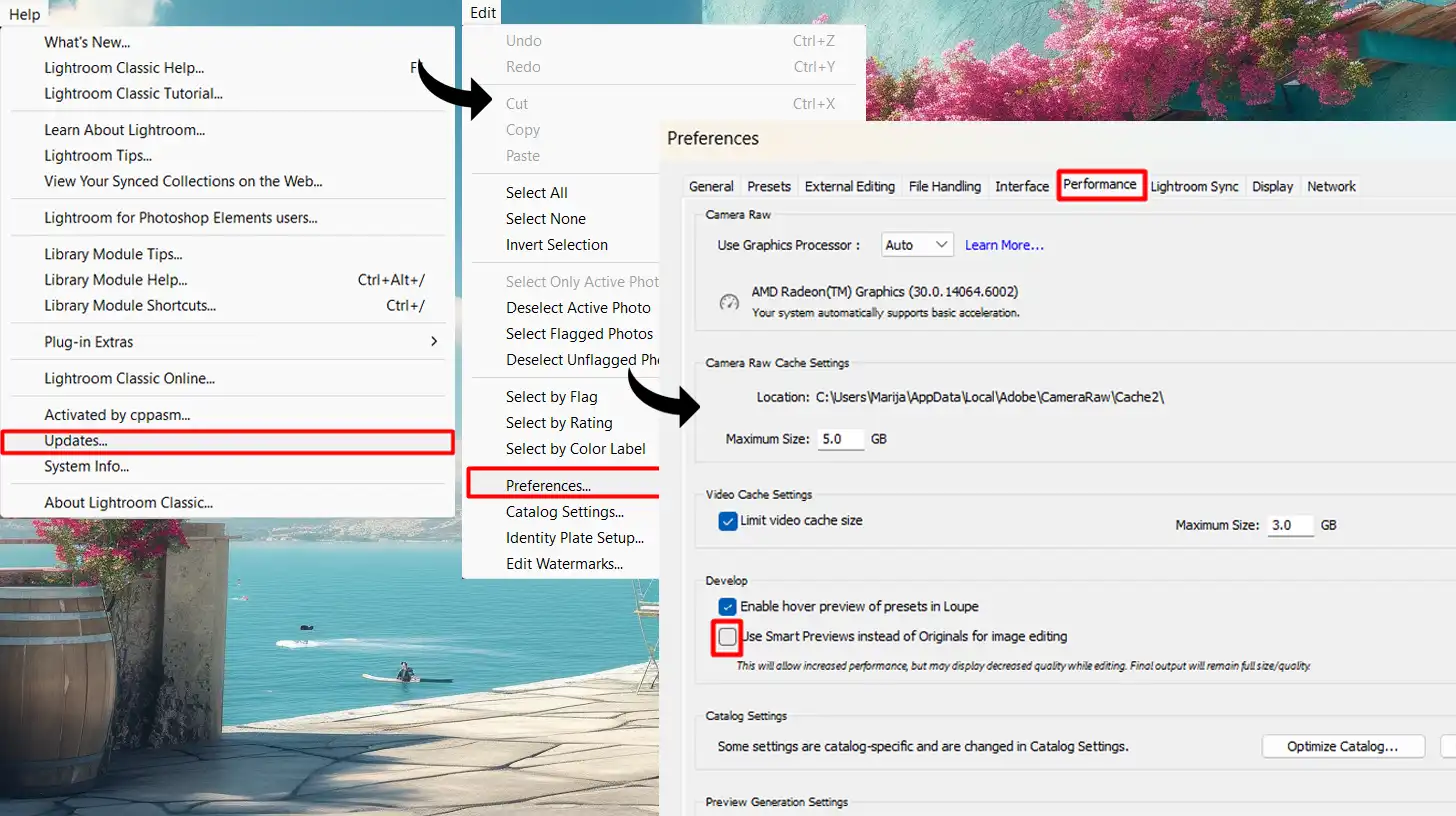
- Issue: File Not Recognized: Your Nikon Electronic Format (NEF) is not showing up. Ensure your Lightroom is up-to-date. Older versions may not support newer file formats.
- Solution: Update Lightroom. Go to "Help" > "Updates" and install any available updates.
- Issue: Slow Importing: Importing takes too long. This could be due to large image files.
- Solution: Use proxies or increase your computer's RAM. Both can speed up the process significantly.
- Issue: Missing Files: After importing, you can't find your imported files.
- Solution: Check the import destination folder. Sometimes the files are just saved in an unexpected location.
Pro Tip: Before diving deep into editing, always back up your RAW files. This guarantees that you keep the original data safe in case anything goes awry.
For more advanced editing techniques, consider learning about Lightroom shortcuts and essential tools in Lightroom to streamline your workflow.
Editing NEF Files in Lightroom
Edit NEF files in Lightroom and seamlessly convert them to Photoshop format for advanced adjustments and professional results.
This process ensures that you maintain high image quality and take full advantage of Photoshop’s powerful editing tools.
Basic Editing Techniques
Now that you have your NEF files imported, let’s get started with basic editing techniques. Lightroom offers a variety of tools to enhance your images.
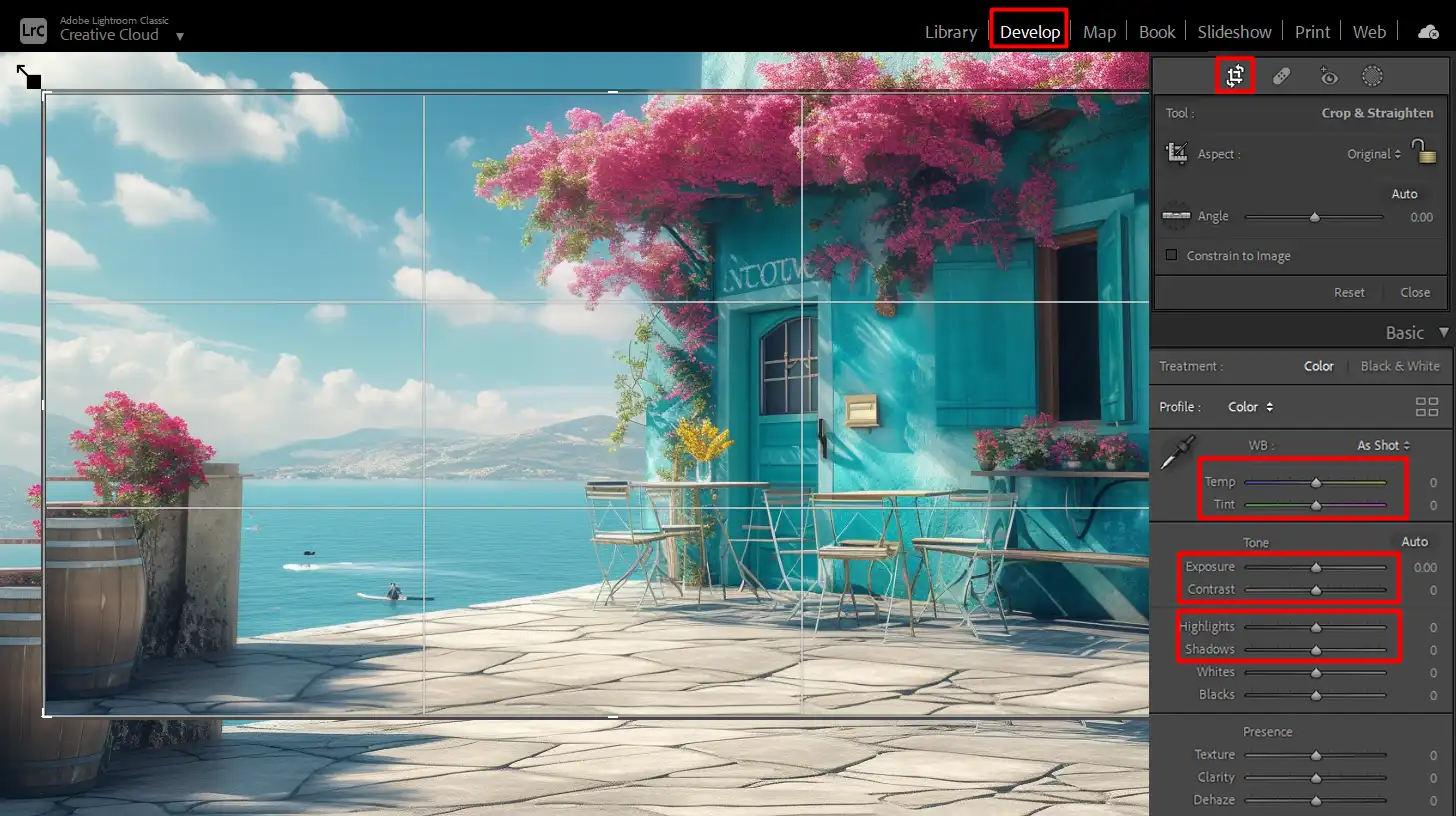
To begin, open your image in the develop module. Here, you can adjust exposure, contrast, highlights, and shadows.
Move the sliders left or right to see the changes instantly. If you need to adjust the color temperature or tint, use the white balance slider.
It’s particularly useful when correcting the colors in your image file that might look off. Cropping is another basic adjustment you can make.
Click the crop tool icon and drag the corners to adjust your image composition.
Advanced Editing Tips
For those who want to take their editing skills to the next level, Lightroom has advanced features to explore:
- Adjustment Brush: Allows for precise edits in specific areas of your photo. Click on the adjustment brush icon and paint over the area you want to adjust. You can then tweak parameters like exposure, contrast, and saturation within that selected area.
- Gradient Filter: Use it to gradually apply adjustments across your image. For example, it’s great for darkening the sky in a landscape photo. Simply click on the gradient filter icon, click and drag over the area you want to affect, and adjust the sliders as needed.
- HSL/Color Panel: Indispensable for advanced color grading. You can adjust hue, saturation, and luminance for individual colors. This is useful for making selective color adjustments without affecting the entire image.
- Detail Panel: Significant for sharpening and noise reduction. Use the sharpening slider to bring out the fine details in your image while keeping an eye on noise levels. If you encounter too much noise, especially in high ISO photos, the Noise Reduction slider will be your best friend.
Pro Tip: Always edit non-destructively. Make sure to create virtual copies of your raw file before making extensive edits. This way, you can always revert back to your original if needed.
For more in-depth guidance, consider checking out some Learn Photography Articles to speed up your workflow.
Exporting NEF Files from Lightroom
Export NEF files from Lightroom and convert them to Photoshop format or other formats for enhanced editing flexibility and easy showcasing on social media platforms.
Export Settings
To begin exporting your NEF files from Lightroom, you’ll want to focus on the right export settings.
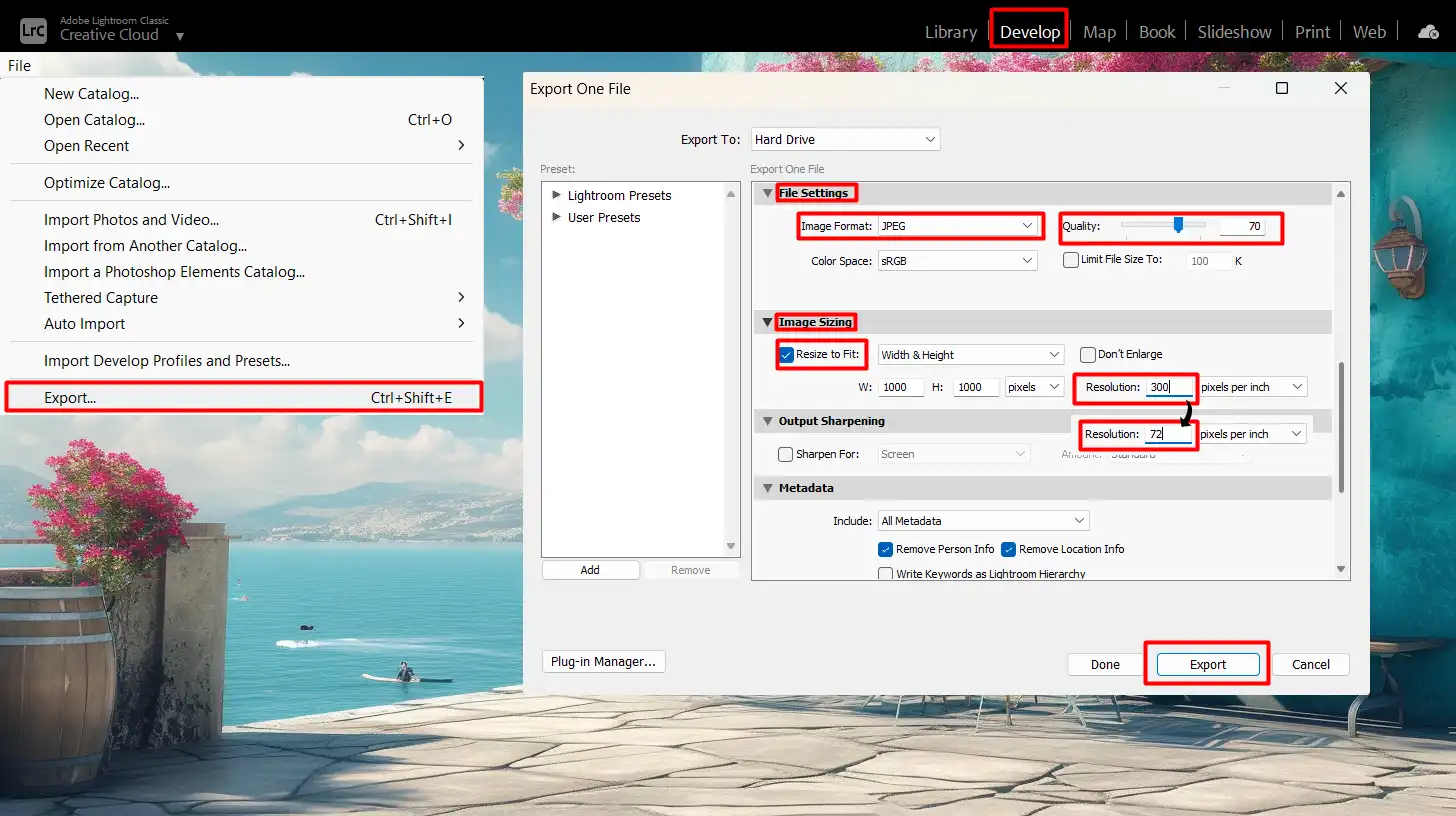
Select your photos in Lightroom and then click ‘File’ -> ‘Export’. In the export dialogue box, you can set your preferences for file format, quality, and size.
Choosing the right file format is significant for retaining the highest quality of your images. You might prefer a ‘JPEG’ for web usage or a ‘TIFF’ for print. If you have multiple image file types, you can use different settings for each.
For Nikon users, your NEF files are unique to Nikon software. Adjust your resolution based on where you plan to use the image.
Choose 300 ppi for print and 72 ppi for digital display. Naming your files systematically helps save time later. When you’ve set these, click ‘Export’.
When choosing between RAW or JPEG format, RAW files offer superior editing flexibility and image detail, while JPEGs are more convenient with smaller file sizes but less quality.
Best Practices for Exporting
Consistency is important. Always stick to your established workflow for exporting.
This ensures uniformity across all exports. Using presets can save tons of time. Create export presets for different needs like web, social media, or print.
It’s easy to do, and you’ll find it very efficient. Make sure your color space is set to sRGB for web images and Adobe RGB for print.
This ensures colors display correctly across different devices and formats. Always check your export for any quality issues.
Open your exported image files in various environments to ensure they meet your expectations. Don’t forget to adhere to community guidelines when sharing your work online.
Each platform has different requirements, so knowing them in advance will save hassle.
Understanding different image file types is important for best practices for exporting your photos.
Learn how each format affects quality and file size to optimize your exports.
Pro Tip: Before finalizing your export, create a virtual copy of your image for safe-keeping. This way, you can experiment without losing your original settings.
Troubleshooting Nikon Electronic Format (NEF) Issues
Troubleshoot Nikon Electronic Format (NEF) file issues by examining compatibility settings and updating to the latest software version for seamless image processing.
| Issue | Description | Solution |
|---|---|---|
| Corrupt Files | NEF files may fail to open if corrupted. | Backup files and use Nikon’s Capture NX for recovery. |
| Software Compatibility | Not all software supports NEF files. | Convert NEF to DNG or use Nikon’s Capture NX. |
| Color Management | Colors might not appear correctly. | Ensure latest camera raw plugins are installed. |
| Large File Size | NEF files are large and take up storage space. | Convert to a smaller format like JPEG for sharing. |
To address Nikon NEF document issues effectively, keep software updated, use tools like Nikon Capture NX, and convert files to formats like DNG or JPEG for better compatibility and easier management.
Common Problems
- Corrupt Files: Sometimes, NEF files just don't open.
- Software Compatibility: Not all apps support this format.
- Color Management: Colors might look off.
- Large File Size: NEF files take up lots of space.
How to Fix Nikon Electronic Format (NEF) Issues
- Use Nikon Software: Open NEF files with Capture NX for better compatibility. Capture NX offers a native solution.
- Convert to DNG: Convert NEF files to the more compatible DNG file format.
- Install Camera Raw Plugins: Make sure your software has the latest camera raw plugins.
- Check Software Updates: Keep Photoshop and Lightroom updated to avoid issues with file formats. Knowing the difference between Photoshop and Lightroom can also help you choose the right tool for your needs.
- Test Third Party Apps: Some third party software can help in opening NEF files.
Pro Tip: Always back up your original files!
A simple step, yet it saves from many headaches.
By following these tips, you’ll navigate Nikon Electronic Format (NEF) issues like a pro. Remember to check community guidelines when sharing edited images.
This ensures your work respects the rules and gets viewed by a wider audience.
Compatibility, Conversion, and Management
We discussed several aspects of Nikon Electronic Format (NEF) issues. Notably, the problem arises largely due to corrupt files, unsupported software, and color management concerns.
Additionally, large file sizes can be inconvenient.
To address these barriers, we recommend:
- Using Nikon's Capture NX for better compatibility.
- Converting NEF files to DNG format.
- Ensuring that camera raw plugins remain up-to-date.
- Regular updates for Photoshop and Lightroom.
- Testing third-party applications to ensure compatibility with NEF files.
Final Thoughts
In conclusion, dealing with Nikon Electronic Format (NEF) issues requires a systematic approach. Using specialized software and maintaining software updates mitigates most problems.
Ultimately, preparedness and proactive maintenance significantly ease file management. Don’t forget to back up your original files regularly.
Pro Tip: Always create multiple backups of your work. This way, you maintain a failsafe should anything go wrong.
When choosing between NEF or JPEG format, NEF files provide superior editing flexibility and detail, while JPEGs offer convenience with smaller file sizes but less image quality.
Frequently Asked Questions (FAQs)

Can Lightroom read NEF files?
- Yes, Lightroom can read NEF files, which are Nikon's RAW file format.
Should I edit NEF or JPG in Lightroom?
- Editing NEF (RAW) files in Lightroom is generally recommended because they contain more data, allowing for more detailed adjustments.
- JPG files can also be edited, but they have less flexibility in post-processing since they are already compressed.
Why can't I import NEF files into Lightroom?
- This issue might occur if your version of Lightroom is outdated and doesn't support the Nikon Electronic Format (NEF) from newer Nikon cameras.
- Ensure your Lightroom is up-to-date or check for specific camera support on Adobe's website.
Does Lightroom convert raw files?
- Lightroom does not convert RAW files when importing. It keeps them in their original RAW format and allows you to export them to other formats like JPG or TIFF after editing.
Conclusion
Working with Lightroom NEF files has been a real game-changer for me. It’s amazing how much more control you get over your photos, allowing you to fine-tune every detail just the way you want it.
If you’re looking to dive deeper into photo editing, I highly recommend checking out my Photoshop Course and Lightroom Course.
They cover everything you need to know to get the most out of your editing tools.
For those interested in trying out the software, Adobe offers Photoshop and Lightroom with powerful features to elevate your editing game.
Read more about Lightroom:


