Lightroom Export Settings for LinkedIn: Optimize for Impact
Lightroom Export Settings for LinkedIn: Optimize for Impact
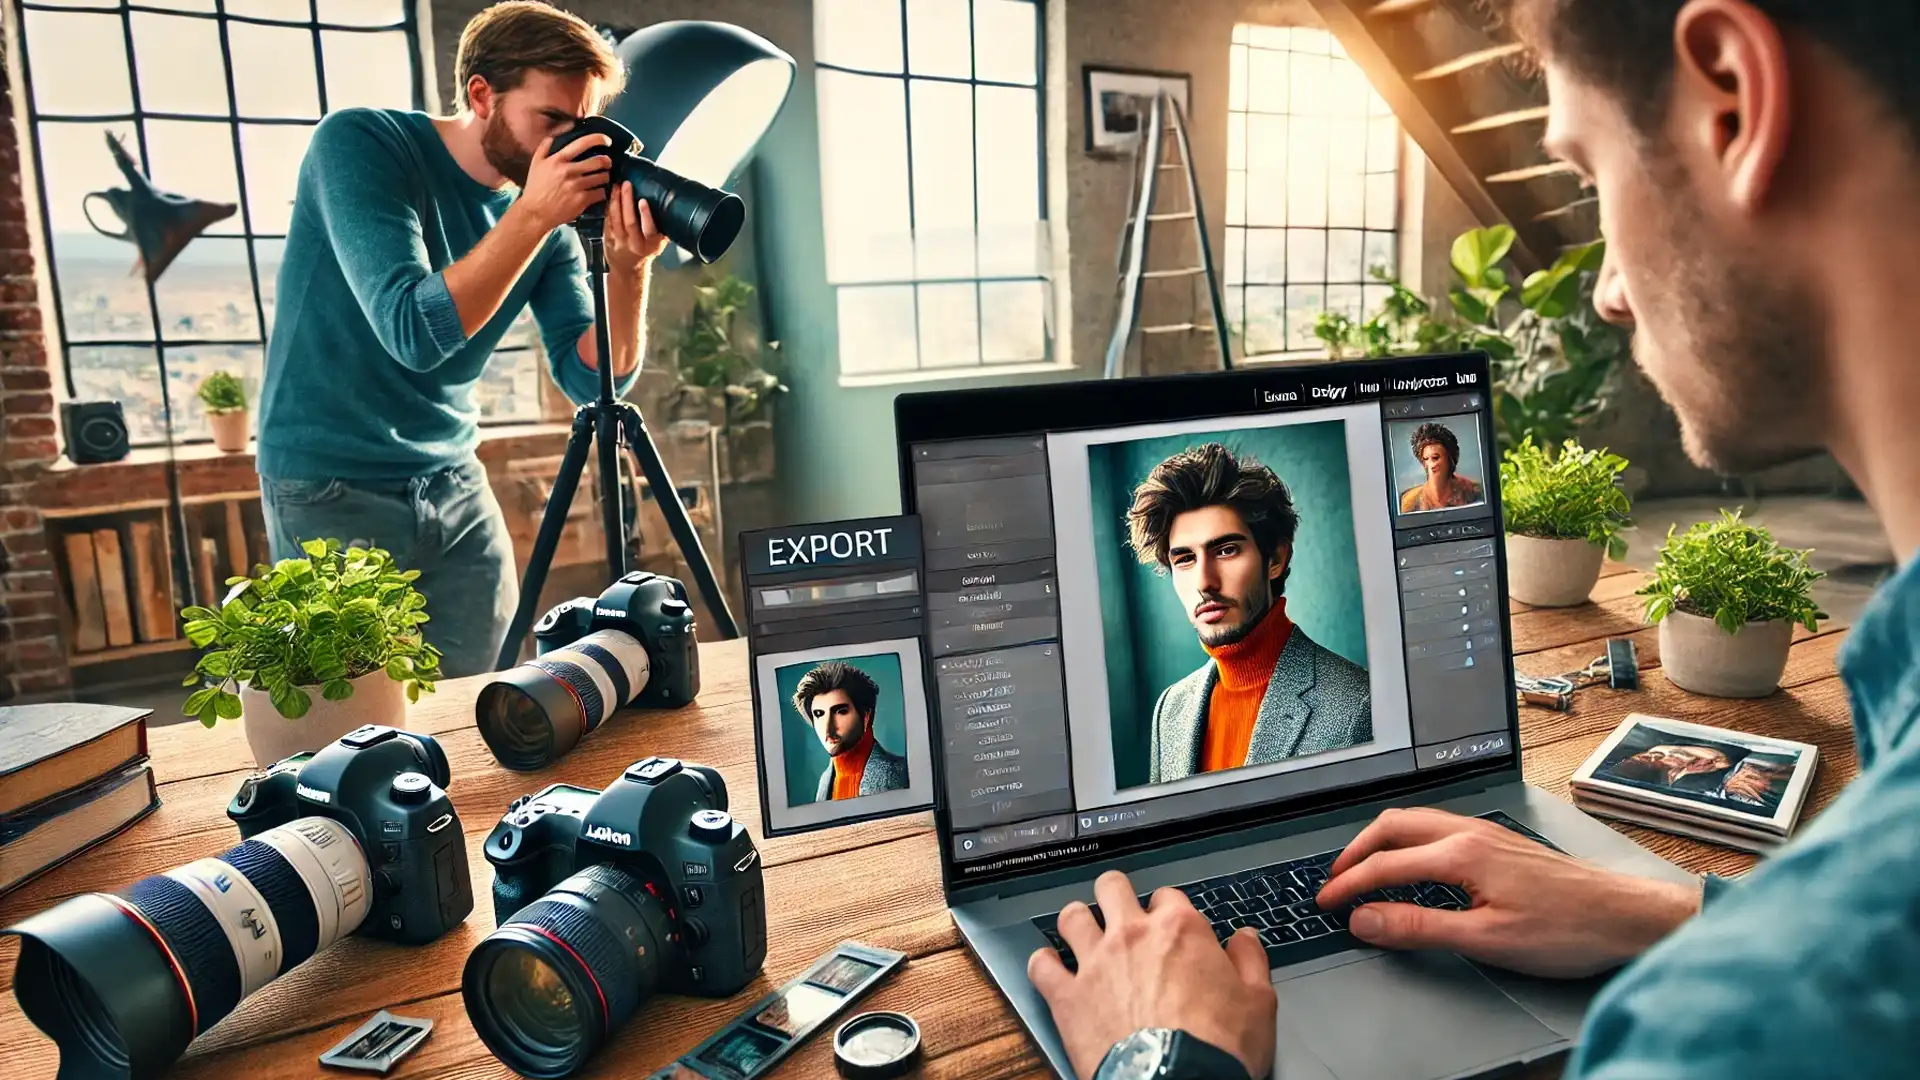
Are you struggling with finding the perfect Lightroom export settings for LinkedIn?
If you’re like me, you know how important it is to make a strong first impression on your professional network.
High-quality images can set you apart, but the wrong export settings can compromise your efforts.
In this article, I’ll guide you through the best Lightroom export settings to ensure your LinkedIn profile stands out with crisp, professional images.
Ready to elevate your LinkedIn game? Let’s get started and make those visuals shine!
Table of Contents
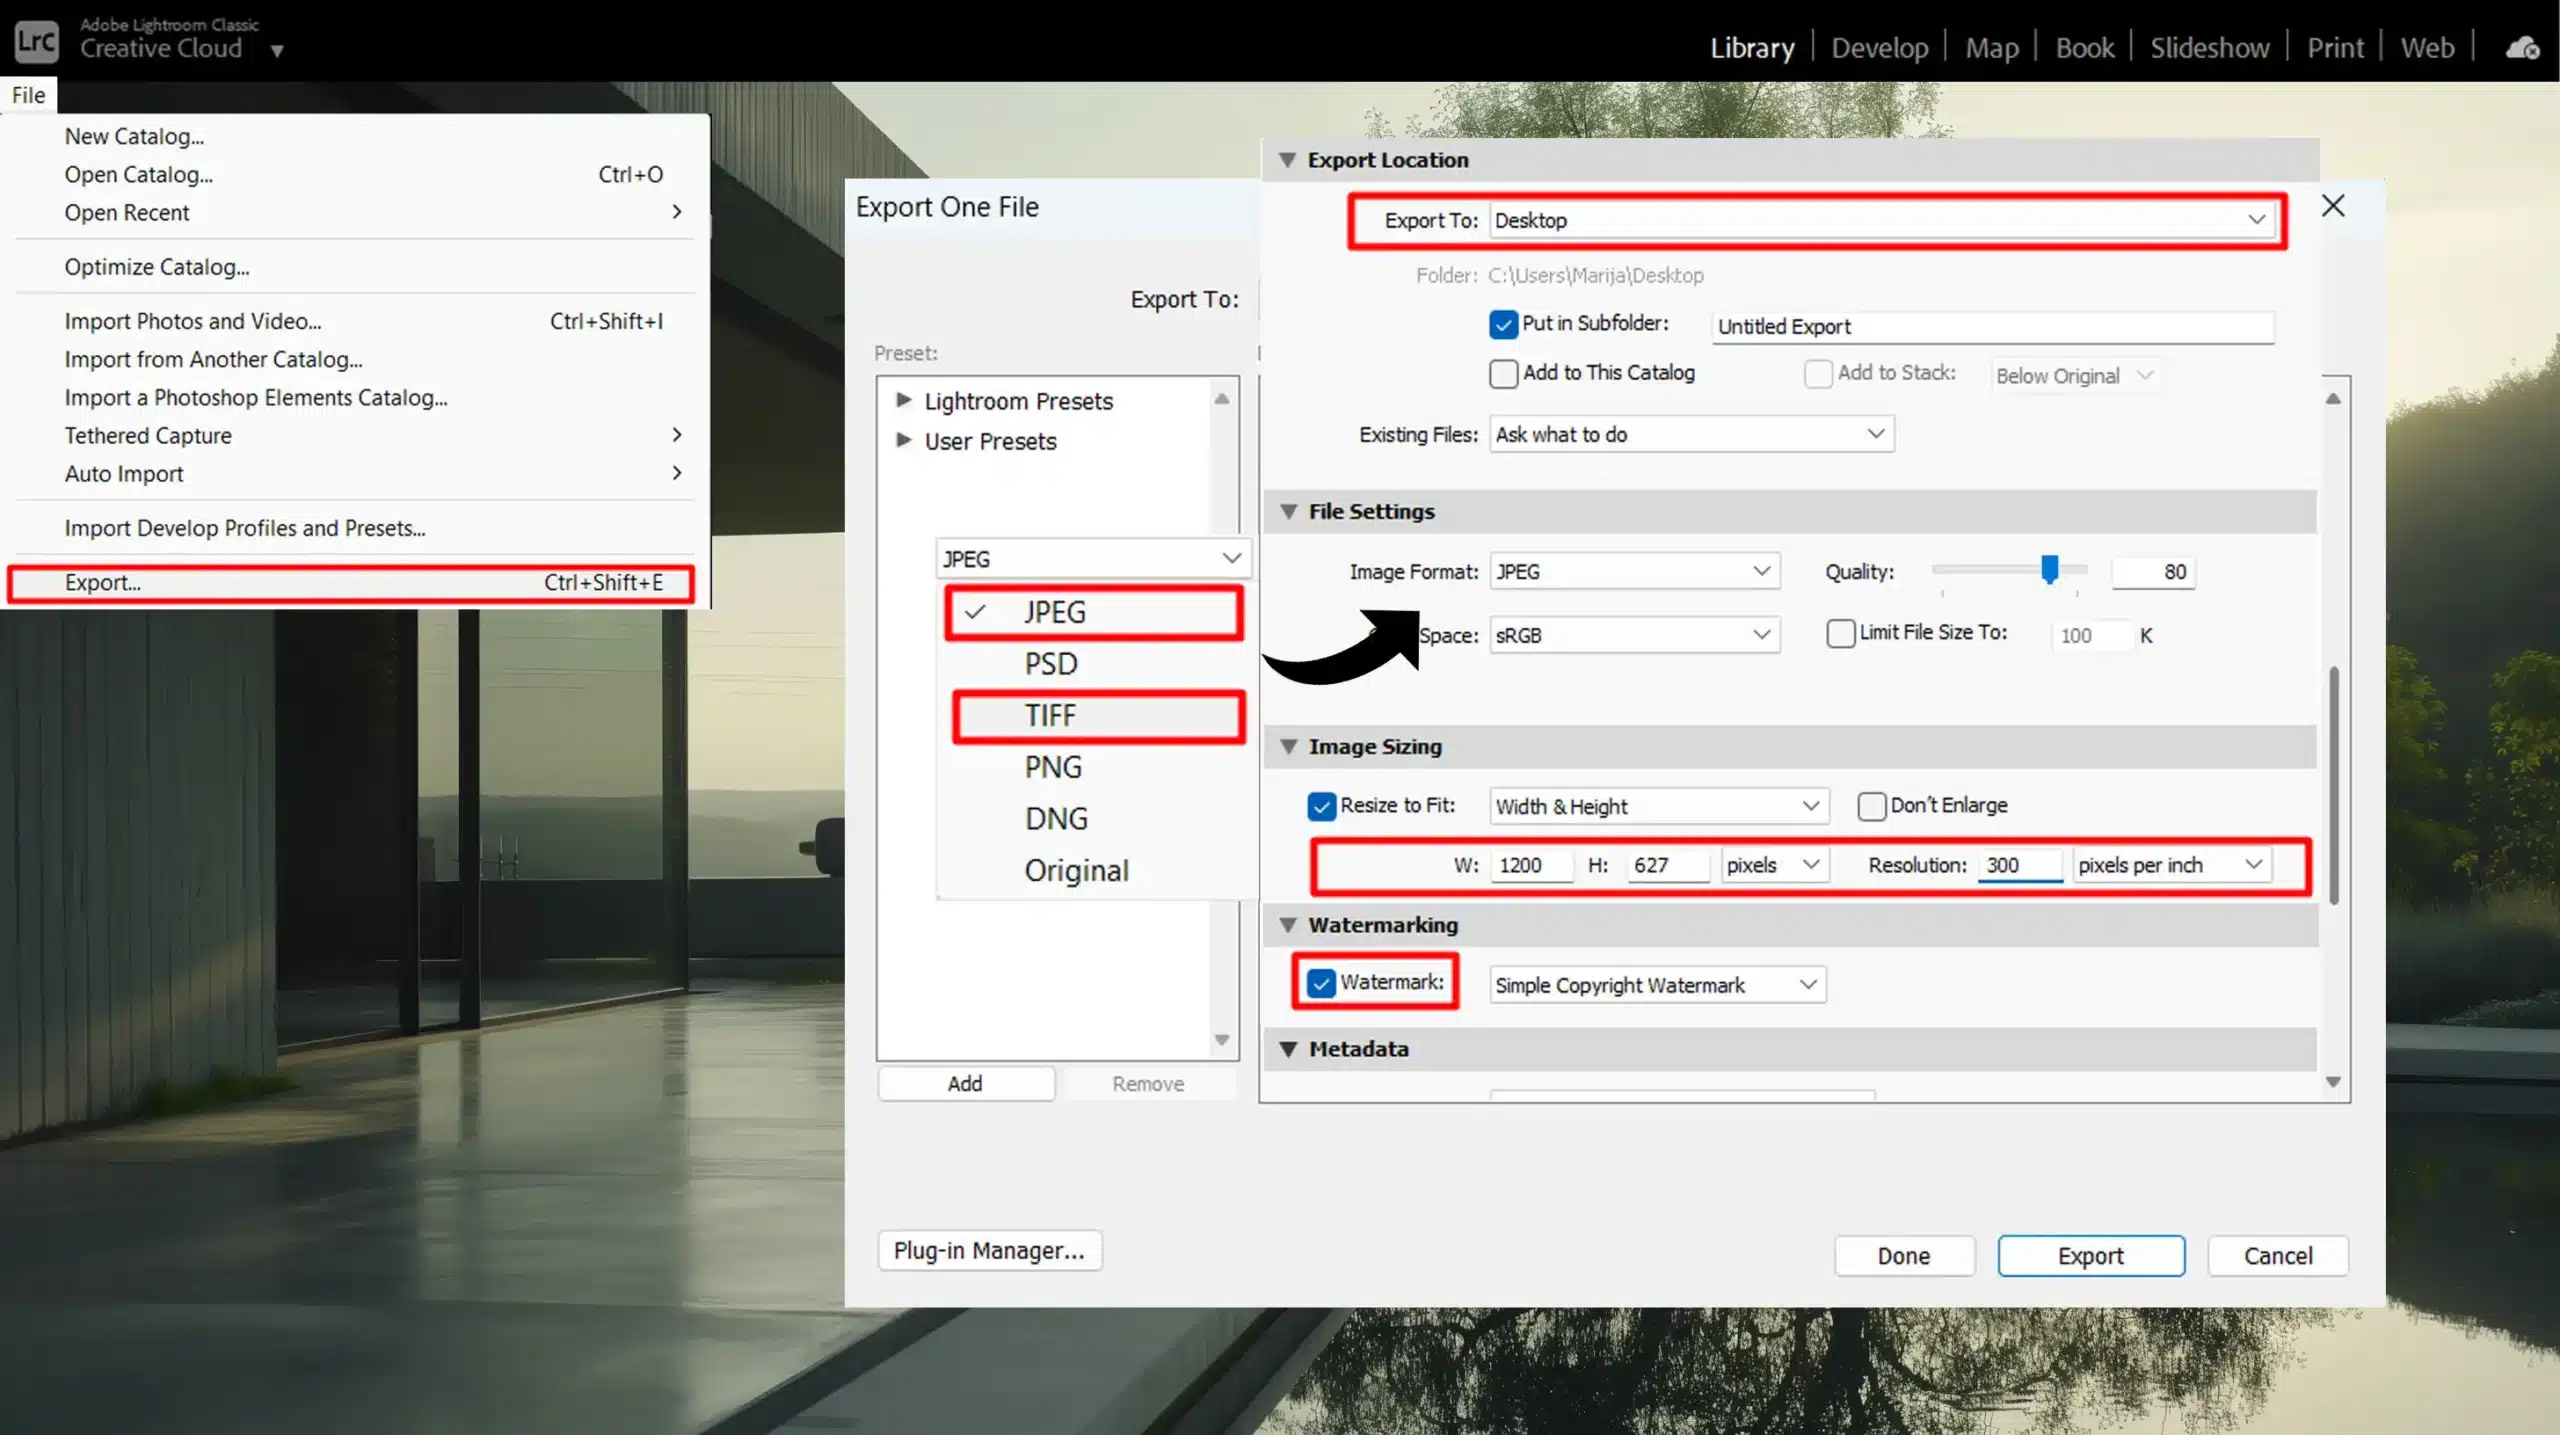
Creating Lightroom Export Settings
To make the most of Lightroom, it’s crucial to grasp the Lightroom export confiqurations. Let’s understand why these settings truly matter and explore an overview of your options.
Why Export Settings Matter
Using correct export settings ensures that all your photos maintain high image quality when shared or printed. Proper settings affect document size, determining how exported files look and perform across different mediums.
When you master these settings, you control how edited photos appear on a social media platform or on a printed photo lab.
Thus, good export habits ensure consistent results.
Overview of Lightroom Export Options
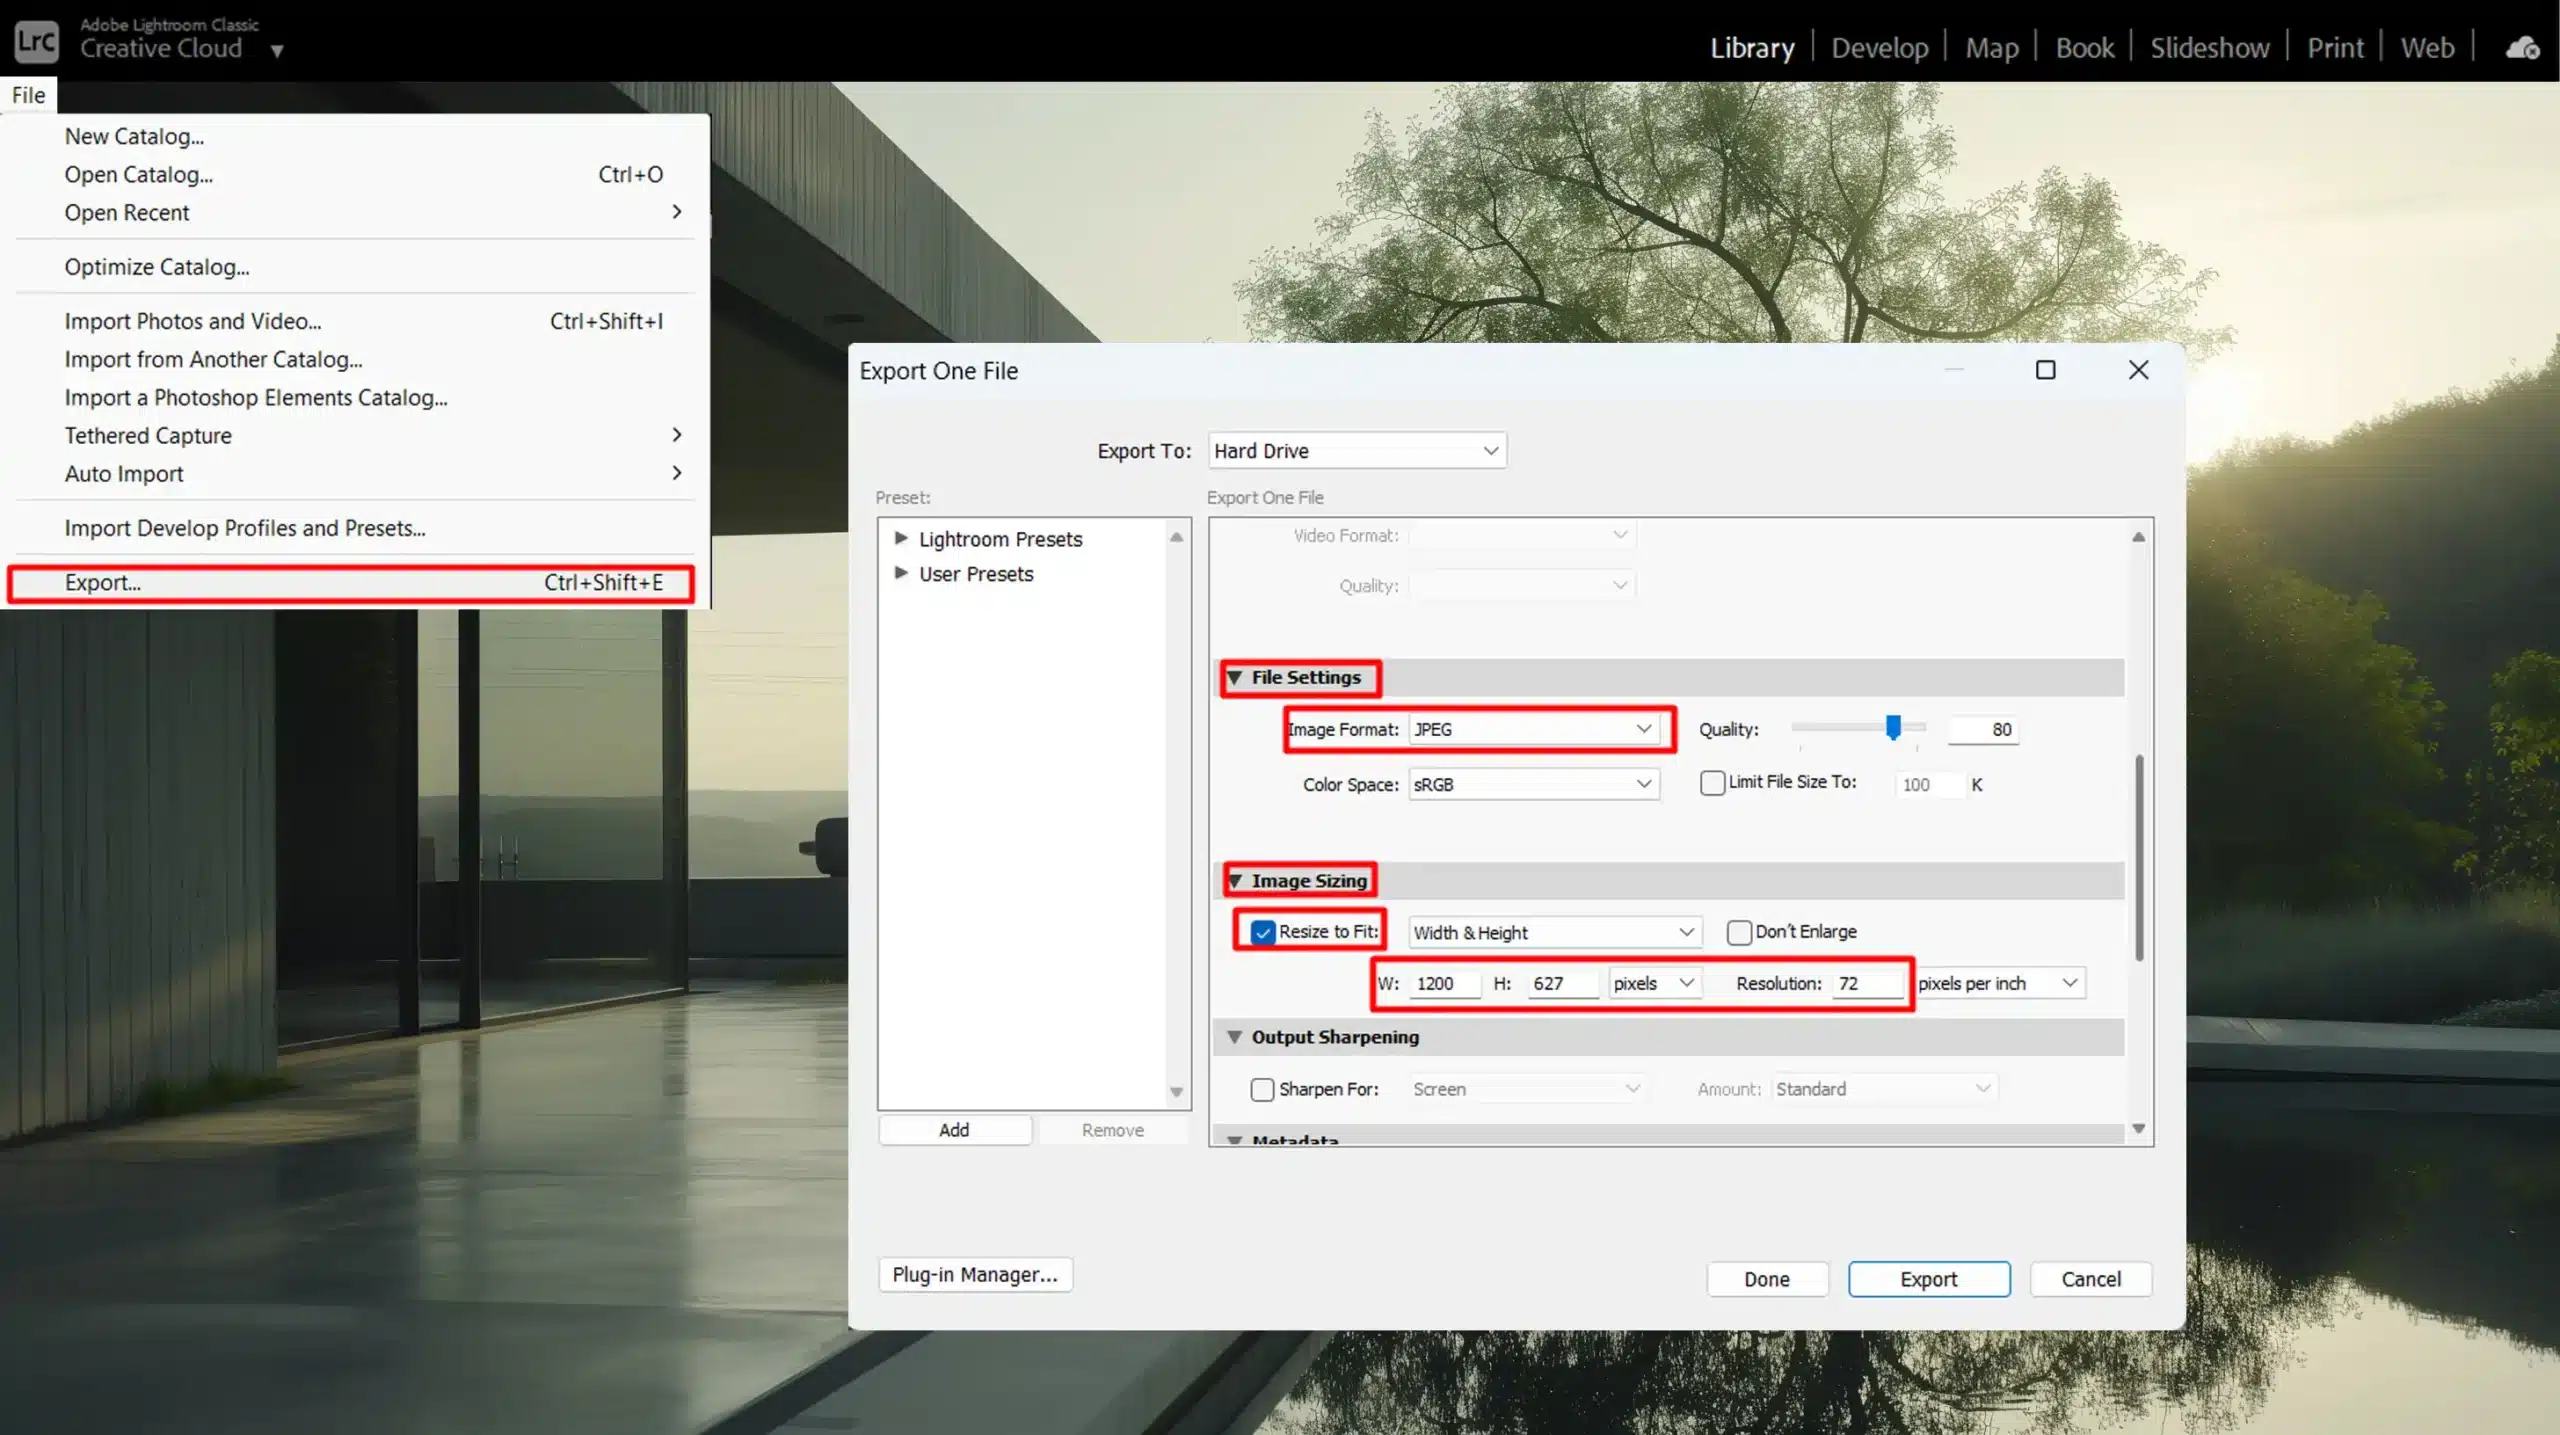
The export dialog box in Lightroom offers flexibility with its numerous options. You choose the image format like JPEG, TIFF, or PNG.
JPEG works well with lossy compression, reducing the file size but maintaining decent quality.
For higher jpeg quality, TIFF provides lossless compression, preserving more data. Adjusting the image size, aspect ratio, and file naming conventions ensures that you meet specific needs, whether it be for a web page or a print job.
You can also select an export preset to streamline the process. These are pre-configured settings you can apply quickly, ensuring consistency across multiple exports. Proper use of export presets saves time while achieving the desired image quality.
Pro Tip: Use Lightroom’s batch processing feature to export photos in bulk, saving significant time.
When deciding between RAW or JPEG format, JPEG is ideal for LinkedIn due to its smaller size and quick loading, while RAW is best for extensive edits and high-quality preservation.
Added these keywords: “Lightroom export settings, image format”.
Best Lightroom Export Settings for LinkedIn
Discover the best Lightroom configurations to enhance your LinkedIn profile with sharp, professional images.
Choosing the Right Image Format
When exporting photos from Lightroom, the image format selection directly impacts file size and quality.
For LinkedIn, JPEG is a suitable choice due to its balance between quality and file size. JPEG uses lossy compression, which helps minimize file size while maintaining acceptable image quality.
However, remember that higher JPEG quality settings increase file size.
Optimal Resolution and Dimensions
LinkedIn prefers specific image sizes to optimize display across various devices.
Ensure your photos are resized correctly in the export dialog box by setting the resolution to 72 PPI (pixels per inch), as higher resolutions do not add noticeable benefits on screens.
For optimal dimensions, we recommend an image size of 1200 x 627pixels to fit LinkedIn’s standard display requirements.
Ensure that your image size adheres to these dimensions to maintain high quality and avoid cropping issues on the platform.
Adjusting Quality Settings
Quality settings affect the final look and file size of your exported file. When exporting images, it’s crucial to find a good balance. In the export dialog, setting the JPEG quality to around 80 provides a nice compromise between quality and file size.
If you are posting detailed photos, you might go slightly higher. Conversely, lower settings reduce file size but may impact image quality.
Additional Tips
Export Configurations: Utilize export configurations in Lightroom Classic Exports for consistent results each time you export images.
Aspect Ratio: Consider maintaining a 16:9 aspect ratio to ensure your images fit well in LinkedIn’s layout.
Color Space: Use sRGB color space for accurate color representation across web browsers.
File Naming: Implement clear and descriptive file naming conventions to keep your images organized.
Export Location: Verify your export location to ensure your files save where you expect them.
Pro Tip: Always preview your exported images on different devices before uploading them to LinkedIn to ensure they look perfect everywhere.
Step-by-Step Guide to Export Photos from Lightroom
Follow this step-by-step guide to seamlessly export your photos from Lightroom, ensuring they are perfectly optimized for any use.
Setting Up Your Export Presets
Let’s start with creating your export configurations. They make life easier by saving time.
Open Lightroom and select a photo to export.
Then, go to the File menu and choose Export. A window called the export dialog box will appear.
Here, you’ll configure your settings.
Let’s focus on the important options:
Export Location: Choose where the photos will be saved.
File Settings: Select the file format you need, like JPEG or PNG. Keep quality around 80%. Examples: JPEG, 80% Quality
Image Sizing: Pay attention to image size. For web, 1200x627 pixels is ideal. Example: 1200x627 pixels (Web)
Once all set, click on the Create Preset button. These choices save as a preset for future use.
Now, press the Export button. This action saves everything according to your preset.
Exporting for Different Platforms
Next, you’ll be customizing your exports for various platforms. Different platforms require different settings.
Here’s what to do:
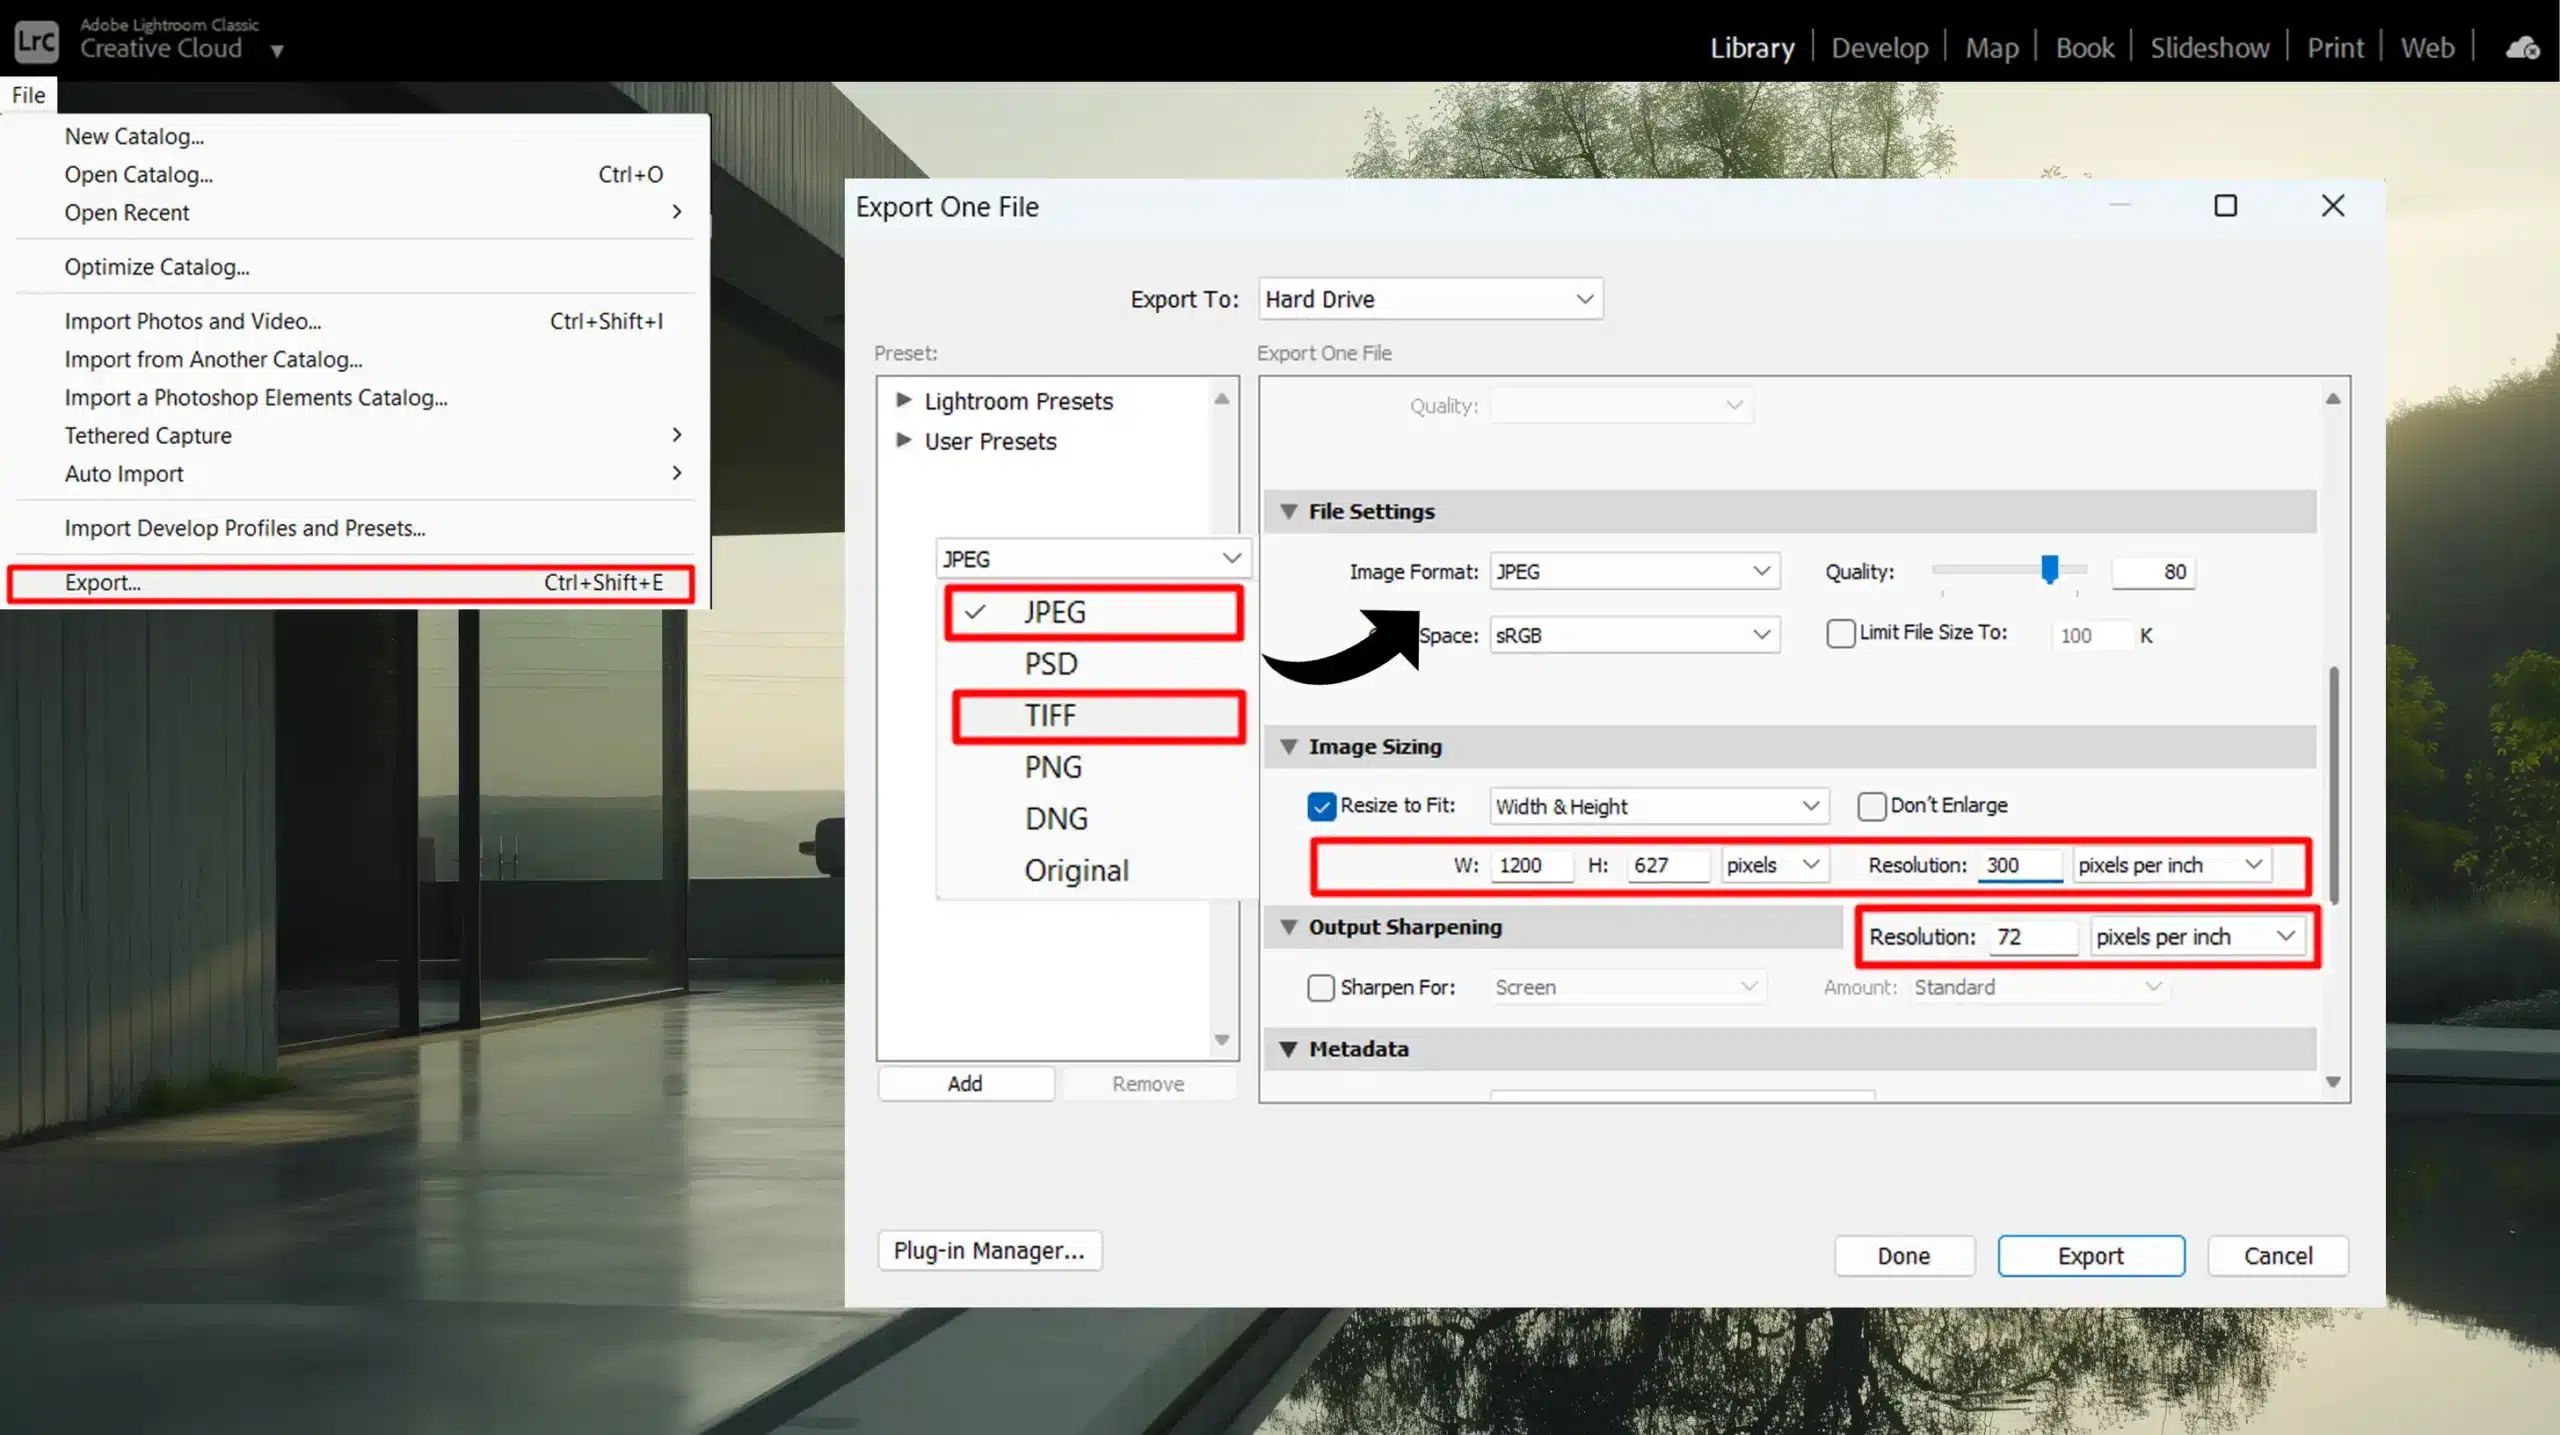
Print Photos: Use higher resolution, around 300 PPI. Example: High Resolution, 300 PPI
Social Media Platforms: Lower resolution works best. Reduce the image sizing to fit the platform's specs. Examples: Facebook, Instagram Specific Sizes
Large Files: Save space by adjusting file settings. A balance between quality and size helps. Example: Optimize File Size
Prepare sections in Lightroom as per these needs. Store each export type as a unique export preset.
This way, you switch platforms without manual tweaks every time.
Troubleshooting Common Export Issues
Sometimes, things go awry.
Here are some common issues and solutions:
Images Look Wrong: Check the color space. sRGB displays colors correctly online. Example: Set to sRGB
Files Too Big: Review file settings. Adjust quality to save space. Example: Adjust Quality
Raw Files Not Exporting: Ensure converting to compatible formats. Example: Convert to JPEG/PNG
These adjustments fix most common exporting problems. Easy to implement in the export dialog.
Pro Tip: Preview exports across devices before sharing them. Fixes initial errors, ensuring better quality.
Advanced Lightroom Export Settings for LinkedIn
Now, diving deeper into Lightroom export settings, let’s focus on metadata.
Metadata is the information about your photos, such as the camera settings, the date taken, and more.
It’s essential to customize this so that you have proper attribution and details available.
Here’s how:
In the export dialog box, navigate to the Metadata section.
Choose between including all metadata or stripping some of it to protect your privacy.
If you're sharing online, you might want to exclude location data or personal details.
For professional work, including detailed metadata often boosts credibility and helps in attributing your photos correctly.
This step ensures that crucial information stays embedded within your photos, which can protect your work and make it easier for viewers to see important data.
Watermarking Your Images
Watermarking your images during the export process in Lightroom is crucial. It’s a way to brand your photos and protect them from unauthorized use.
Here’s how to do it:
In the export dialog box, find the Watermarking section.
Select or create a new watermark. You can customize the text, font, size, and position.
Preview the watermark on your image to ensure it looks good and doesn't cover important details.
Once you're satisfied, save it as part of your export preset to use it for future exports.
This way, anyone who comes across your photos online or elsewhere will immediately recognize your work.
A Camera RAW guide for professional photographers helps you make the most of RAW image formats for high-quality edits, while also showing how to effectively apply watermarking to protect and brand your images
Exporting for Print vs. Web
Understanding the difference between exporting photos for print versus the web is critical.
Export settings play an integral role here:
For Print: Use a high resolution, typically 300 PPI (Pixels Per Inch). This ensures that your images have enough detail and clarity when printed.
For Web: A lower resolution like 72 PPI is sufficient. You should also adjust the image sizing to fit the platform's requirements, such as 1200x627 pixels for a Facebook cover photo.
Remember to select the appropriate file format based on where you'll use the photo. JPEG is common for web use, while TIFF is better for high-quality prints.
Check and adjust your file settings to balance between quality and storage space, especially if you're exporting large collections.
Different platforms have varying requirements, so customize your Lightroom export settings accordingly for best results and optimal display.
Pro Tip: Always preview your exports on different devices to ensure they look good everywhere. Consistent quality across devices builds trust and shows you’re a pro!
Optimizing Lightroom Export Settings for LinkedIn and Other Use Cases
In our digital age, mastering Lightroom export settings is essential. Different occasions demand different file settings.
Let’s explore how to customize these settings according to your requirements.
Photoshop Online offers powerful, accessible editing tools from any device, enhancing your ability to refine images on the go.
It works well with Lightroom by allowing for detailed adjustments after exporting, ensuring your photos are perfectly optimized for LinkedIn and other uses.
Lightroom Export Settings for LinkedIn and Social Media
Consider where you plan to display your photos. Every socialmedia platform has its preferences.
Setting
Value
Purpose
File Format
JPEG
Standard format for social media
Quality
80%
Balances quality and file size
Resolution
72 PPI
Optimal for web viewing
Image Sizing
1080×1080 px (Instagram)
Matches platform dimensions
For Facebook or Instagram, you’ll want quick loading times.
Here’s a simple process to follow:
Click the export button in Lightroom.
Choose your export location. A dedicated folder will keep things tidy.
Set your document format to JPEG and limit the quality to about 80%. This balances quality and file size.
Adjust the resolution to 72 PPI. Social media platforms don’t need more than this.
Set your image sizing to either long edge or dimensions suitable for each social media platform: 1080x1080 px for Instagram, for instance.
By following these steps, you ensure your images load quickly and look sharp on your followers’ screens.
Export Settings for Professional Portfolios
Presenting a professional portfolio calls for higher standards. Your images need to impress potential clients or employers.
Follow these guidelines:
In the export dialog, click the export button.
Save your files in a well-organized export location, maybe a folder named "Portfolio."
Set your file settings to TIFF or high-quality JPEG. This ensures clarity.
Increase the resolution to 300 PPI for detailed prints.
Adjust image sizing with full resolution, as your audience might zoom in to view finer details.
Remember to include relevant metadata, it boosts your credibility.
With these settings, your portfolio maintains professionalism and high quality, impressing everyone who views it.
Lightroom Export Settings for LinkedIn and Client Deliverables
Clients expect high-quality images that reflect your skills and their vision. So, file settings and details matter.
Here’s what to do:
Initiate the export by clicking the export button.
Choose an export location with the client's name for easy access.
Adjust image sizing according to project needs: whether it’s a print, a website, or an advertisement.
Watermark your images with your logo to protect your work.
Delivering well-prepared images leaves a strong impression on clients, highlighting your attention to detail.
Pro Tip: Always preview your exports on various devices. This ensures your work looks top-notch everywhere it’s viewed.
Common Mistakes to Avoid When Exporting Photos for LinkedIn and Social Media
Mastering the art of exporting images can elevate your photography game. However, there are some common pitfalls you’ll want to dodge.
Let’s talk about them now.
Over-compressing Images
We’ve all been there. Trying to save space on your hard drive, you compress your photos too much.
What’s the result? Grainy, degraded images that lose their charm. Sure, you’re saving space, but at what cost?
What’s the trick here? Strike a balance. Compress just enough to save space without sacrificing how much quality your photos retain.
Keep an eye on that quality slider and experiment to find the sweet spot. For those using Lightroom, understanding the best Lightroom export settings for Instagram can be particularly helpful in maintaining quality while optimizing file size.
Adobe Photoshop Express is a user-friendly app that provides essential photo editing tools for quick adjustments.
Unlike some apps that over-compress images and reduce quality, Photoshop Express helps maintain high resolution and clarity, ensuring your photos look their best.
Ignoring Color Profiles
Color profiles are like translators between your camera, your computer, and your printer. Without the right translator, your colors might look off.
Ever wonder why that sunset doesn’t pop as it did on your screen? The wrong color profile could be to blame.
When you export images, always check your color profile settings.
For web use, sRGB works fine. For print, Adobe RGB could be a better choice. Don’t ignore this step!
To resize an image for printing using Lightroom, adjust the resolution and dimensions in the export settings to ensure your photo maintains sharpness and clarity at the desired print size.
Incorrect File Naming Conventions
Misnaming files is an organizational nightmare. Imagine trying to find your best sunset shot among a sea of “Image001” files. A consistent naming convention saves time and reduces stress.
Create a naming pattern that works for you, like “EventName_Date_ShotNumber”. This way, you always know what’s in each file at a glance.
Neglecting Different Image File Types
Choosing between different image file types like NEF or JPEG format can significantly impact your workflow and final output. NEF files offer more flexibility for post-processing but take up more space, while JPEGs are more convenient for quick sharing and storage.
Pro Tip: Always preview your exports in different environments, different screens, resolutions, and devices. It ensures you catch any issues before they become problems.
Frequently Asked Questions (FAQs)
What settings should I use when exporting from Lightroom?
File Format: Choose between JPEG, TIFF, or DNG based on your needs.
Color Space: Select sRGB for general use, Adobe RGB for printing.
Quality: Drag the slider to 100% for maximum quality.
Resolution: Set to 300 pixels per inch for print, 72 for web.
How do I export high quality photos in Lightroom?
Set Quality to 100%: Ensure no compression.
Choose a lossless file format: Use TIFF or DNG.
Ensure the resolution is set to 300 dpi: For high-quality prints.
Turn on Sharpening: Select "Screen" for digital use or "Print" for physical prints.
What is the best export file type for Lightroom?
JPEG: Best for web, social media, and general use.
TIFF: Ideal for high-quality prints and archival storage.
DNG: Useful for preserving all Lightroom edits in a raw format.
What size should I export from Lightroom for social media?
Resize to fit: Choose \"Long Edge\" and set it to 2048 pixels for platforms like Facebook.
Resolution: Set to 72 dpi which is optimal for screens.
Aspect Ratio: Use common ratios like 1:1 for Instagram squares, 16:9 for YouTube thumbnails.
Getting your Lightroom export settings right for LinkedIn can make a big difference in how your profile looks. From personal experience, I’ve found that using the right settings ensures your images are clear and professional, making a strong impression.
Remember to export images in JPEG format, set the resolution to 72 DPI, and use the dimensions recommended for LinkedIn profiles and banners.
$2,061.00Original price was: $2,061.00.$1,061.00Current price is: $1,061.00. 27584
Download Your Free Guide Now!
Discover the secrets of photography with our printable guide! Master essential techniques like aperture, shutter speed, and ISO to create stunning images. Get your free printable PDF now and start turning your snapshots into masterpieces!