Lightroom Export Quality: Optimize Your Photos

When it comes to mastering Lightroom export quality, many photographers often feel overwhelmed. Imagine spending hours perfecting your photos only to find they don’t look as sharp or vibrant after exporting. 

Frustrating, right? In this article, I’ll guide you through the essential steps to ensure your exported images maintain the same stunning quality as your originals. 

From understanding the best file formats to tweaking those crucial settings, you’ll learn how to get the most out of your Lightroom exports.

Table of Contents

Understanding Lightroom Export Quality

Export quality in Lightroom refers to the settings used to save your edited images for various purposes. 

These settings can impact your image’s visual detail, file size, and how it appears on different devices and platforms.

Why Export Quality Matters

Choosing the right export quality is crucial. It helps balance between keeping image details and managing file size. 

High-quality images are essential for printing, whereas smaller files are suitable for websites and email sharing.

File Settings

File settings in Lightroom, including export quality and color space options like sRGB.

Export Settings

When configuring your export settings, it’s crucial to select the best export settings to ensure your images maintain optimal quality and performance for their intended use.

Managing File Size

To manage file size, adjust the quality slider, resolution setting, or image dimensions. Lower settings reduce file size but may affect image quality. Always aim for balance to maintain the best image quality without excessively increasing file size.

Exporting Multiple Images

When exporting multiple images, ensure you use the same settings for consistency. It’s especially important when you’re batch processing for a specific project or client requirement.

Using Lightroom Export Dialog

Lightroom Export Dialog provides numerous options to fine-tune your exports. Take advantage of it to set the right export settings for your needs.

Make sure to explore all tabs and experiment with different settings to find what works best for you.

Pro Tip: Before finalizing your export settings, preview the output to make sure you’re happy with the image quality and file size.

For more tips on optimizing your workflow, check out our articles on Lightroom Shortcuts and Best Lightroom Export Settings for Instagram.

Best Lightroom Export Settings

Exporting images from Lightroom is key for photographers. To get the best results, you need to understand Lightroom export settings and their impact on image quality.

Aspect Overview
Understanding Your Drone’s Camera and Settings Learn about key camera settings like ISO, shutter speed, aperture, white balance, and picture profile/color mode to enhance image quality.
Flight and Safety Precautions Conduct pre-flight checks, practice basic maneuvers, and understand no-fly zones to ensure safety and compliance.
Essential Add-Ons for Enhanced Photography Utilize accessories like ND filters, extra batteries, and carrying cases to improve the photography experience.
Creative Techniques and Composition Explore different angles and composition techniques to capture unique and visually interesting shots.
Advanced Flying Techniques Develop skills in advanced flying maneuvers such as orbiting, revealing, and tilt-revealing to create dynamic footage.
Editing and Post-Processing 
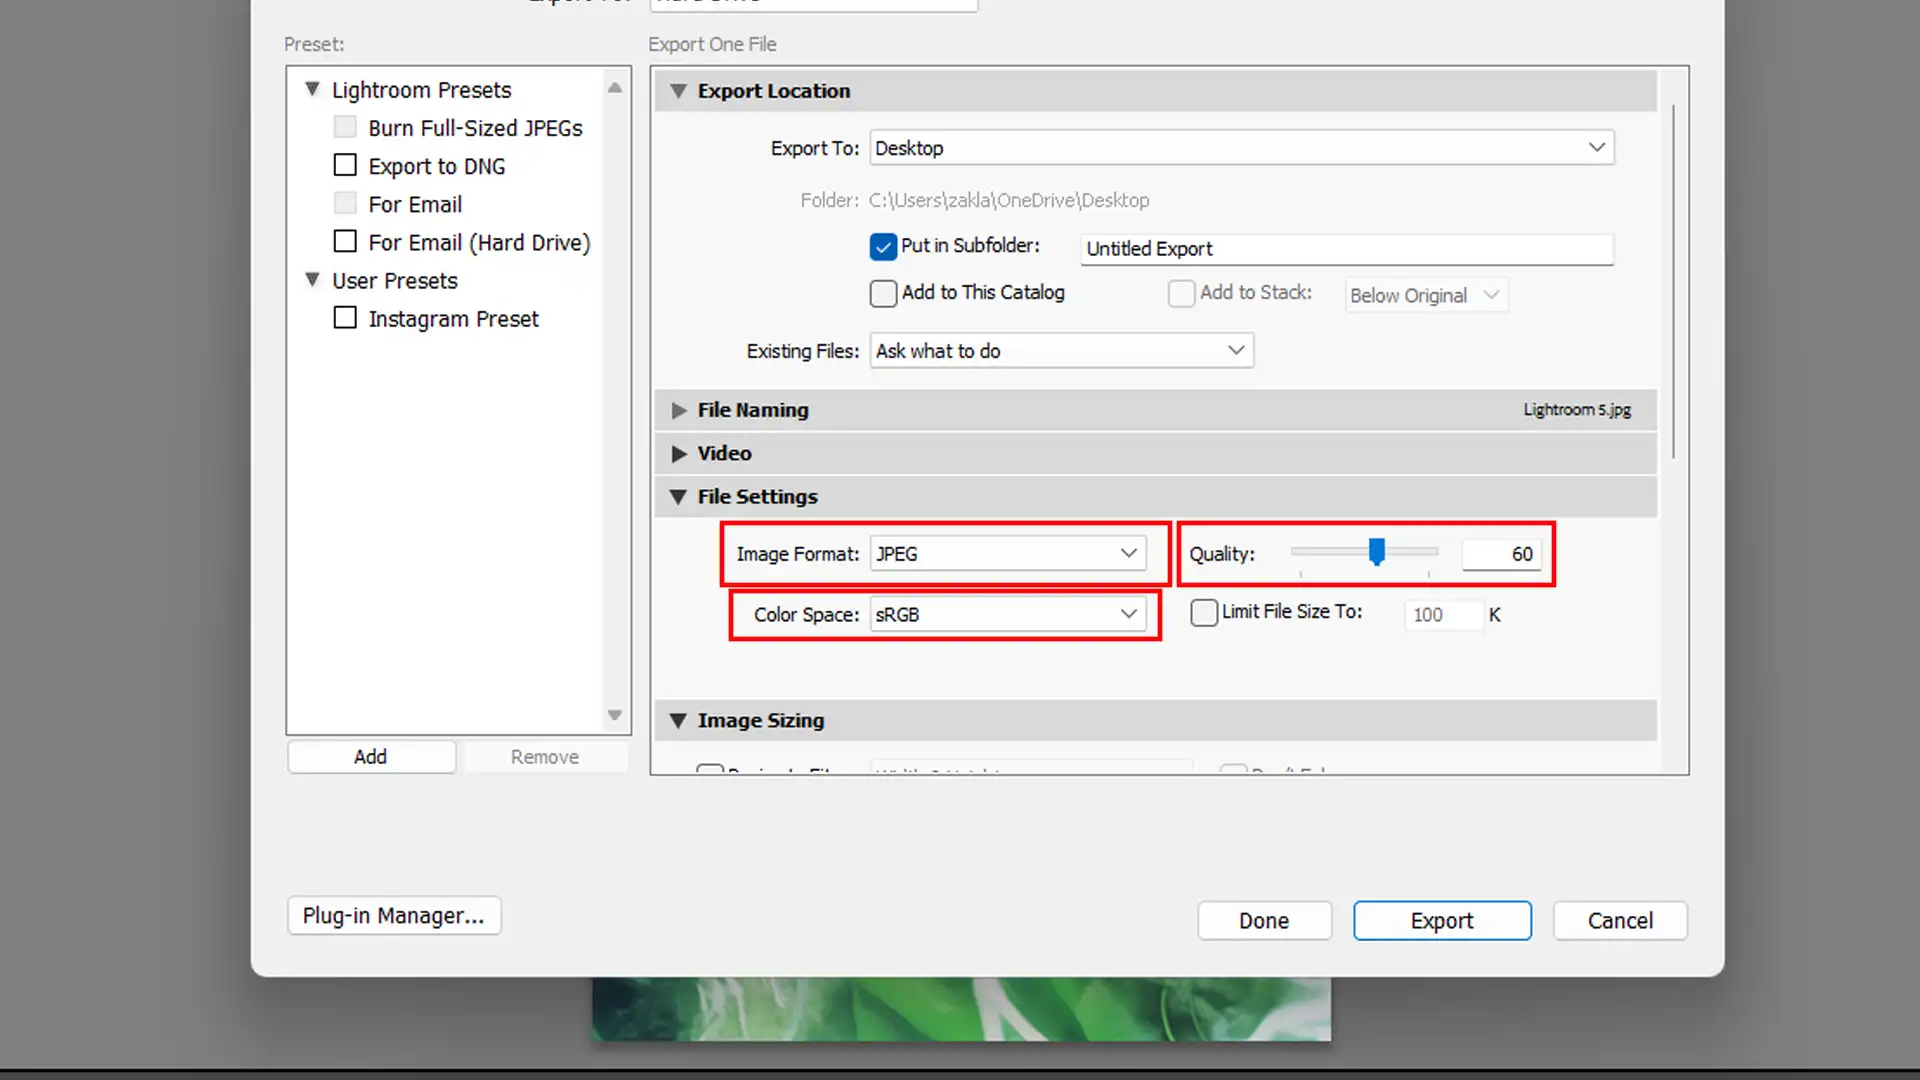
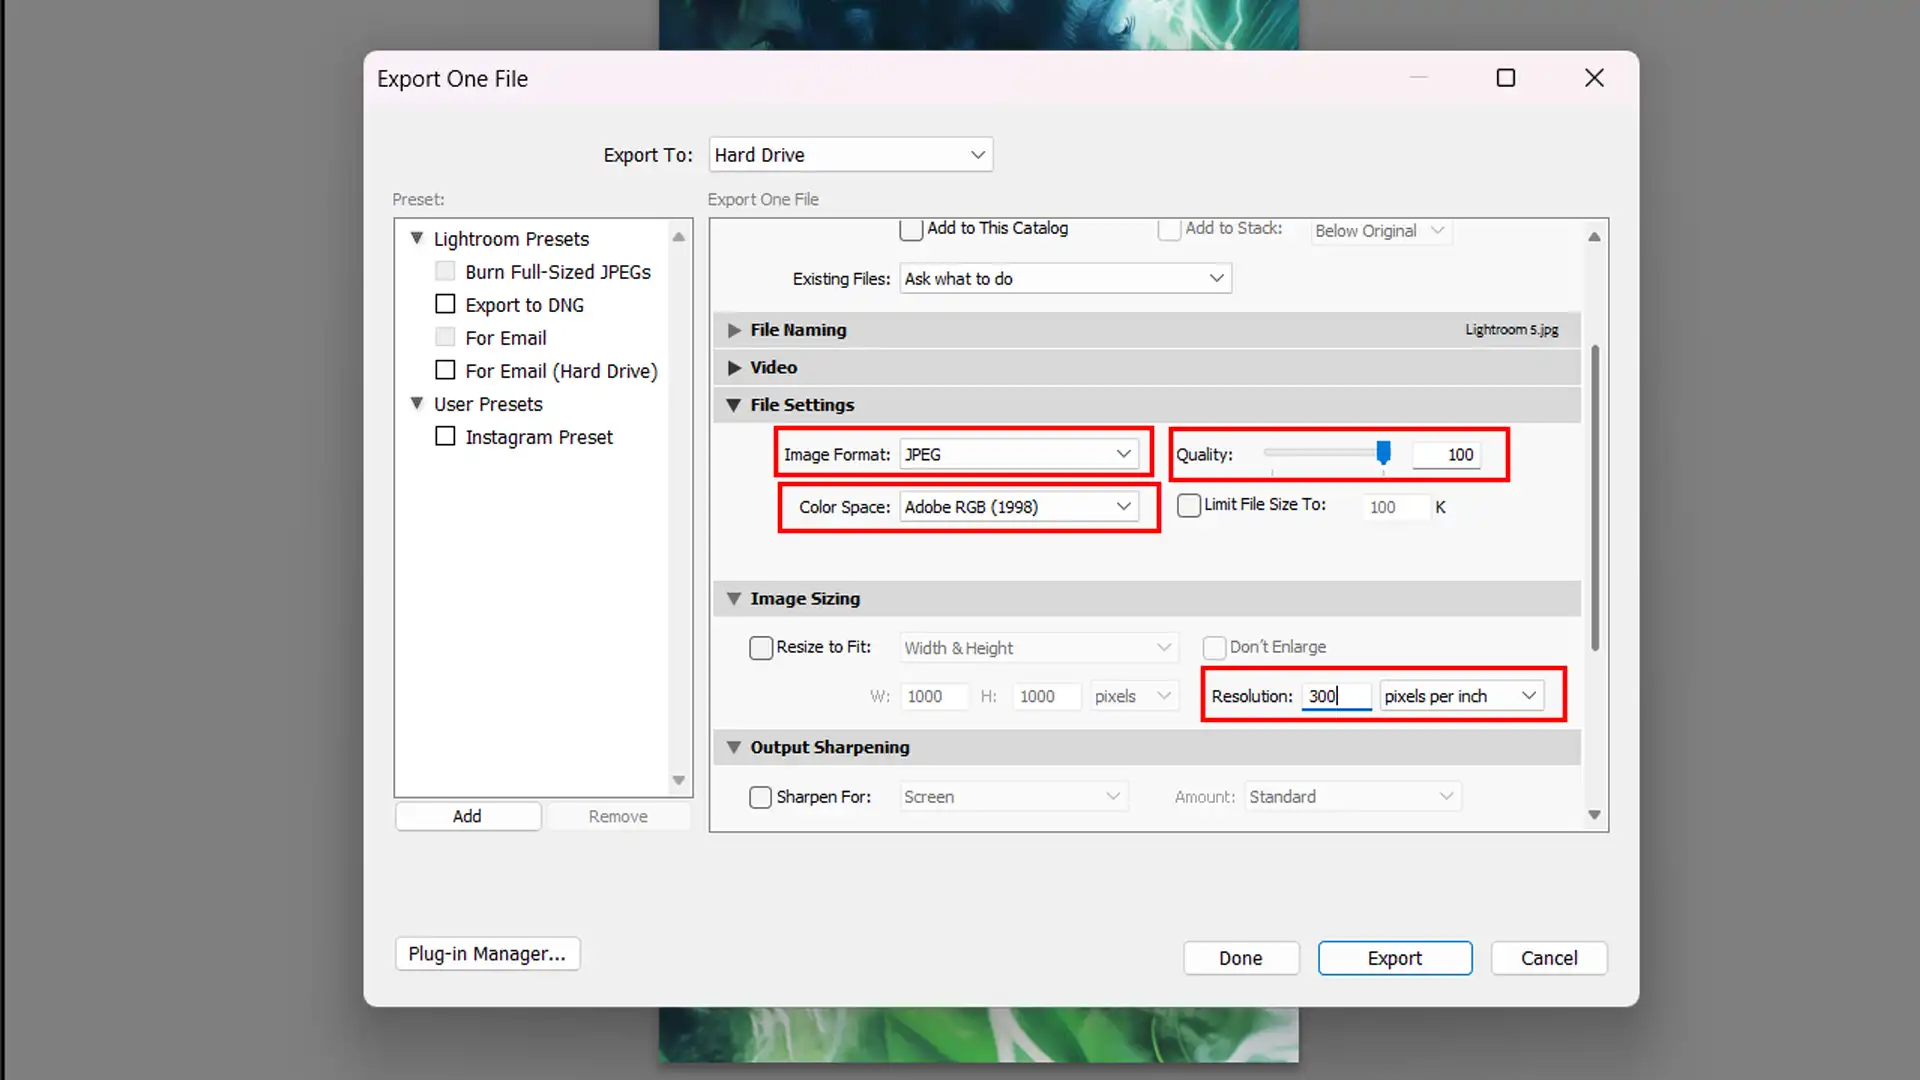
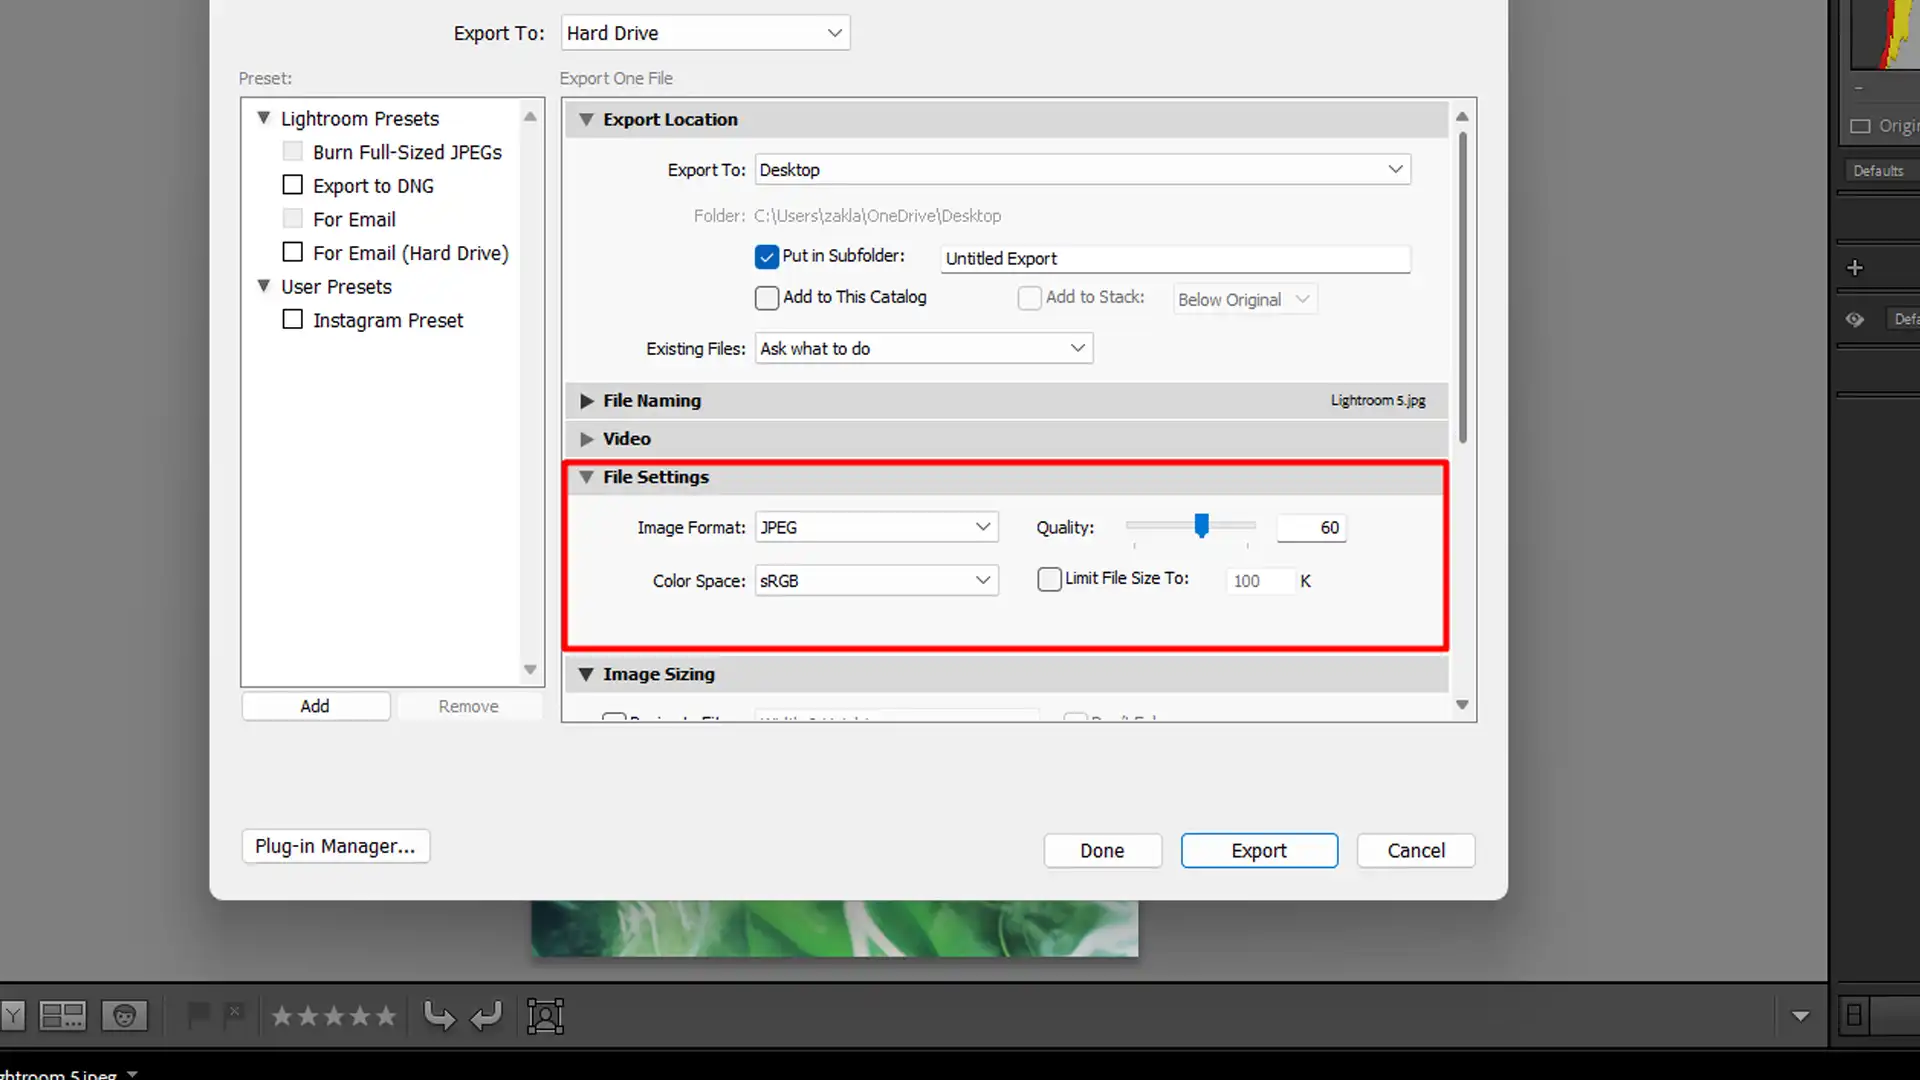
Use color correction, cropping, and HDR processing to refine images and bring out their best qualities.
Staying Current with Regulations Stay informed about FAA guidelines and local laws to ensure legal and safe drone operation.

By applying the best export settings, you can ensure that your images are optimized for both online sharing and high-quality prints.

Understanding what is camera raw is can enhance your Lightroom export settings.

Camera Raw allows for better image adjustments before exporting.

Recommended Settings for Different Uses

Sometimes we need different export settings for web, print, or social media. 

Let’s break it down:

Web

Use sRGB color space, set the quality slider between 60-80, and resize your image to 2048 pixels on the long edge.

Print

High-quality print settings in Lightroom, with a resolution of 300 pixels per inch and color space set to Adobe RGB.

Export in Adobe RGB, set the quality slider to 100, and ensure resolution is 300 pixels per inch (PPI).

Social Media

Use sRGB, quality slider around 70-80, and resize to 1080 pixels on the long edge for platforms like Instagram.

How to Adjust Export Settings

Let’s tweak some export settings to get high quality images:

Preset vs Custom Settings

You’re likely wondering whether to use preset or custom export settings. 

Here’s a quick guide:

Custom Settings

For specific needs, such as unique dimensions or high resolution prints, customize your settings to match the output requirements. 

Adjusting settings yourself gives control over the final output.

Pro Tip: Always preview your images before finalizing export settings. This ensures that you maintain the best image quality without unwanted surprises.

Remember, finding the right balance between detail, file size, and usability takes practice. Now go ahead, dive into those export settings and make your images shine!

For more advanced editing tips, consider exploring Lightroom shortcuts and essential tools in Lightroom to streamline your workflow and enhance your editing capabilities.

Quality Settings in Lightroom

Quality settings in Lightroom play a crucial role in determining the final size of your JPEG files. Lower configuration settings create smaller files, but you might lose details. 

On the other hand, higher-quality settings produce larger files that maintain more detail. 

Exporting images requires finding a balance. Most web browsers prefer images that load quickly, so lower-quality settings often work best for web use.

Balancing Quality and File Size

Lightroom export quality settings showing the balance between image quality and file size with an emphasis on quality slider set to 60.

Finding the sweet spot between quality and file size is essential for any photographer or enthusiast.

The best Lightroom export settings for web should employ sRGB color space with a quality slider set between 60-80. This ensures quicker load times without compromising too much on image quality.

For print, utilize Adobe RGB with a quality of 100 and a resolution of 300 PPI for the best results.

Mastering image quality involves finding the right balance between quality and file size. To achieve this, you need to manage how your images are compressed.

Exporting for Social Media

Let’s not forget social media. Exporting JPEG files for social networks is different:

This keeps your photos sharp and vibrant, adapted for mobile screens. 

Lightroom export settings offer immense flexibility for balancing quality, size, and format.

Preview and Presets

One key factor to remember: always preview your images before finalizing your export settings. This step ensures you maintain the same quality you aim for.

Presets can save time and ensure consistent outputs. But custom settings may sometimes be necessary for unique projects, like specific dimensions or high-resolution prints allocating additional space.

Pro Tip: Use Lightroom’s built-in presets for usual tasks to save time. Customize only when you have specific needs!

Exploring Lightroom’s options not only improves your efficiency but also enhances your final product. Simple steps make a big difference. 

Experiment, preview, and export!

File Size Considerations

When exporting JPEG files, file size matters. Smaller files mean less detail. As JPEG clarity drops, compression increases. Large JPEG files retain more details but can be cumbersome for web use.

Balancing this is essential.Why? 

Because too much detail might not be visible online, yet too little renders prints unusable. We must find a middle ground.

Managing File Size for Different Outputs

What are your needs? Web or print? 

For the web, sRGB color space and a quality slider of 60-80 usually suffice. This way, upload speed and display quality marry well. 

Preparing for printing takes a different route. Adobe RGB color space with a JPEG clarity setting at 100 ensures glorious prints. A

Always set the resolution to 300 PPI for crisp output.

When managing file size for different outputs, using a color filter in Photoshop can help maintain quality while reducing size. 

Tips for Reducing File Size without Losing Quality

Want smaller files but don’t want to lose too much detail?

Resize images appropriately. Export JPEGs at reduced dimensions when the full size isn’t necessary. 

Pro Tip: for social media, resize to 1080 pixels on the long edge. sRGB color space and a quality slider around 70-80 hit the sweet spot.

Presets Save Time

LR's export presets panel showing options like Instagram preset and full-sized JPEG export.

Create specific settings for frequent tasks and stick to them. Save each configuration under an intuitive file naming convention for swift access later.

Lightroom’s built-in presets cover most needs, but customizing can yield the best export settings for unique projects.

Experiment to Improve

Test each setting until you find what works best. Preview before you finalize any export. It helps you tweak and save the desired results.

When deciding between RAW or JPEG format, it’s crucial to balance file size and image quality. 

Understanding how each format affects your photos is key for those looking to reduce file size without losing quality.

Pro Tip: Always export RAW file formats alongside JPG files. This way, you keep a high-quality backup just in case. 

Mistakes happen, but being prepared helps mitigate them.

By exporting JPG files, you ensure that while the JPG quality may be reduced, you still retain the original RAW files for future adjustments and high-resolution needs.

How to Export Photos from Lightroom

Ready to export your photos from Lightroom? 

Let’s dive into the steps:

Choose a specific folder for your output by clicking the “Export To” option. Next, in the File Settings section, set the image format to JPEG. 

Adjust the Quality slider to 60-80 works well for web use. In the Image Sizing section, define dimensions if required. 3

Lastly, hit the Export button.

Common Export Issues and How to Fix Them

Sometimes exports don’t go as planned. 

Here are some common issues and their fixes:

These tweaks often solve most common issues.

Exporting for Different Platforms

Different platforms need different settings:

Pro Tip: Always save a RAW copy along with your JPEG file exports. This gives you a high-quality backup if something goes wrong. 

Frequently Asked Questions (FAQs)

FAQ image of software Distribute clarity

How to Export from Lightroom in High Quality?

Why Does Lightroom Export Low Quality?

What is the Quality Percentage in Lightroom Export?

What is the Best DPI for Lightroom Export?

Conclusion

Mastering Lightroom export quality can make a big difference in how your photos turn out. I remember struggling with this myself, often feeling frustrated when my final images didn’t look as great as they did in Lightroom. 

It took some trial and error, but I learned that adjusting settings like file format, quality slider, and color space is key to keeping your images sharp and vibrant.

If you’re looking for more detailed guidance, check out my Photoshop Course and Lightroom Course. They offer step-by-step instructions to help you get the best results. 

And if you’re not using Adobe’s tools yet, you can explore them on the official Adobe website: Adobe Photoshop and Adobe Lightroom.

Happy editing!

If this article has helped you, then Like and Share it with your friends
Facebook
Twitter
LinkedIn
Pinterest

Read more about Lightroom:

Download Your Free Guide Now!

Discover the secrets of photography with our printable guide! Master essential techniques like aperture, shutter speed, and ISO to create stunning images. Get your free printable PDF now and start turning your snapshots into masterpieces!