
I’m excited to share some insights on how to use Lightroom crop to specific size. Whether you’re a professional photographer or just someone who loves capturing memories, mastering this technique can significantly enhance your photo editing skills.
Have you ever struggled with achieving the perfect crop in your photos?
Imagine being able to tailor your images precisely to fit your needs, whether it’s for social media, printing, or any other purpose. Intrigued? Keep reading, and I’ll walk you through each step, making the process simple and enjoyable.
Table of Contents
I’m excited to share some insights on how to use Lightroom crop to specific size. Whether you’re a professional photographer or just someone who loves capturing memories, mastering this technique can significantly enhance your photo editing skills.
Have you ever struggled with achieving the perfect crop in your photos?
Imagine being able to tailor your images precisely to fit your needs, whether it’s for social media, printing, or any other purpose. Intrigued?
Keep reading, and I’ll walk you through each step, making the process simple and enjoyable.
Understanding Lightroom Crop Tool
Lightroom Classic helps us improve our photos with ease. One important feature is the crop tools. This tool allows us to change an image’s shape and size.
What is the Crop Tool?
The crop tools in Lightroom Classic trims parts of a photo. This creates a better frame or removes unwanted areas.
To begin, we open our photo in the Develop module and select the crop tools from the module picker.
Why Use the Crop Tool?
Using this tool makes our images look better. Adjusting the dimension ratio helps with print and web standards. For instance, social media photos have specific pixel sizes.
Crops can also draw attention to important elements in a photo.
How to Use the Crop Tool
- Select a photo and open the Develop module.
- Press "R" as a shortcut for the crop tool.
- Adjust the crop area using the corners.
- Use the lock icon to maintain the dimension ratio.
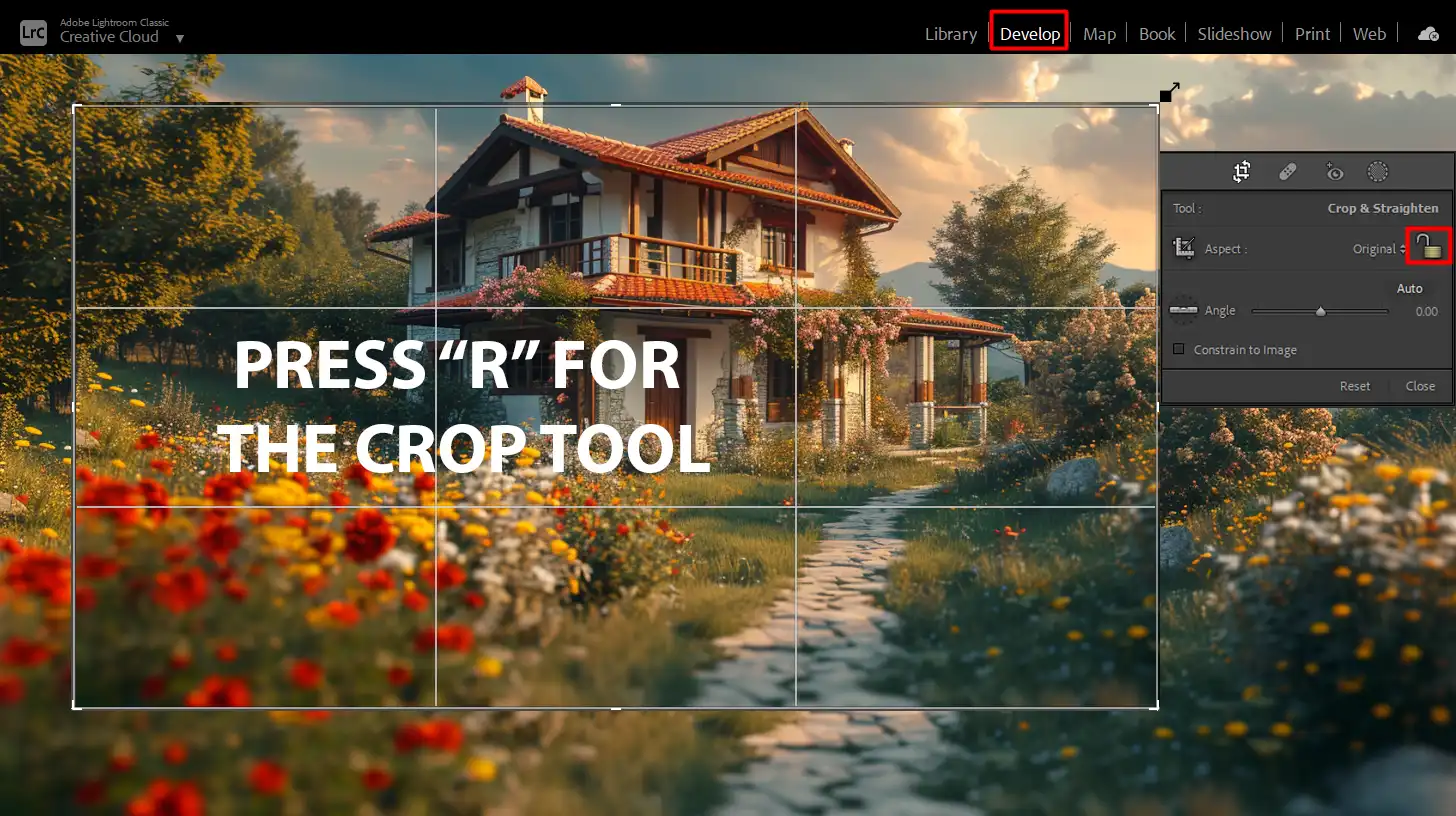
To crop to a specific size, we can enter the exact pixel dimensions. This is useful when the image needs to fit certain requirements, like for printing a passport photo or uploading to a website.
Setting the Aspect Ratio
In Lightroom Classic, several preset aspect ratios are available. We access these by clicking the dimension ratio drop-down menu.
Use custom ratio settings for unique sizes.
- Grid Overlay: Helps align elements.
- Angle Tool: Corrects image tilt.
- Crop and Straighten: Both actions at once.
When cropping, always aim to highlight the photo’s main subject. Be mindful of how the cropped image will be used, whether for web or print.
Matching Pixel Dimensions
Lightroom Classic also allows resizing to match specific pixel dimensions. This step ensures consistency across multiple images. It is particularly helpful when preparing a series of photos for a project.
Remember to review the cropped image before finalizing. Ensure the elements of interest stay within the frame. The Develop Module offers a preview of cropped dimensions and the overall impact on the image.
Pro Tip: Double-click the crop area to reset it quickly. This comes in handy after multiple adjustments.
For those familiar with cropping in Photoshop, transitioning to Lightroom’s crop tool offers similar precision but with additional features tailored for photo enhancement and specific size adjustments.
How to Use Lightroom Crop to Specific Size
Lightroom Classic helps you shape your photos just right. Let’s dive into the steps on how to get it done.
Accessing the Develop Module
First, you need to open your photo in the Develop module. Simple enough, right? Just click on the Develop tab at the top. It’s like walking into your personal photo lab.
Using the Crop Tool
To start cropping, Click “R” on your keyboard. You’ll see a grid guide appear on your image. Use the corners of this grid to adjust the resize area.
The goal here is to focus on the important parts of your photo.
Setting a Custom Aspect Ratio
Want a specific aspect ratio? Click on the dropdown menu near the lock icon. From there, choose from preset ratios or create your own custom ratio.
This helps you fit your image into specific dimensions, whether for web or print standards.
Adjusting Pixel Dimensions
Exact pixel size matters too. For precise adjustments, directly input your pixel dimensions. This feature is handy when you have to resize for particular uses. For example, resizing an image for social media asks for specific pixel dimensions.
Pro Tip: Double-click on the angle tool to straighten your image while cropping. It’s a two-for-one deal! Remember, practice makes perfect.
Each time you use these tools, you get a step closer to photo editing mastery. For more advanced edits, consider learning about Lightroom shortcuts to speed up your workflow.
Advanced Cropping Techniques: Lightroom Crop to Specific Size
Explore advanced cropping techniques in Lightroom to perfect your prints. Learn how to tailor your images for different print sizes and formats to ensure they look their best.
Here’s a comparison of different advanced cropping techniques in Lightroom, focusing on print, web, and maintaining image quality.
Use this table as a quick reference to improve your cropping skills and ensure the best results for your projects.
| Aspect | Overview |
|---|---|
| Cropping for Print | Ensure your photo has the right dimensions to fit perfectly on your print medium, using Lightroom crop tools for precision. |
| Cropping for Web | Resize images for web use, focusing on specific image ratios and pixel dimensions to ensure optimal appearance and performance. |
| Maintaining Image Quality | Use precise measurements and correct aspect ratios to maintain high image quality during cropping in Lightroom. |
| Using Photo Grid | Utilize the photo grid in Lightroom to align elements perfectly, ensuring a balanced and visually appealing crop. |
Cropping for Print
When we crop for print, we have to ensure our photo has the right dimensions. This way, it fits perfectly on your print medium.
Steps to Crop for Print:
- Open your photo in Lightroom Classic and click "R" to activate the crop tools. This is one of the important Lightroom shortcuts.
- Use the corners of the grid to adjust the crop area.
- Adhere to particular aspect ratios like 8x10 or 11x14.
- Enter the exact pixel size for precise results.
- Ensure the photo's resolution retains high quality.
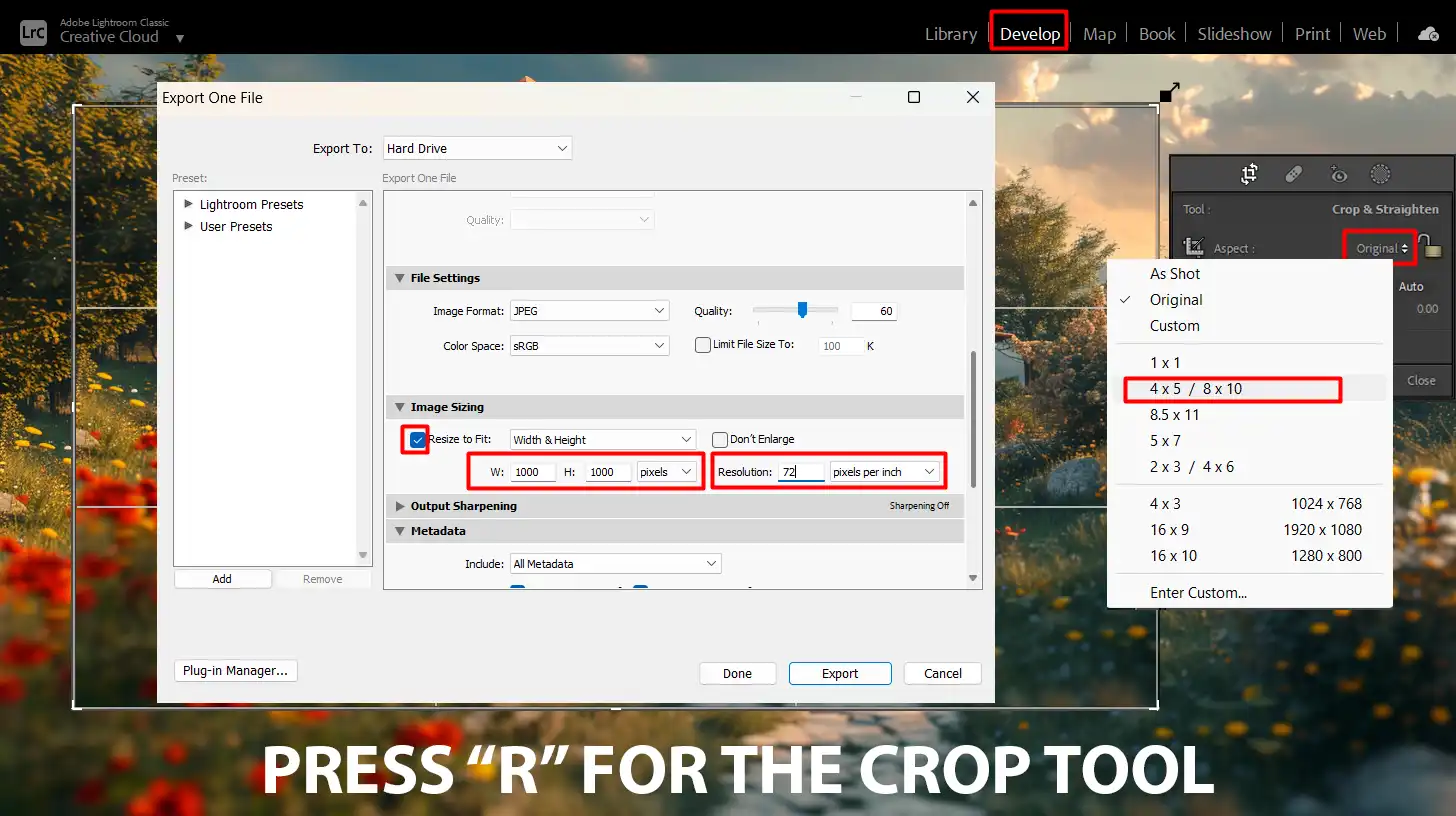
Remember, altering the pixel size can affect the final print. Double-checking your cropped dimensions helps.
Consider the longest edge of your photo to maintain optimal sharpness. Properly setting a crop size ensures your photo looks as good on paper as on screen.
Pro Tip: When using the photo grid in Lightroom to crop for print, keep an eye on the pixel dimension to maintain clarity.
Cropping for Web
Online photos often require a different approach. For web purposes, resizing is significant.
Steps to Crop for Web:
- In Lightroom Classic, make sure the crop tool is active by pressing "R".
- Use the grid overlay to position your crop.
- Adjust to a specific image ratio, like 16:9 for web content.
- Directly input the pixel dimension to ensure your photo fits well online.
Cropping can make or break the appearance. Verify the image size suits your intended use. Saving images with proper cropped dimensions reduces load time and enhances viewer experience.
Pro Tip: Regularly backup your library module to safeguard your edited work.
Maintaining Image Quality
Keeping image quality high while cropping is important. When you engage the crop tools, finding the perfect balance in resizing becomes significant.
Uniformity matters in every aspect, including crop sizes and pixel sizes. Pay attention to the exact size needed for your project. Double-click the angle tool to straighten any distortions that might occur when you crop and straighten.
Tips for Maintaining Image Quality:
- Using precise measurements, adjust the pixel size to avoid compromising quality.
- Lightroom crop to a specific size guarantees accuracy within your projects.
- Always aim for the right crop aspect ratio and verify it fits the criteria.
- Ensure cropped dimensions align perfectly; otherwise, the image may suffer from quality loss.
Pro Tip: Set aside time occasionally to practice these techniques; it helps improve your skills efficiently.
Common Cropping Issues and Solutions: Lightroom Crop to Specific Size
Encountering cropping issues in Lightroom? Let’s address common problems and find solutions to perfect your image adjustments, starting with aspect ratio challenges
Dealing with Image Ratio Problems
Image ratio issues occur when you try to fit an image into a certain size. This happens a lot during printing. When using Lightroom Classic, you can easily fix this with the crop tools. Click “R” to activate it and adjust the crop box to the desired dimension ratio.
Use the grid’s corners to get the right dimensions. Sticking to common ratios like 4:3 or 16:9 helps. For specific needs, you can enter the exact pixel size.
Always remember correct dimension ratio avoids stretching or squashing your images. If you need to change the dimension ratio in Lightroom, it’s straightforward and ensures your images maintain their intended composition.
Fixing Pixelation
Pixelation happens when you resize images too much, losing quality. In Lightroom Classic, start with high-resolution images for best results.
Use the resize tool to adjust the pixel size carefully. Avoid enlarging photos more than 200% of their original size. Correct pixel size maintains image clarity and details.
Check your images at 100% zoom to identify pixelation issues early. Adjust accordingly to keep image sharpness intact. For more advanced editing, consider using Photoshop to upscale images without losing quality.
Avoiding Unwanted Crops with Lightroom Crop to Specific Size
Sometimes, automatic cropping cuts out important parts of your image. To avoid this, always manually check the crop area after pressing “R“. When you crop, look at the whole image to ensure you’re capturing all critical parts. Use the crop overlay for better accuracy.
You can save specific crop settings in Lightroom’s library module for future use. Exact pixel size input also helps control unwanted image loss.
Keep your images well-framed and balanced by meticulous cropping checks. For complex edits, Photoshop offers more precise tools to manage and refine your crops.
Pro Tip: Regularly backup your Lightroom library to prevent data loss!
Tips and Tricks for Effective Cropping
Cropping images well can make a big difference in presentations. In this section, we explore some techniques.
Using Grid Overlays
Grid overlays help achieve balanced composition. When editing photos in Lightroom, I always start by enabling the grid overlay tool. This simple step helps keep everything aligned neatly.
Steps to Use Grid Overlays:
- Enable the grid by pressing "O" while in crop mode.
- Switch between different grid types by pressing "Shift + O."
- Choose a grid that fits your photo's needs. For me, it’s about fitting the elements within the frame.
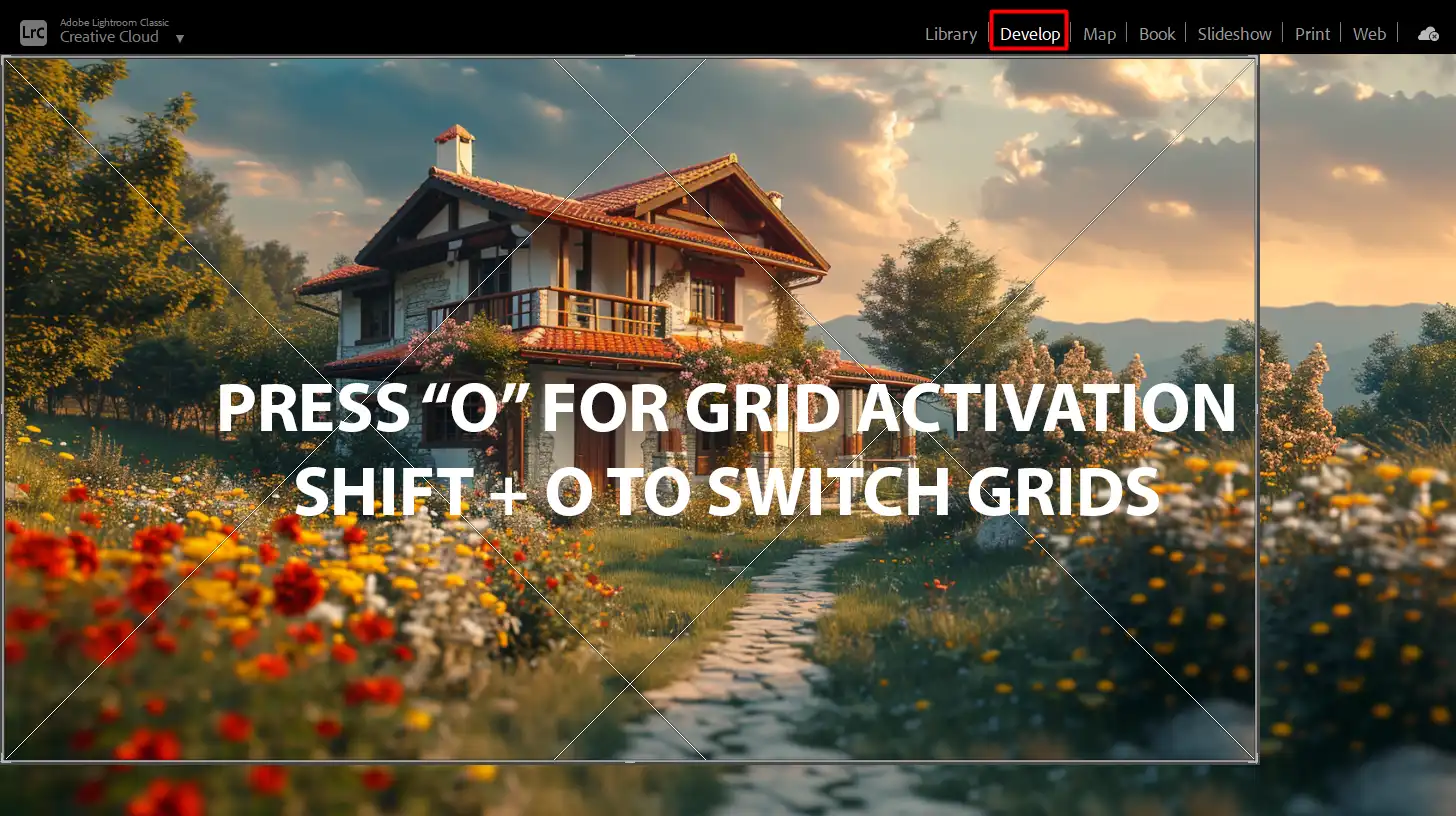
If you’re unsure, stick to the classic grid. It’s useful for aligning the long edge of landscapes.
Leveraging the Rule of Thirds
The rule of thirds helps make photos more engaging. Imagine breaking your photo into nine parts using two horizontal and two vertical lines. Interesting points should lie where these lines intersect.
How to Apply the Rule of Thirds:
- Activate this grid by pressing "O" until the rule of thirds appears.
- Align important elements along the lines or at intersections.
- Keep subjects slightly off-center for a natural feel.
Remember, rules are guides. Feel free to adjust based on your creative vision.
Cropping for Composition
Great compositions involve intentional cropping. Lightroom allows you to crop to specific size settings to match photo to print dimensions perfectly.
Specific pixel size matters when printing high-quality photos.
Steps for Effective Cropping:
- Click"R" to open the crop mode.
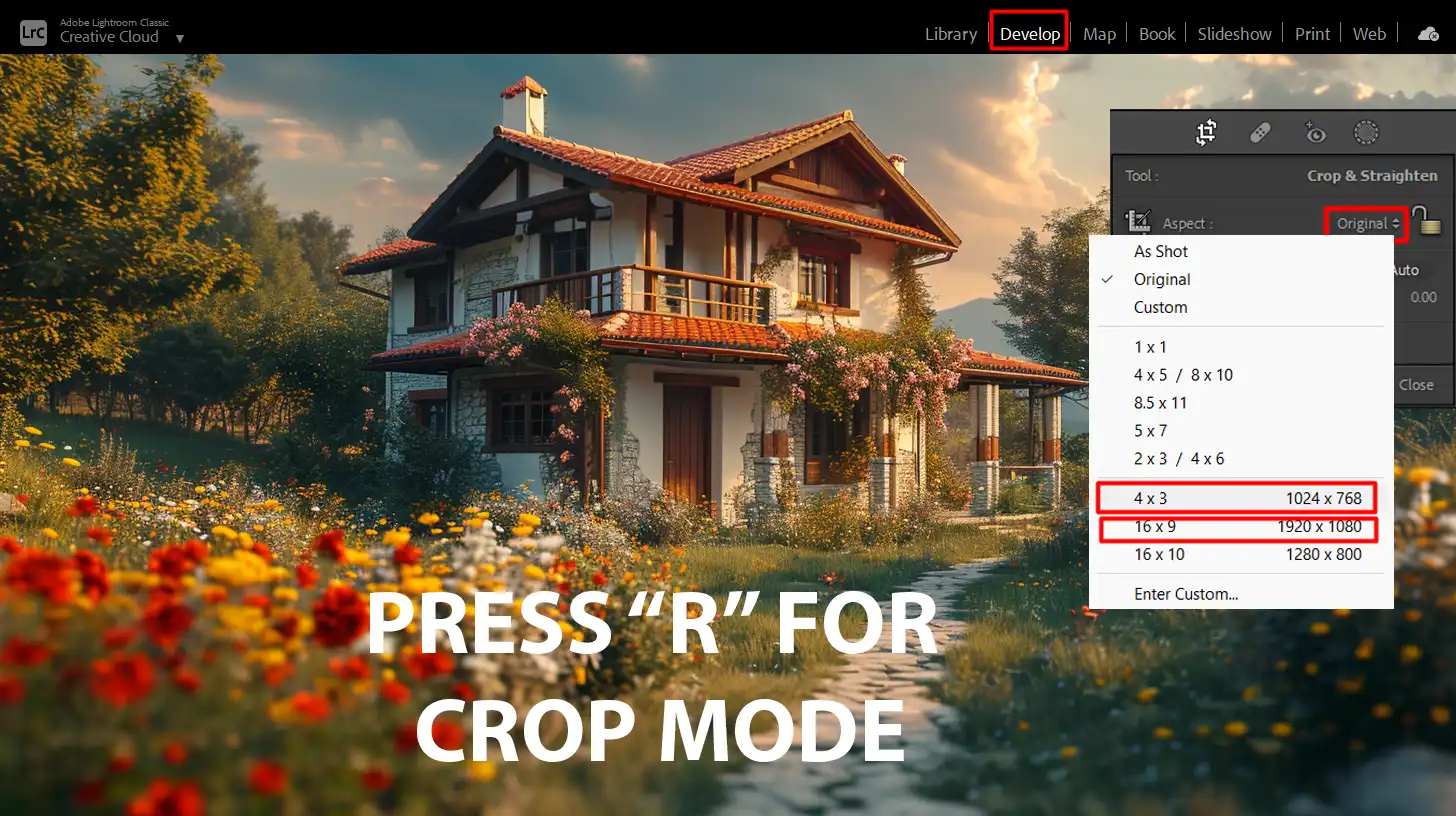
- Use preset aspect ratios for common needs like 4:3 or 16:9.
- Adjust the handles to crop your photo quickly.
I find that manually inputting cropped dimensions ensures accuracy. The right crop enhances the storytelling element of the photo.
Pro Tip: Backup your image edits regularly. Avoid unexpected loss of hours of work with this simple habit.
Recap of Important Points: Lightroom Crop to Specific Size
We dive into crafting better photos by focusing on grid overlays, the rule of thirds, and cropping techniques.
Grid Overlays
Grid overlays provide a reliable guide to structure and balance compositions. Use “O” to enable them in crop mode and switch grids with “Shift + O.” Different grids benefit various photo types.
The Rule of Thirds
The rule of thirds enhances engagement through strategic alignment of significant elements along grid lines or intersections. Remember, off-center subjects bring a dynamic feel.
Intentional Cropping
Intentional cropping is significant for fitting specific dimensions and storytelling. Open crop mode by pressing “R” and use presets like 4:3 or 16:9 for efficient resizing. It helps in maintaining proportions while emphasizing focal points.
Don’t forget to back up your edits regularly to avoid losing your precious work.
Final Thoughts on Lightroom Crop to Specific Size
Mastering these photo editing techniques isn’t rocket science. With practice and patience, you’ll significantly improve your images.
Grid overlays, the rule of thirds, and precise cropping make a difference in composition. Applying composition rules, such as the rule of thirds and using grid overlays, along with precise cropping, can transform your photos.
So, the next time you’re in Lightroom, remember to integrate these tips:
- Hit "R" for easy cropping
- Apply the rule of thirds
- Adjust those grid overlays
Experiment and see your photos transform.
Pro Tip: Keep exploring and learning. Your skills only get sharper with continuous practice. Consider diving into Lightroom training to further enhance your editing prowess.
Frequently Asked Questions

What’s the Process for Lightroom Crop to Specific size?
- Open your photo in Lightroom.
- Select the Crop Overlay tool from the toolbar or click R on your keyboard.
- In the crop panel, you can manually enter the dimensions you desire in the aspect ratio box.
- Adjust the crop frame on your photo as needed.
- Press Enter or double-click inside the crop frame to apply the crop.
What are the steps to Lightroom Crop an image to a Specific Size?
- Launch Lightroom and load the image you want to crop.
- Activate the Crop Overlay tool by clicking on it or pressing R.
- Enter the specific dimensions or select a preset from the aspect dropdown menu.
- Adjust the crop boundaries on your image.
- Apply the crop by hitting Enter or double-clicking inside the frame.
How to Crop to a Specific Aspect Ratio?
- Open your image in Lightroom.
- Hit R to bring up the Crop Overlay tool.
- Open the aspect ratio dropdown and choose or type a specific ratio like 1x1, 16x9, etc.
- Move the crop handles to suit the area you want to keep.
- Confirm the crop by pressing Enter or double-clicking the crop area.
How to Constrain Crops in Lightroom?
- Open the desired image in Lightroom.
- Select the Crop Overlay tool or click R.
- To lock the aspect ratio, click the padlock icon in the tool options.
- Choose your desired aspect ratio from the list or input it manually.
- Adjust your crop area and finalize it by pressing Enter or double-clicking.
Conclusion
Mastering the “Lightroom crop to specific size” feature has truly transformed my photo-editing workflow. This tool has allowed me to achieve precise dimensions effortlessly, ensuring my images meet specific requirements for various projects.
By streamlining the cropping process, I’ve saved valuable time and maintained consistency across my portfolio.
If you’re looking to enhance your editing skills and make the most out of Lightroom’s powerful features, I highly recommend checking out this comprehensive Lightroom course.
For those of you who want to dive deeper into photo-editing techniques, this Photoshop course will provide you with the knowledge you need.
Both courses have been pivotal in my growth as a photographer and editor, and I believe they can do the same for you.
Read more about Photoshop:


