Have you ever felt frustrated trying to perfectly crop your photos in Lightroom, wishing there was a quicker way? In this article, I’ll guide you through the Lightroom crop shortcut that will transform your editing workflow.
Imagine the time you’ll save and the precision you’ll gain. Curious to learn how?
Let’s get started and discover the magic of efficient cropping.
Table of Contents
What is Lightroom Crop Shortcut
Lightroom is a powerful tool in the world of photo editing. The crop tool allows users to enhance their images effectively. In this guide, we will explore the Lightroom crop shortcut.
Why Use Lightroom Crop Shortcut?
Shortcuts make your work process faster. When you use the Lightroom crop tool, you often need to quickly adjust the dimensions of your photo.
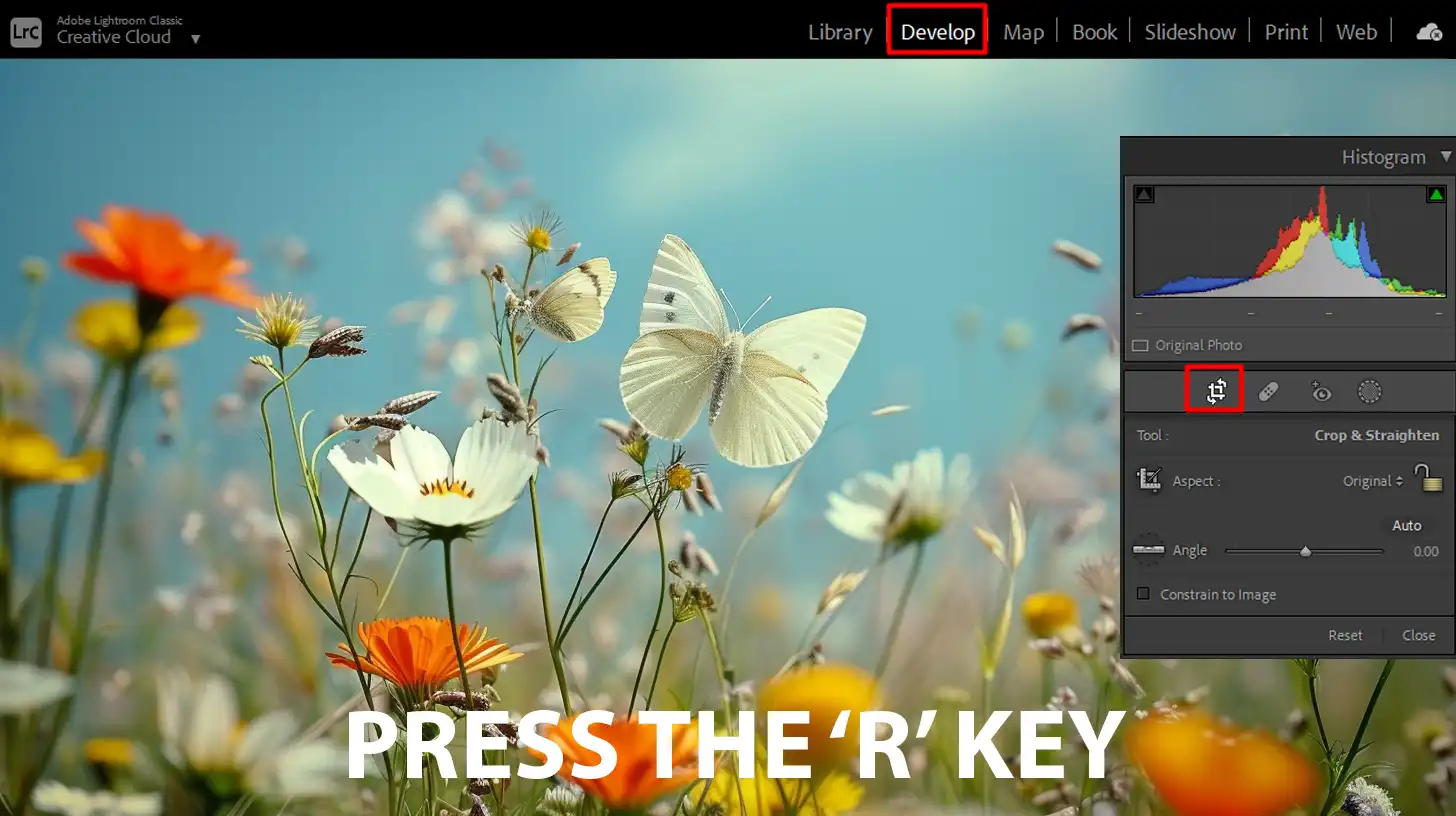
The Lightroom crop shortcut speeds up this process. Use the crop shortcut ‘R’ in Lightroom to instantly activate the cropping tool.
No more searching through menus! This simple command gets you into cropping mode, ready to fine-tune your images.

Benefits of Using Shortcuts in Lightroom
Using shortcuts like the Lightroom crop shortcut enhances your work process speed. Less time navigating menus means more time editing.
Picture editing becomes less cumbersome and more efficient. Lightroom shortcuts also minimize mouse movements.
This reduces hand strain during long editing sessions.
By learning a few key commands, you can switch tools, adjust settings, and perfect compositions quickly.
Imagine adjusting your aspect ratio or switching to grid view expertly with just a few button presses. All these shortcuts save you significant time and effort.
Familiarize yourself with the develop module keyboard shortcuts. This habit will streamline your editing process.
Tools like the adjustment brush or the radial filter become easier to use with handy shortcuts.
Pro Tip: Consistently use the ‘Shift’ key along with other commands to modify the effect of your keypresses.
For instance, Shift + R might bring up an alternative crop mode if your Lightroom version supports it. Remember that these small changes accumulate.
Mastering keyboard shortcuts turn you into a more proficient and faster photo editor. Efficiency in editing keeps your attention on the creative aspects rather than repetitive tasks.
For those looking to delve deeper into photo editing, understanding the difference between Photoshop and Lightroom can further enhance your skills.
Additionally, exploring Lightroom training resources can provide you with advanced techniques to elevate your editing game.
Getting Started with Lightroom Crop Tool
The journey with the Lightroom’s crop tools begins by hitting the ‘R’ key on your keyboard. This simple shortcut immediately brings up the cropping interface, allowing you to adjust the composition of your images.
If you prefer using the mouse, you can access the tool through the Develop module, just click on the crop icon located under the histogram. Whether you use a shortcut or navigate the menu, either method works fine.
Basic Functions of the Crop Tool
In the cropping interface, you have access to several essential features:
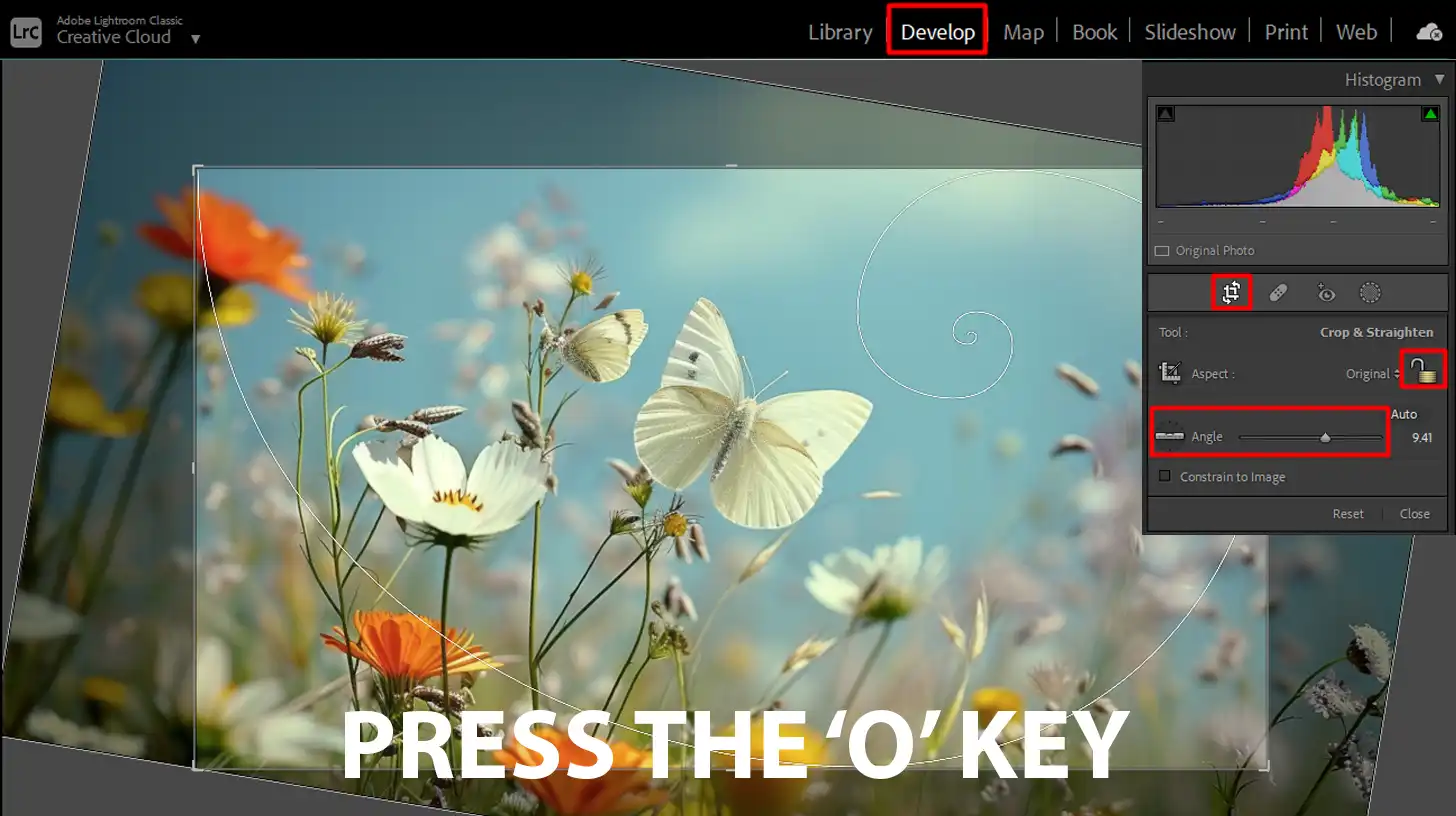
- Rotate your image by dragging outside the corners of the crop box.
- Adjust the aspect ratio by clicking the lock icon and selecting from predefined ratios like 1:1 or 16:9.
- Align your image's grid with the golden ratio or other rules of thirds by pressing the 'O' key.

Remember, adjusting crop and aspect ratio all the time ensures precision.
Understanding Crop Mode
In crop mode, sneaky tricks come in handy:
- Pressing the Shift key while dragging constrains your crop to the original aspect ratio, keeping perfect compositions intact.
- Using keyboard shortcuts like 'A' for Auto Crop aligns your horizon straight away.
Getting around Lightroom’s cropping features keeps your workflow smooth and efficient.
Once you master these basics, you’ll find that cropping becomes second nature.
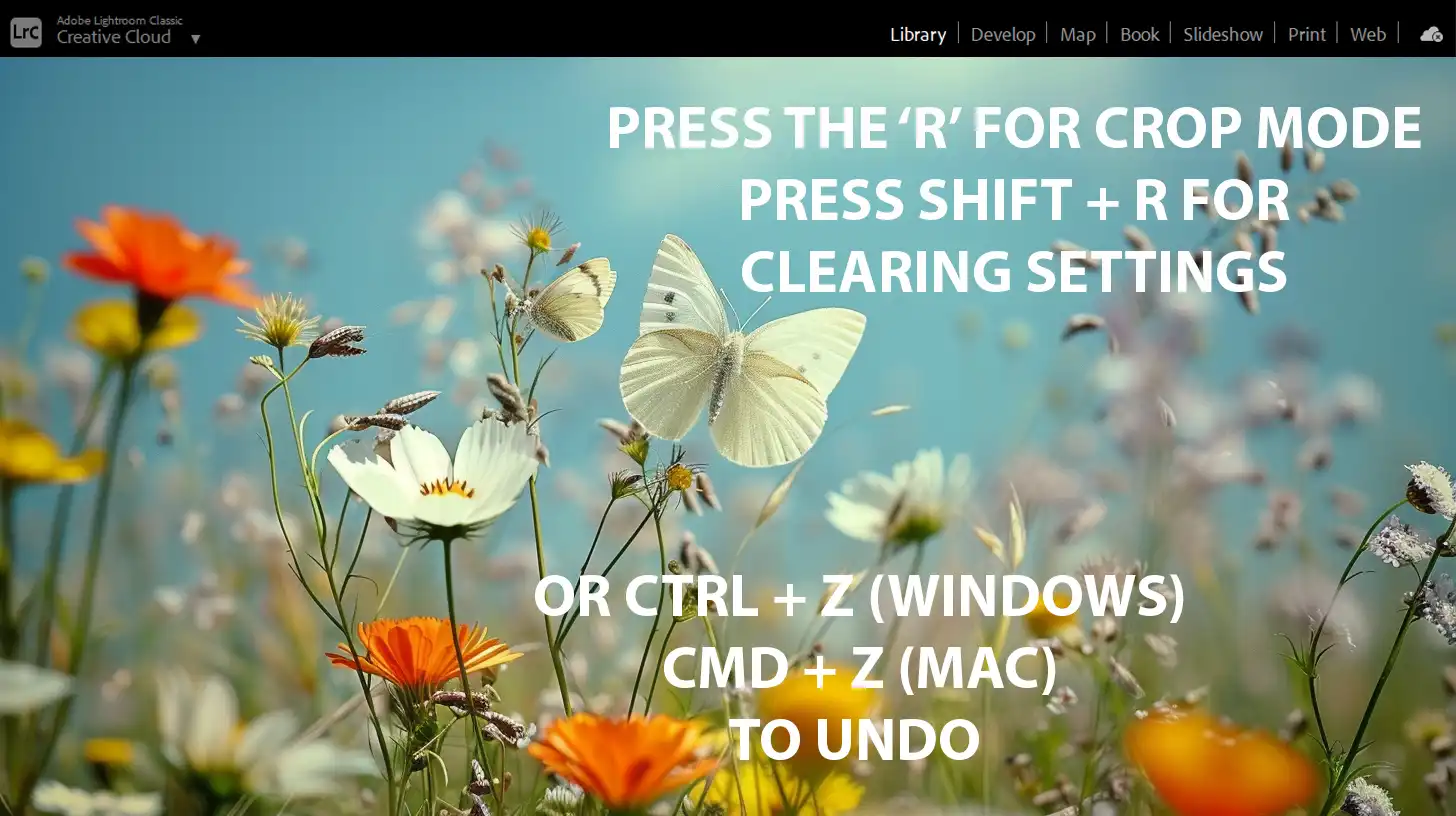
Pro Tip: If you accidentally mess up your crop, just hit Ctrl + Z to undo any unwanted changes. Also, feel free to experiment; editing isn’t a one-way street.
That’s it for this quick guide to getting started with the Lightroom’s Crop Tool.
Just as the layer shortcut in Photoshop helps you manage layers efficiently, understanding Crop Mode in Photoshop is crucial for precise editing.
Both shortcuts improve your workflow by streamlining essential tasks.
Using Lightroom's Crop Shortcut Effectively
To begin, press ‘R’ to access the Crop Tool. It’s an efficient Lightroom’s shortcut that starts your process.
Next, click on the crop icon in the Develop module if you prefer a visual approach.
Hover your cursor outside the crop box corners and drag to rotate the image. This movement helps you correct any tilt. Clicking the lock icon allows you to adjust the aspect ratio. Select from predefined ratios available.
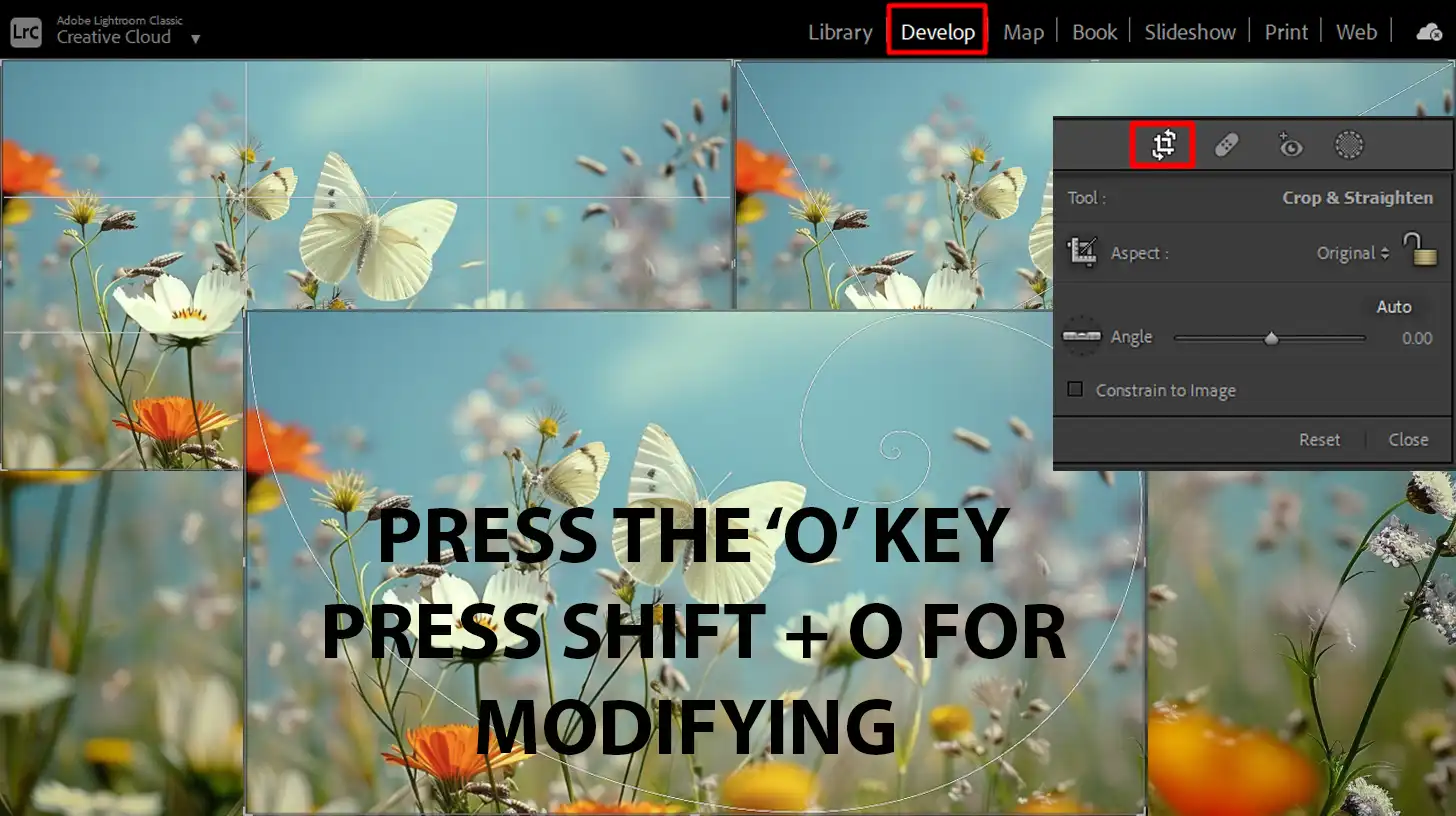
You can align your image by using Lightroom’s composition guides. Press ‘O’ to cycle through different guides. Each guide shows on the screen and can help achieve perfect composition.
Holding the shift key while dragging keeps the aspect ratio locked to its original form. It’s a nifty way to constrain your crop precisely. You may also press ‘A’ to auto-align if a straight horizon is what you seek.
Don’t worry about making mistakes. Use `Ctrl + Z` to undo any changes quickly. Cropping and adjusting the image graciously enhances your editing experience.
Common Mistakes to Avoid
When using keyboard shortcuts, it’s essential not to rush. Over-clicking can lead to an undesired outcome. One common mistake is not locking the aspect ratio with the shift key. It can distort the images, making the final edit look odd.
Another point to note is avoiding unnecessary rotation. Slight adjustments are good, but excessive rotation can spoil the natural look of the image. People often forget to align the grid properly, rendering an unbalanced photo.
Lastly, don’t ignore the undo feature. Hitting `Ctrl + Z` can save your work if things go awry. It’s a simple yet potent part of editing that should always be in mind.
Tips for Faster Editing
Here are some tips for enhancing your speed in Lightroom:
- Integrate more keyboard shortcuts into your process flow. Using shortcuts like `Ctrl + Z` or holding the shift key saves clicks and improves efficiency.
- Always keep a consistent aspect ratio when cropping. This practice reduces the need to make multiple adjustments later on.
- Use composition guides to ensure perfect alignment, speeding up your overall process.
- Make small incremental edits. Large sweeping changes can often require more corrections later. Efficient cropping begins with minor tweaks, refining the image incrementally.
- Adjust the brush size during editing for added precision. While not directly related to cropping, having control over your tools boosts overall productivity.
Pro Tip: Switch to full-screen mode (‘F’ key) when editing for a clearer view of your changes without distractions. It allows you to focus solely on the image, ensuring a higher quality final product.
Advanced Techniques with Lightroom's Crop Tool
Lightroom’s Crop Tools offers more than just trimming the edges of your images. Let’s get started into some advanced techniques that not only simplify your work process but also enhance your final edits.
Discover how to crop images effectively in Photoshop with our easy-to-follow guide. Mastering this technique can enhance your compositions and improve your overall editing efficiency.
Customizing the Crop Overlay
One of the most powerful features within Lightroom’s is the ability to customize the crop overlay. This allows you to change the gridlines showing on your image as you crop, making it easier to align elements and enhance composition.
- Press 'O' to cycle through various overlays, such as thirds, diagonal, and golden ratio.
- If a specific guide isn't what you want, press 'Shift + O' to modify the orientation of some overlays.
- Using these Lightroom's shortcuts helps ensure your images maintain a balanced and aesthetically pleasing look.

Using Aspect Ratio for Better Composition
Maintaining the correct aspect ratio while cropping improves the composition of your images. Changing the aspect ratio can completely alter how your audience perceives the image.
- Click on the lock icon beside the aspect ratio dropdown to unlock custom aspect ratios or choose from preset ones like 1:1 for square photos.
- Hold down the 'Shift' key while dragging corners to keep the original aspect ratio intact, a handy keyboard shortcut you'll use all the time.
- Aspect ratios help ensure the essence of the image remains intact despite cropping.
Creative Cropping Ideas
Cropping isn’t just about trimming the edges, it’s also about rethinking the entire frame. A creative crop can turn an otherwise ordinary photo into a work of art.
- Try cropping to focus on a subject's eyes, making the image more engaging.
- Crop out distractions or unwanted elements in the background to simplify the scene.
- Experiment with unusual aspect ratios, sometimes a panoramic crop lends a new perspective to your images.
Pro Tip: Use the ‘A’ key to auto-align your image for a straight horizon. This not only saves time but also ensures professionalism in your composition.
Troubleshooting Common Issues
Has your crop tools suddenly stopped doing its job? Don’t worry, you’re not alone. This can sometimes happen if you accidentally lock aspect ratios or use unusual settings.
Steps to Fix:
- Ensure you haven't locked the aspect ratio. Disable this mode by checking that the 'Lock' icon isn’t activated at the top of your display.
- Verify the grid options. Try pressing 'O'. If that doesn’t help, holding 'Shift + O' might do the trick.
- Clear unnecessary settings to refresh your tools. Go to 'Edit' and select 'Preferences' to further customize your settings.
- A quick reset can save you heaps of time.
Resetting Crop Settings
Sometimes your crop tools just doesn’t feel right. So, reset it!
Locate the ‘Tool Settings’ menu and look for ‘Reset Tool’. This action returns the tool to its original state, including aspect ratio, gridlines, and overlays.
Quick Tips:
- If you notice sluggish performance or unusual behavior, resetting could be your quick fix.
- Lightroom's shortcuts improve speed and efficiency. Take advantage of keyboard shortcuts, like pressing 'R' to enter crop mode. Quick and effective, these actions make life easier.
Dealing with Aspect Ratio Problems
Dealing with aspect ratio issues is a common struggle. The key is understanding how to maintain or unlock the aspect ratio.
Solutions:
- In Photoshop, hold 'Shift' while dragging corners to keep your images proportional. Switch to freeform mode if the ratio perplexes you.
- In Lightroom, choose presets or create custom ratios right from the toolbar. This allows for creative crops that fit your vision better.
- Always remember to align those horizons for professional-looking results.
Pro tip: Consistent practice speeds up your work process. Familiarize yourself with Lightroom’s shortcuts to become more efficient.
Optimizing Your Workflow with Shortcuts
Do you ever feel like your editing process is dragging, even when you think you’re done? The key is optimizing your process flow with shortcuts.
| Shortcut | Function | Benefit |
|---|---|---|
| ‘R’ | Crop Mode | Quickly enter crop mode |
| ‘Shift + R’ | Clear Crop Settings | Reset crop settings instantly |
| ‘Cmd/Ctrl + Z’ | Undo Actions | Undo multiple actions rapidly |
| ‘G’ | Grid View | Compare photos side by side |
| ‘D’ | Develop Mode | Start adjusting settings immediately |
| ‘O’ | Crop Guides | Toggle between crop guides for better composition |
Trust me, it’s like finding a secret path through a maze
Combining Shortcuts for Efficiency
To start, combining shortcuts for efficiency makes a difference. For example, in Lightroom, pressing ‘R’ activates crop mode instantly. Pair this with ‘Shift + R’ to clear settings quickly. It’s like unlocking new levels in a game.
Another trick is to use ‘Cmd/Ctrl + Z’ to undo multiple actions rapidly. This saves time and avoids unnecessary clicks. It’s magic at your fingertips.

Creating Custom Lightroom Shortcuts
Next, creating custom shortcut, personalizes your workflow. Head to ‘Edit > Keyboard Shortcuts in Photoshop. Assign Lightroom shortcuts that feel natural. Make them intuitive. Shift complex sequences to a single keystroke, such as ‘F1’ for ‘New Layer’.
In Lightroom, save specific presets with your own hotkeys. For example, press ‘Shift + 1’ for black and white conversion. Your fingers will soon dance across the keyboard effortlessly.
Integrating Other Lightroom Shortcuts
Integrating additional Lightroom’s shortcuts enhances efficiency:
- Using 'G' brings grid view. Handy for comparing photos side by side.
- Press 'D' for develop mode. Start tweaking settings right away. Navigation becomes seamless.
- Don’t forget the 'O' key. Switch between different crop guides. Focus on composition without guessing. These little hacks make your life easier.
Pro Tip: Spend a few minutes customizing and practicing these Lightroom shortcuts every day. Your muscle memory will develop, and soon, editing will be faster than ever.
By incorporating these Lightroom shortcuts, you optimize your workflow. Editing becomes a joy, not a chore.
So why wait? Start integrating these tips today and watch your productivity soar!
Frequently Asked Questions

What is the shortcut key for crop in Lightroom?
- To crop an image in Lightroom, press R on your keyboard. This will activate the Crop & Straighten tool.
How do I quickly crop in Lightroom?
- Quickly cropping in Lightroom can be done by pressing R. This opens the crop overlay where you can adjust the crop boundaries as needed.
What is the shortcut key for the crop tool?
- The shortcut key for accessing the crop tools in Lightroom is R. This allows you to enter the cropping mode instantly.
What does Ctrl+S do in Lightroom?
- In Lightroom, pressing Ctrl+S (Command+S on macOS) saves the metadata of your photos to the file or to a sidecar file.
Conclusion
Mastering the Lightroom crop shortcut has truly transformed my photo editing workflow. By simply pressing ‘R’, you can quickly access the crop tool and make precise adjustments without wasting time navigating through menus.
This small tip can make a big difference in your editing speed and accuracy.
I’ve found that using shortcuts like this not only saves time but also makes the whole editing process smoother. If you’re looking to dive deeper into photo editing, check out my Photoshop Course and Lightroom Course.
For more on Adobe’s editing tools, visit Adobe Photoshop and Adobe Lightroom.
Give this shortcut a try and see how it can make your photo editing more efficient!
Read more about Lightroom:


