
Are you struggling with unwanted objects in your photos and wondering how to remove objects in Lightroom? You’re in the right place! In this article, I’ll guide you through the simple steps to make those distractions disappear, leaving you with stunning images.
Imagine being able to perfect your shots with just a few clicks. It sounds exciting, right?
Whether you’re a seasoned photographer or just starting out, mastering this technique will take your editing skills to the next level.
Ready to transform your photos? Let’s dive in and discover how easy it can be!
Table of Contents
How to Remove Objects in Lightroom
Let’s dive into the practical use of Adobe Lightroom to remove unwanted elements from your photos. You’ll learn how to make those distracting items vanish, keeping the focus where it should be.
We will cover the essentials like using the clone tool, healing brush tool, and generative AI. Let’s get started.
Step-by-Step Guide to Removing Unwanted Objects in Lightroom
Removing objects in Lightroom Classic is straightforward when you follow these steps:
Open your Image
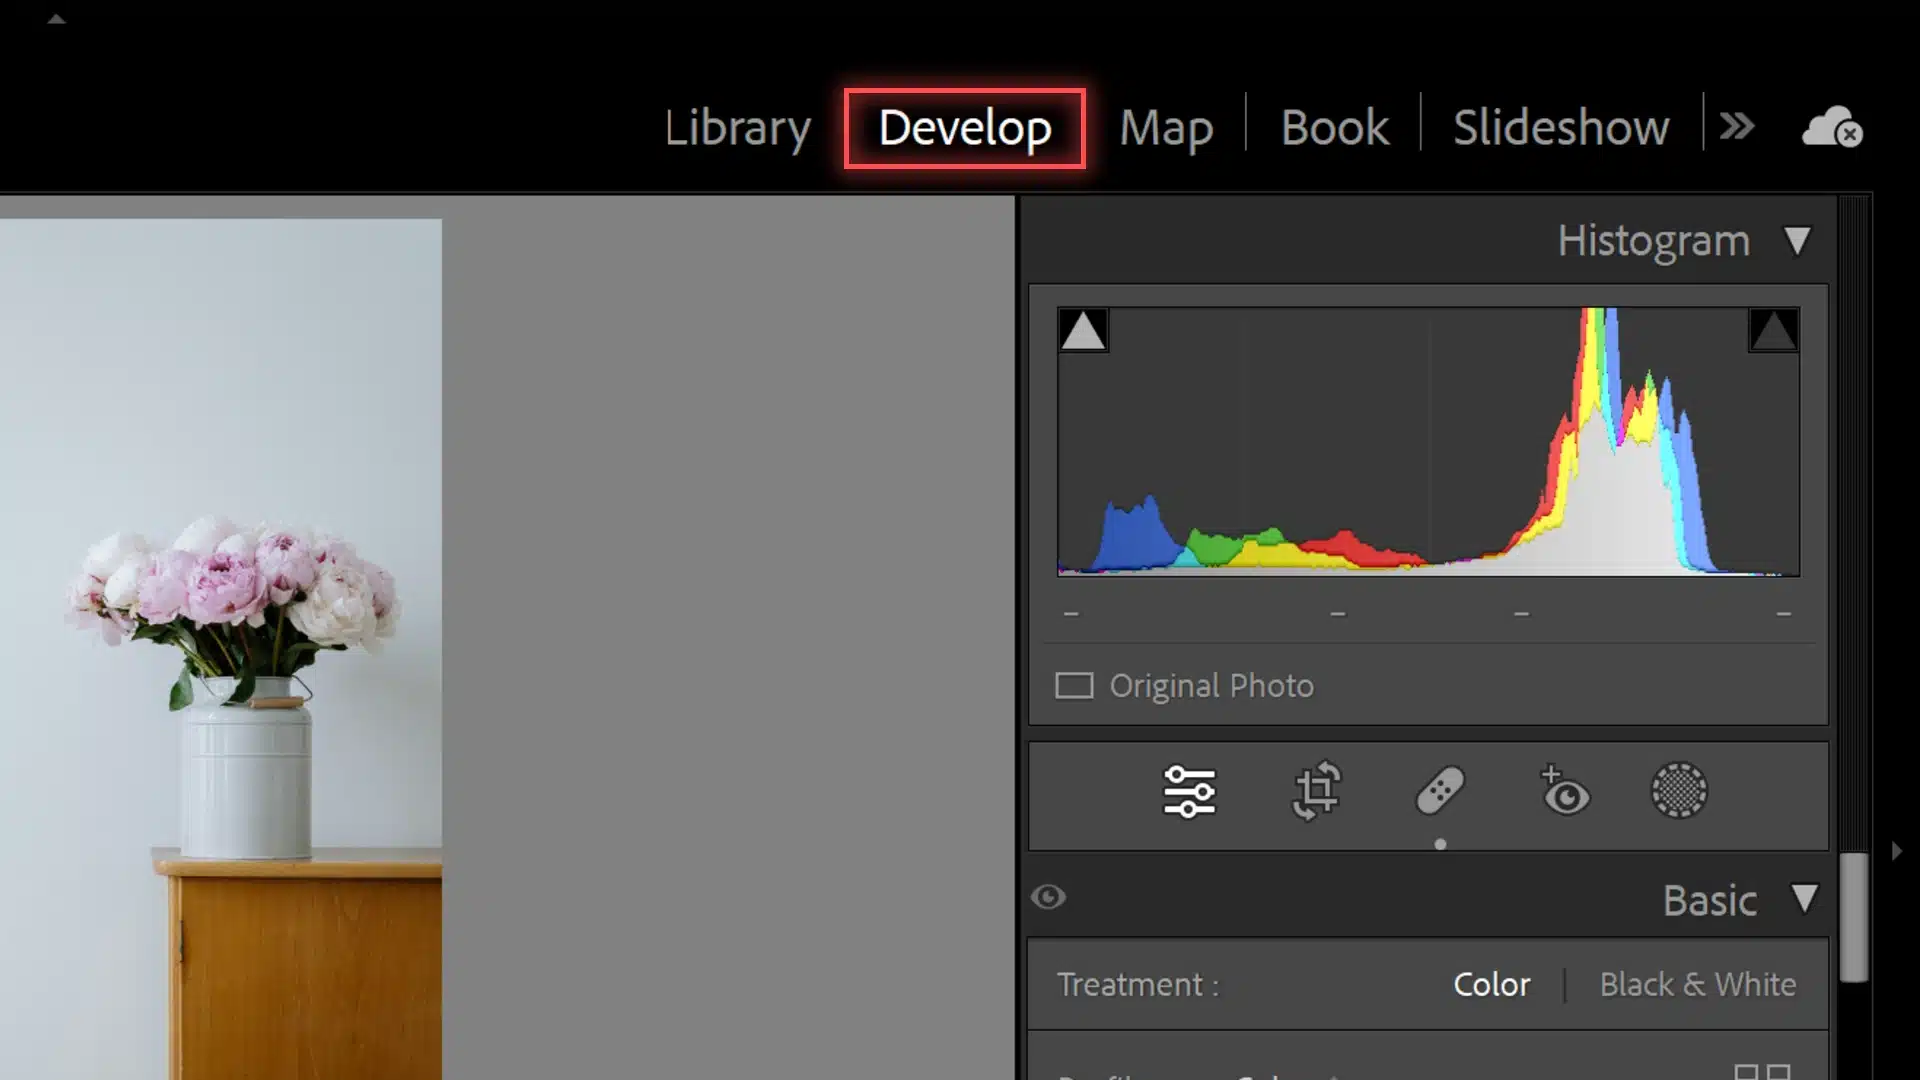
Open the image in Lightroom’s Develop Module.
Select the Spot Removal Tool
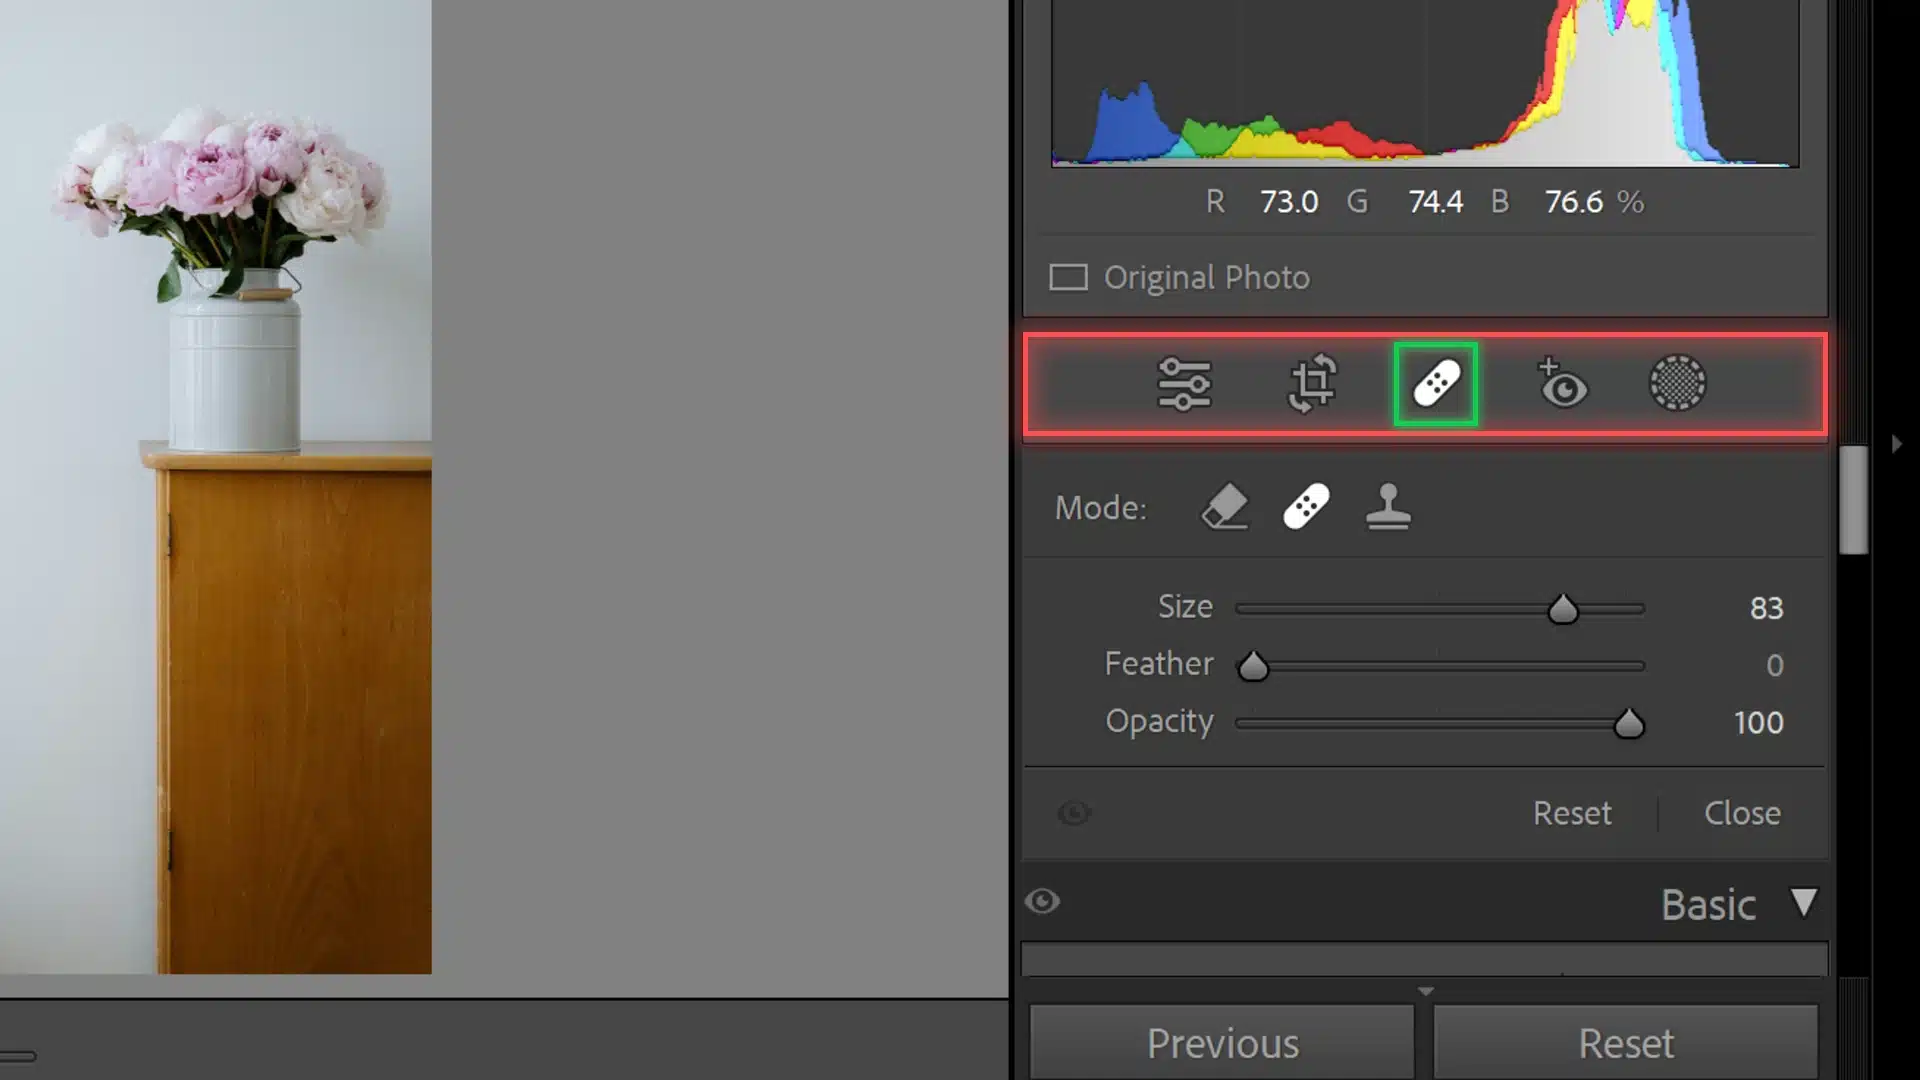
Select the Spot Removal Tool from the toolbar.
Select the Right Tool
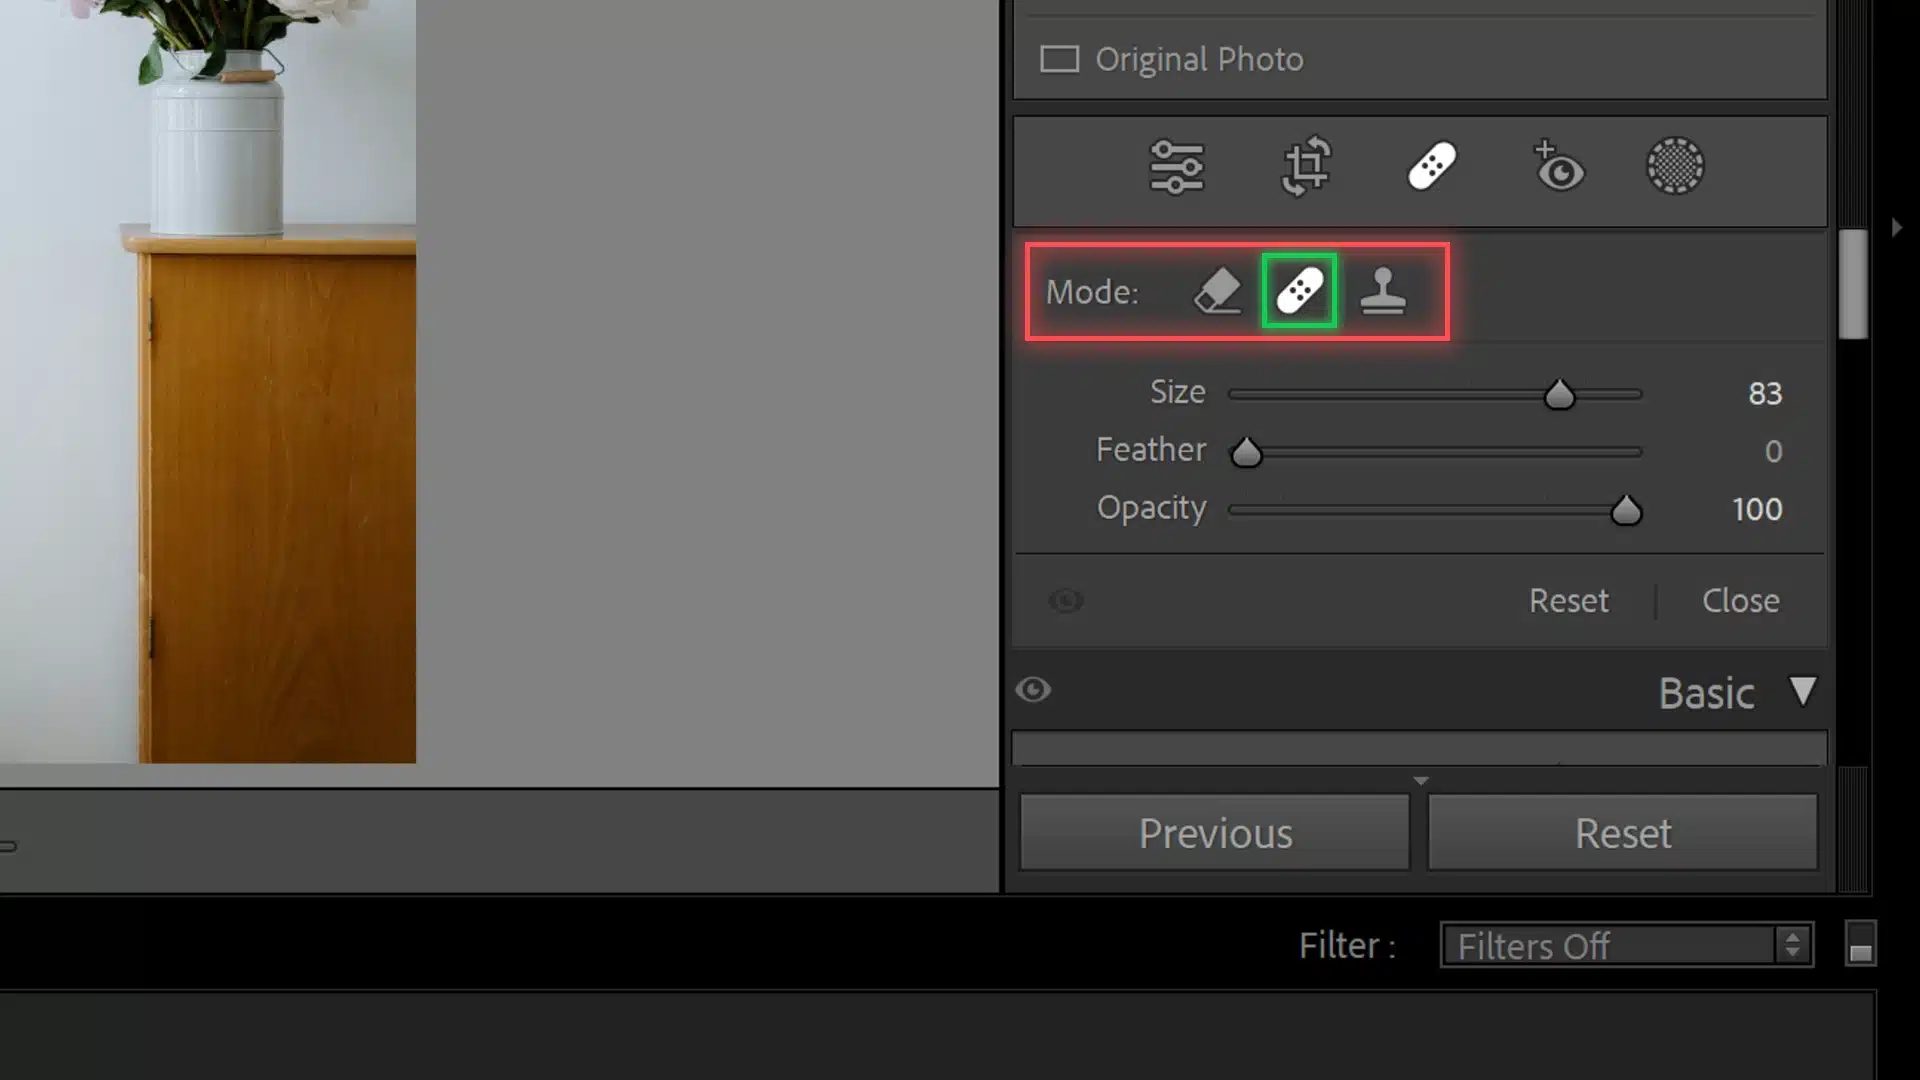
Choose either “Heal” or “Clone” options depending on the object you want to remove.
Fine-Tuning: Adjusting Brush Size for Precision
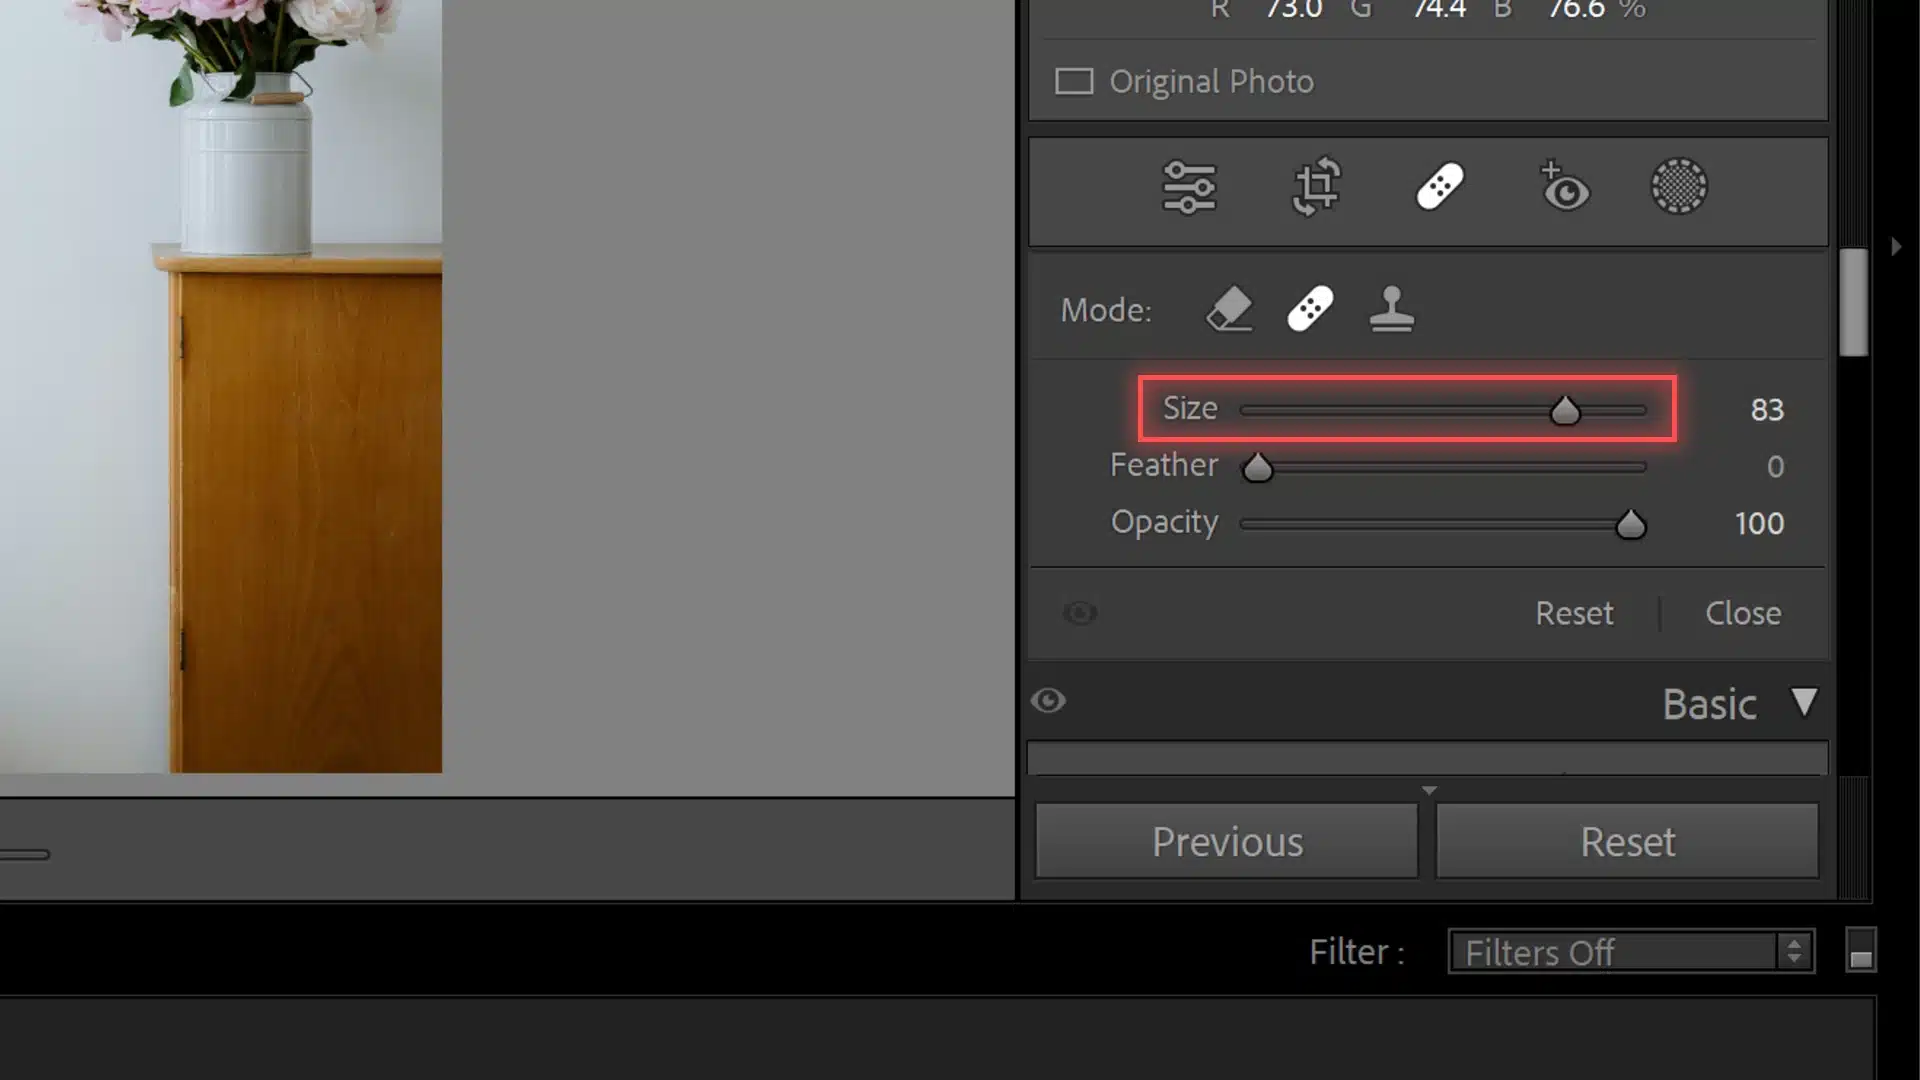
Adjust the brush size to fit the object.
Applying the Tool
Click on the object and let Lightroom do its magic.
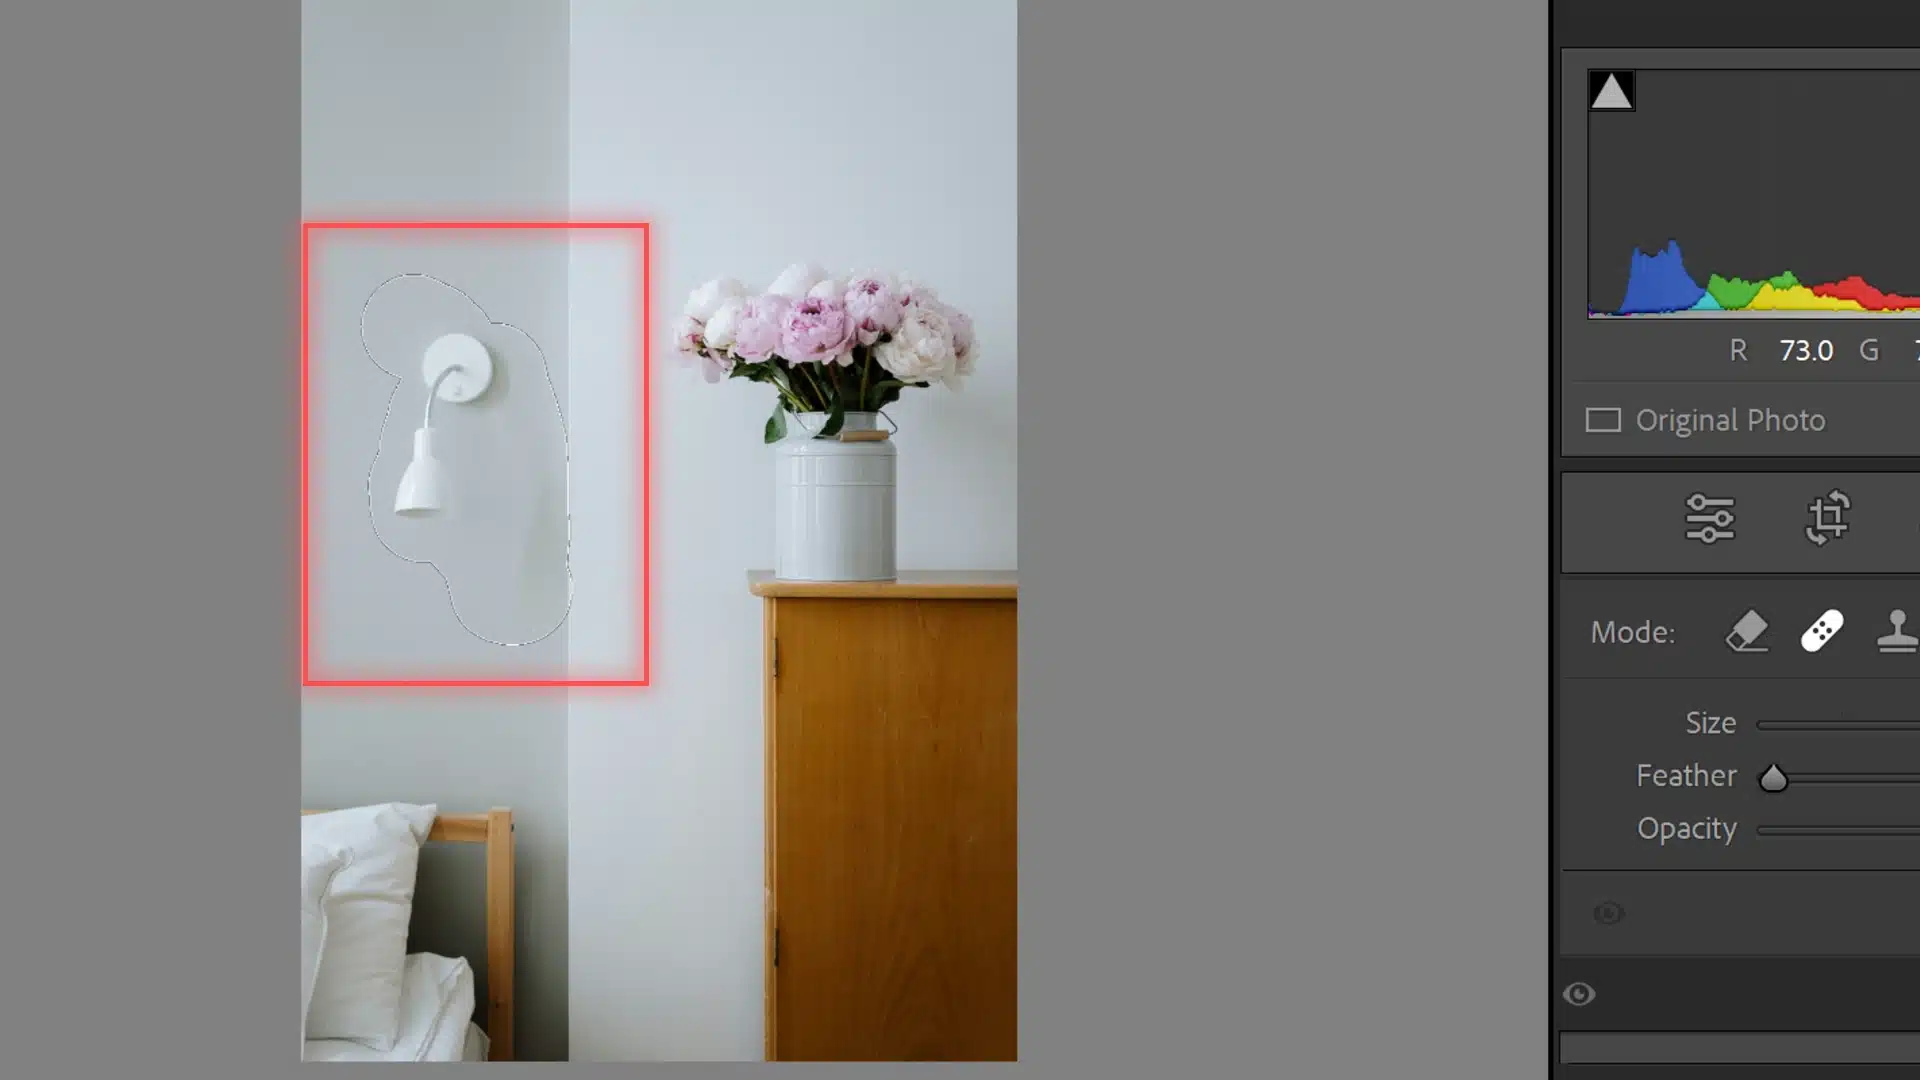
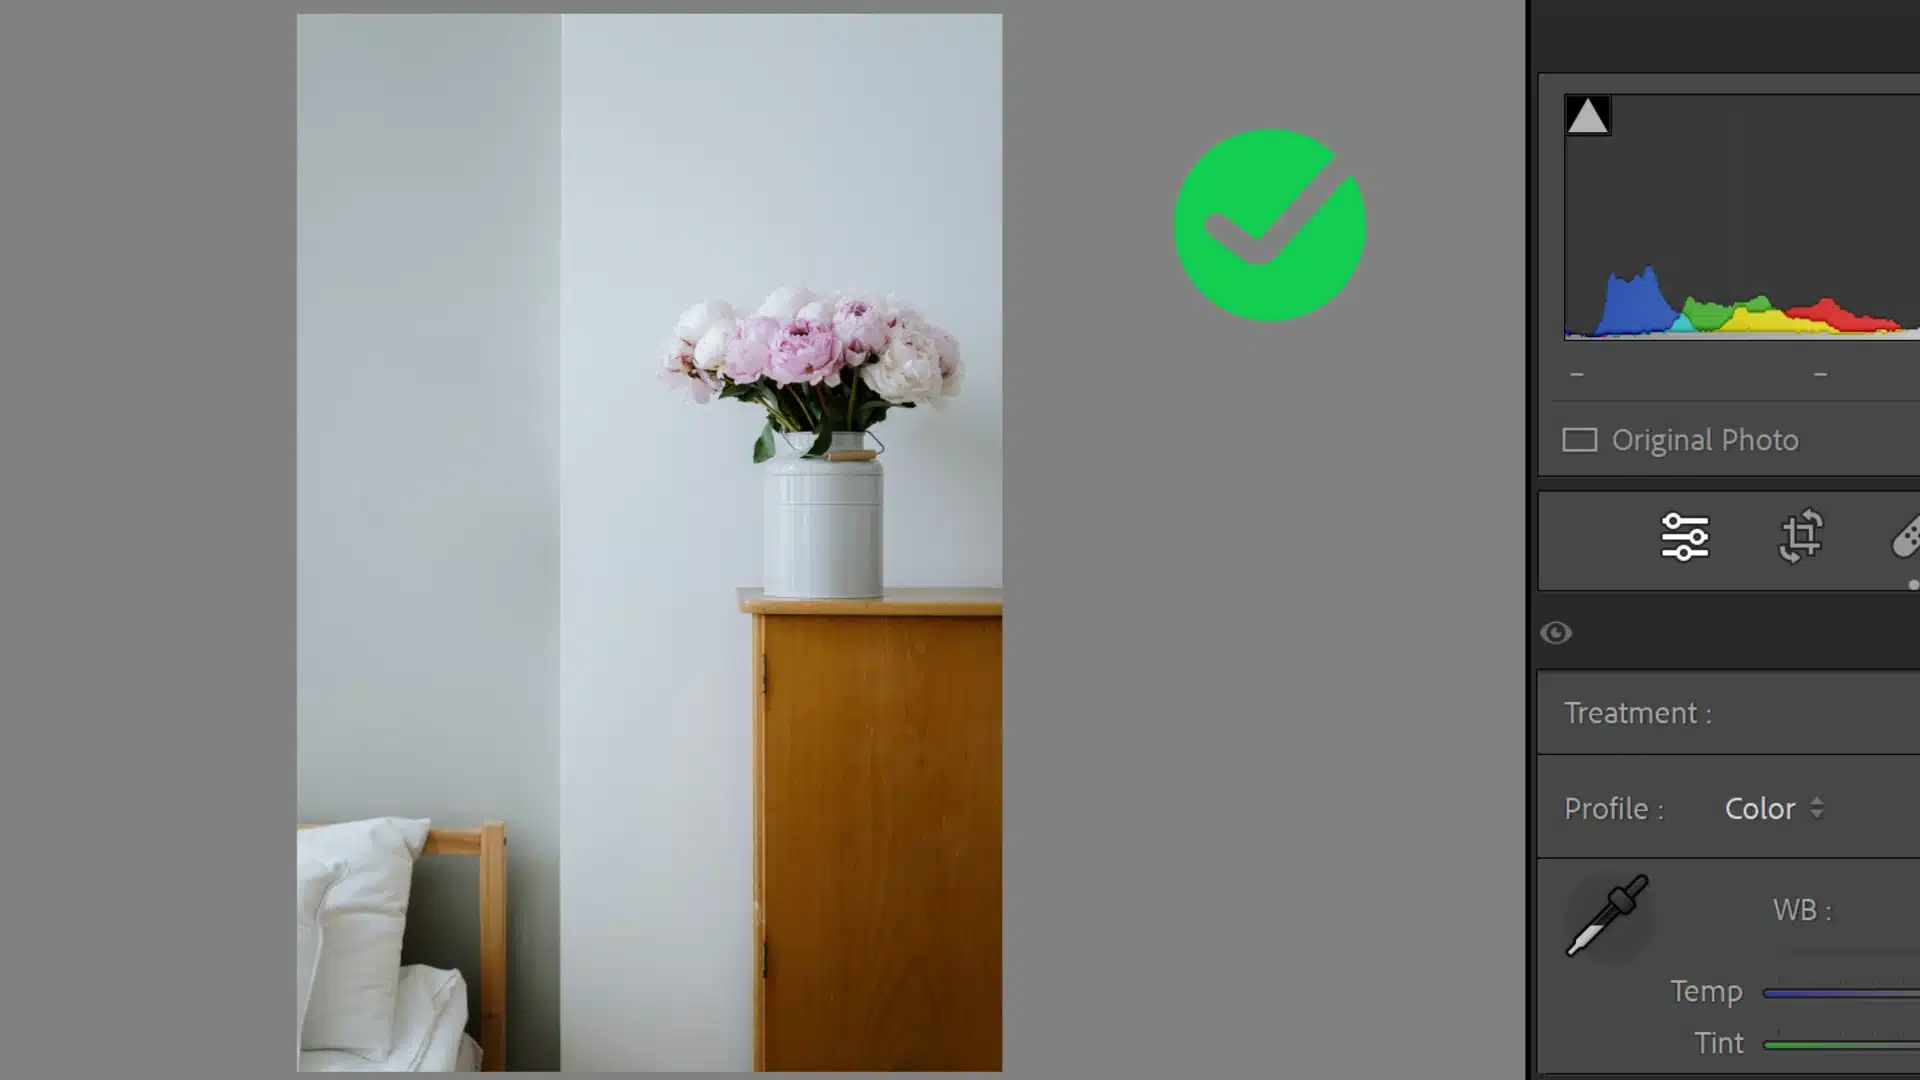
Using the Clone Tool in Lightroom Effectively
The clone tool is very effective for removing unwanted objects:
- Select the Clone Tool from the Develop module.
- Set the brush size to match the object you're removing.
- Click on the object to copy pixels from a clean area of the photo.
- Adjust the copied area if needed.
To achieve a natural look, use a smaller brush size and zoom in closely while working.
Experiment with both healing and cloning options to see which gives the best result for your specific photo.
Remember to keep it simple and let your creativity be your guide. Lightroom Classic’s new generative AI features make these tasks faster and more efficient.
Pro Tip: Additionally, understanding the difference between Photoshop and Lightroom can help you choose the right tool for your editing needs.
Exploring Alternatives to Lightroom Object Removal Techniques
In the realm of photo editing, exploring alternatives to Lightroom’s object removal can enhance your creative options. Tools like generative AI offer innovative ways to achieve impressive results.
While Lightroom Classic provides solid functionality, some users may find that features such as generative remove in other software or early access feature tools can streamline their workflow and deliver unique effects.
Let’s take a closer look at how these options stack up against Lightroom.
Comparing Lightroom with Other Editing Tools
Many of us use Lightroom Classic to remove unwanted objects in photos. But how does it stack up against other software?
Lightroom Classic’s Heal Tool and Spot Removal Tool are excellent, particularly for common objects and simple fixes.
However, if you’re working with backlit photos or more complex backgrounds, you might find it lacks precision.
Enter Photoshop and the content-aware fill tool. Photoshop offers more control for those needing to remove detailed objects.
It can handle intricate details better and bring more options into play for editing.
Meanwhile, for quick fixes, the generative AI features in new software updates and the generative remove capabilities make it even faster to remove distracting elements.
When to Use External Editing Software
When should you consider using external programs? Here are a few scenarios:
- Challenging Objects & Backgrounds: When the tools in Lightroom Classic aren't cutting it. Try Photoshop's Content-Aware Fill tool for better results.
- Precision Edits: Need to replace pixels or eliminate distractions? Photoshop's healing brush gives you finer control.
- Generative AI Needs: If you're using generative remove features, newer tools might offer better early access features.
For quick photo edits, stick with Adobe Lightroom and its spot removal tool or the heal tool functions.
However, for more complex edits, Photoshop or other advanced tools have become the best choices.
Pro Tip: When using the content-aware fill tool, always zoom in and carefully select the area. Generative AI can help, but your judgment ensures better outcomes.
Whether you’re learning how to remove background in Photoshop or how to Photoshop someone out of a picture, generative AI can help, but your judgment ensures better outcomes.
How to Remove Objects in Lightroom: Troubleshooting and Tips
As you edit your photos, challenges can arise. This section covers troubleshooting tips to refine your results after using content aware remove.
By utilizing generative AI and generative remove, you can effectively address imperfections and enhance your final image.
Fixing Imperfections After Object Removal
After using the healing tool or any other remove tool, we often notice some imperfections. It’s important to zoom in and closely inspect the edited area.
Sometimes, you may find leftover unwanted pixels or a mismatched texture that still needs adjustment. In such cases, consider these steps:
- Use the Clone Stamp Tool: This allows precise control when covering up any flaws left behind. It can be particularly effective for more complex objects.
- Feather the Edges: Softening the edges of your edits often leads to more natural blends and makes the edit less noticeable.
Enhancing Edited Photos for Better Results
Once you’ve removed the objects in Lightroom Classic, it’s important to refine your photos for a polished look. The Basic panel is an excellent place to start:
- Adjust Light and Color: Correcting the exposure, contrast, and color balance can help blend the edited section seamlessly into the rest of the image.
- Use Gradients: Applying gradient filters can direct the viewer's eye away from the edited area, enhancing the overall composition.
- Apply Sharpening: Gentle sharpening improves the clarity of your image and masks artifacts introduced during the edit.
Pro Tip: Use the escape key to quickly cancel any unwanted changes you’ve made.
Additionally, take advantage of Adobe Photoshop new features to enhance your editing workflow. This allows for efficient experimentation without committing to every edit immediately.
Advanced Techniques for Removing Unwanted Objects in Lightroom
Mastering advanced techniques can elevate your photo editing skills, especially when it comes to eliminating unnecessary elements.
In this section, we’ll share tips for seamless object removal, incorporating tools like generative remove and insights from generative AI to achieve flawless results.
Below is a comparison of advanced methods you can use to achieve more seamless and natural edits in your photos.
| Aspect | Overview |
|---|---|
| Content-Aware Remove Tool | Analyzes surrounding pixels and fills the gap left by the removed object, useful for simple or moderately complex edits. |
| Clone Stamp Tool | Allows precise control by copying pixels from a clean area to cover up unwanted objects or defects, ideal for more detailed work. |
| Feathering Edits | Softening the edges of your edits can help blend changes naturally into the rest of the image. |
| Combining Tools for Complex Backgrounds | Combining the Clone Stamp Tool with Content-Aware Remove yields better results when removing larger or more complex objects. |
| Light and Color Adjustment | Using the basic panel to adjust light and color ensures the fixed area integrates smoothly with the original surroundings. |
Tips for Seamless Object Removal
To remove objects in Lightroom Classic might seem daunting at first, but with a few important strategies, it becomes much more manageable.
Using the Content-Aware Remove Tool
Start by selecting the object you want to remove with the Content Aware Remove tool. This tool is useful because it analyzes the surrounding pixels and fills in the gap left by the removed object. For more complex edits.
Using the Clone Stamp Tool
Another tip is to use the Clone Stamp Tool for areas where accuracy is important. Zoom in to avoid excess pixels and carefully select areas to clone over defects.
Feathering the edges can help blend your edits naturally into the rest of the image.
For even greater precision, you can also utilize the clone stamp tool in Photoshop.
Combining Tools for Complex Backgrounds
For larger objects, using multiple tools may be necessary. For example, combining the Clone Stamp with Content Aware Remove can yield better results.
Adjust the light and color using the basic panel to better integrate the fixed area with the original surroundings.
Common Mistakes to Avoid
Avoiding common mistakes can greatly improve your editing results. One area where users often struggle is brush size adjustment.
While tools like generative remove can help, utilizing the best tool for precise adjustments, along with insights from generative AI, can enhance your overall workflow and outcomes.
Brush Size Adjustment
One common mistake when using the Content-Aware Remove tool is neglecting to adjust the brush size. Keep it just slightly larger than the object you’re trying to remove for efficient and precise action.
Overreliance on a Single Tool
Another error is expecting the tool to solve everything. It’s often better to refine the edit using additional methods like the Clone Stamp.
Overediting
Overediting is another pitfall. Resist the urge to tweak an area continuously. It’s tempting, but it often makes the final image look unnatural. Instead, take breaks and come back with fresh eyes.
Consistent Lighting
Ensure consistent lighting across edited sections. If the lighting doesn’t match, it can draw attention to the edited area.
Use of Layers and Undo Options
Finally, ignoring the use of layers or undo options can be a mistake. Always take advantage of Lightroom’s history panel to revert changes if necessary. Keep your edits non-destructive whenever possible.
Pro Tip: When removing power lines or similar straightforward elements, start with a lower opacity brush on the content-aware remove tools settings.
Build up the correction slowly for a more natural blend. Whether you’re performing a Lightroom remove person or using the Photoshop remove tool, build up the correction slowly for a more natural blend.
Frequently Asked Questions

Can I remove an object from a photo in Lightroom?
- Yes, you can remove objects in Lightroom by using the Spot Removal tool, which can be found in the Develop module. Select the tool, adjust the size, and click on the object you wish to remove.
How do I cut something out of a photo in Lightroom?
- To cut something out, Lightroom offers limited capabilities. Instead, use the Adjustment Brush to select and modify specific areas or consider using Photoshop for more precise cut-outs.
How do I use the magic eraser in Lightroom?
- Lightroom does not have a Magic Eraser like Photoshop. However, you can use the Spot Removal tool for similar effects to erase minor blemishes or objects.
Is there an eraser tool in Lightroom?
- Lightroom does not have a dedicated eraser tool. Use the Spot Removal or the Adjustment Brush to achieve similar results by adjusting exposure or other settings to blend areas into the background.
Conclusion
Understanding how to remove objects in Lightroom has truly changed my editing game. It’s made my workflow smoother and helped keep my photos clean and focused.
When I first used the object removal feature, I was surprised at how easy it was to make my images look better without relying on Photoshop.
If you’re looking to learn how to remove objects in Lightroom and enhance your editing skills, I recommend taking the time to explore the Lightroom course I found helpful. It covers the ins and outs of the software. For more advanced techniques, the Photoshop course is a great follow-up.
Both courses have helped me improve my skills significantly. Plus, if you haven’t already done so, check out Photoshop and Lightroom for your editing needs. With these resources, I’m sure you’ll find your editing journey as rewarding as I have!
Read more about Photoshop:


