How to Cut Out an Image in Photoshop: Master the Art with Ease
How to Cut Out an Image in Photoshop: Master the Art with Ease
Are you struggling with how to cut out an image in Photoshop? You’re not alone. Cutting out images can seem daunting, but with a few straightforward steps, it becomes a breeze.
Imagine having the power to isolate any subject, remove unwanted backgrounds, and create stunning visuals with ease.
In this article, I’ll guide you through the entire process, breaking it down into simple, actionable steps.
Whether you’re a beginner or just looking to refine your skills, by the end, you’ll have the confidence to tackle any image. Let’s dive in and transform your editing game!
Table of Contents
Why Use Photoshop for Image Editing?
Using Photoshop for image editing opens up many creative possibilities. I’ve found that understanding its features makes editing much easier and more enjoyable. Let’s explore some of the basic tools that can help you get started.
Overview of Basic Tools
Using Adobe Photoshop for image editing serves several purposes. Initially, it might seem overwhelming, but understanding its basic tools makes the process smoother.
It’s important to familiarize yourself with the magic wand tool, quick selection tool, elliptical marquee tool, and masking layers, as these facilitate important editing tasks.
Each of these features provides a unique function that can enhance your editing experience and efficiency, along with other tools available in Photoshop.
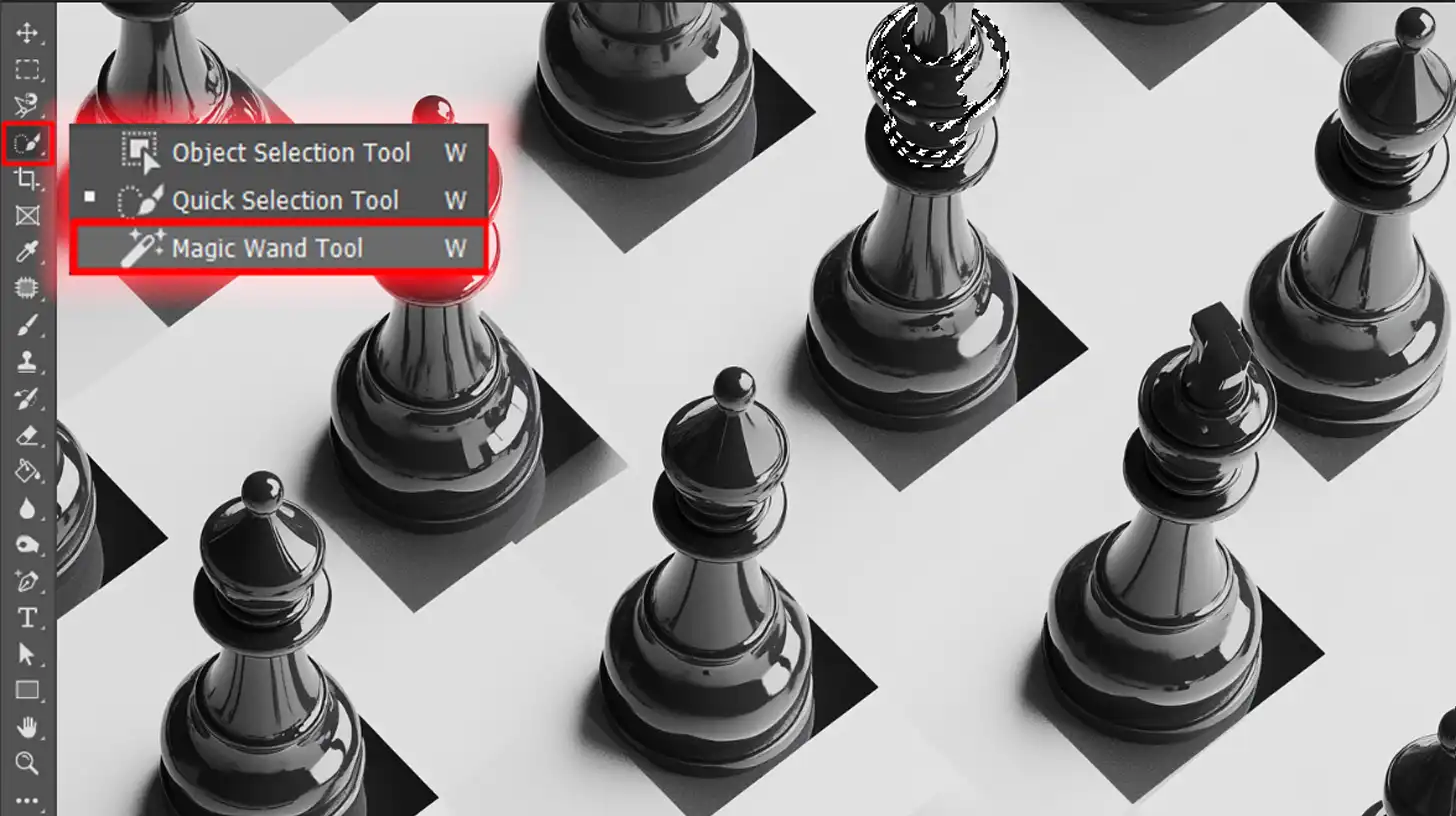
Magic Wand Tool
The magic wand tool selects areas of the image with similar colors. This helps in isolating parts of an image in Photoshop quickly.
If precision is significant, the pen tool and polygonal lasso tool come in handy as they allow for more controlled selections by drawing straight lines.
Layers Panel
Another fundamental tool is the layers panel, which lets users manage different parts of their images. Layers enable non-destructive edits. Here, you can add a new layer or create a new document.
The main advantage of this panel is that you can adjust each layer independently. You don’t need to worry about ruining your original image. Use features like layer mask to hide or reveal parts of a layer.
Cutting Out Images
One iconic method on how to cut out an image in Photoshop involves the triangulation of magic wand, pen tool, and the quick selection tool.
Combined, they swiftly isolate and transfer your desired image parts onto a new layer. This step breaks down complex background removal into manageable pieces.
Brush Tool
For those who enjoy painting over adjustments, the brush tool is indispensable. It allows adding and subtracting details from the image. Moreover, complementing this is the refine edge brush, perfect for refining selections around intricate edges like hair or fur.
Effective use of these tools starts integrating efficiency and quality into your workflow. This knowledge brings into focus the versatility of Photoshop.
Pro Tip: Use the layer mask instead of deleting parts of an image, as it provides flexibility and better control for future changes.
Cutting out an image is a fundamental skill in Photoshop that allows you to isolate subjects from their backgrounds.
By understanding how to make accurate selections, you can easily remove unwanted areas and create stunning visuals. Let’s dive into the basics of making effective selections.
Understanding Selections
Creating a selection is the first step to cut out an image in Photoshop. Selections help you isolate parts of an image, making precise edits easier. Using different selection tools helps achieve better results.
Object Selection Tool Techniques
The object selection tool is great for selecting specific objects. Click and drag around the object. Photoshop then automatically selects it. This tool is ideal for objects with clear boundaries.
For more detailed work, using the various lasso tools like the magnetic lasso ensures more intricate selections within a complicated image.
Mastering the Pen Tool
The Pen Tool offers precision for complex selections. It allows creating paths around the object. Start by clicking to create anchor points around the edges of your object.
Creating Paths in Adobe Photoshop
Paths are important for precise selections. Use the Pen Tool to create paths. Click to place anchor points, then adjust their curves. Convert the path into a selection to cut out the image.
Refining Edges in Adobe Photoshop
After making a selection, refine the edges. Use “Select and Mask” to smooth out jagged edges. Adjust the feather and contrast to perfect the selection before cutting out the image.
By mastering these tools, you’ll effectively cut out an image in Photoshop. Each tool serves a unique purpose, enhancing your editing accuracy.
Mastering how to cut out an image in Photoshop can transform your ordinary photos into unique creations. Now, let’s dive into some advanced techniques that every Photoshop enthusiast should know.
Layer Masks and Adjustment Layers
Layer masks provide a non-destructive way to hide parts of an image or photo, especially when working with complex backgrounds. Here’s how you can use this feature effectively:
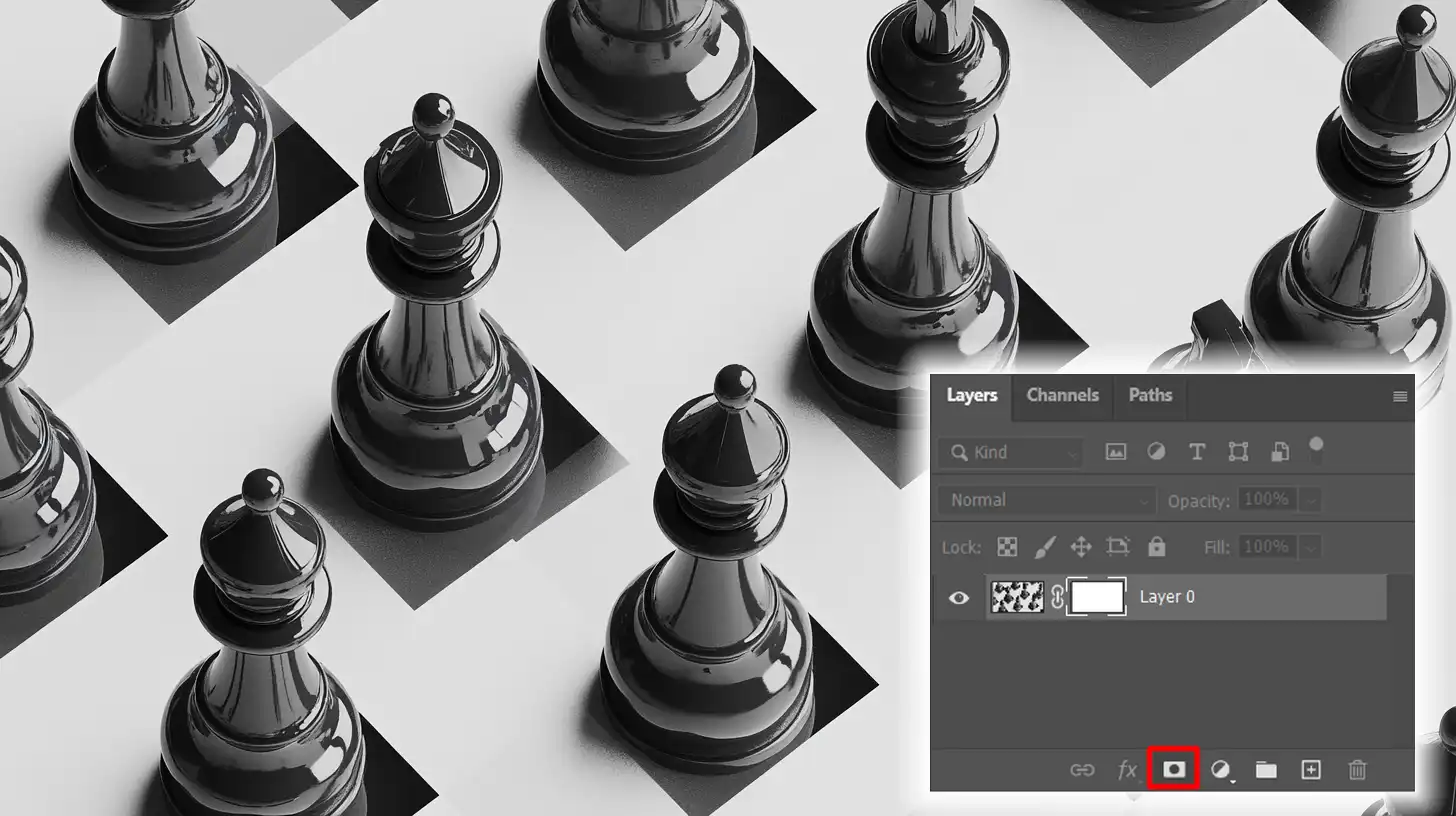
Step 1: Create a Layer Mask
First, select the layer you want to modify. Click on the “Add Layer Mask” icon available on the layer panel.
This action adds a thumbnail to your selected layer. You can paint on this mask to hide or show parts of the layer, allowing you to control how the subject interacts with the background layer.
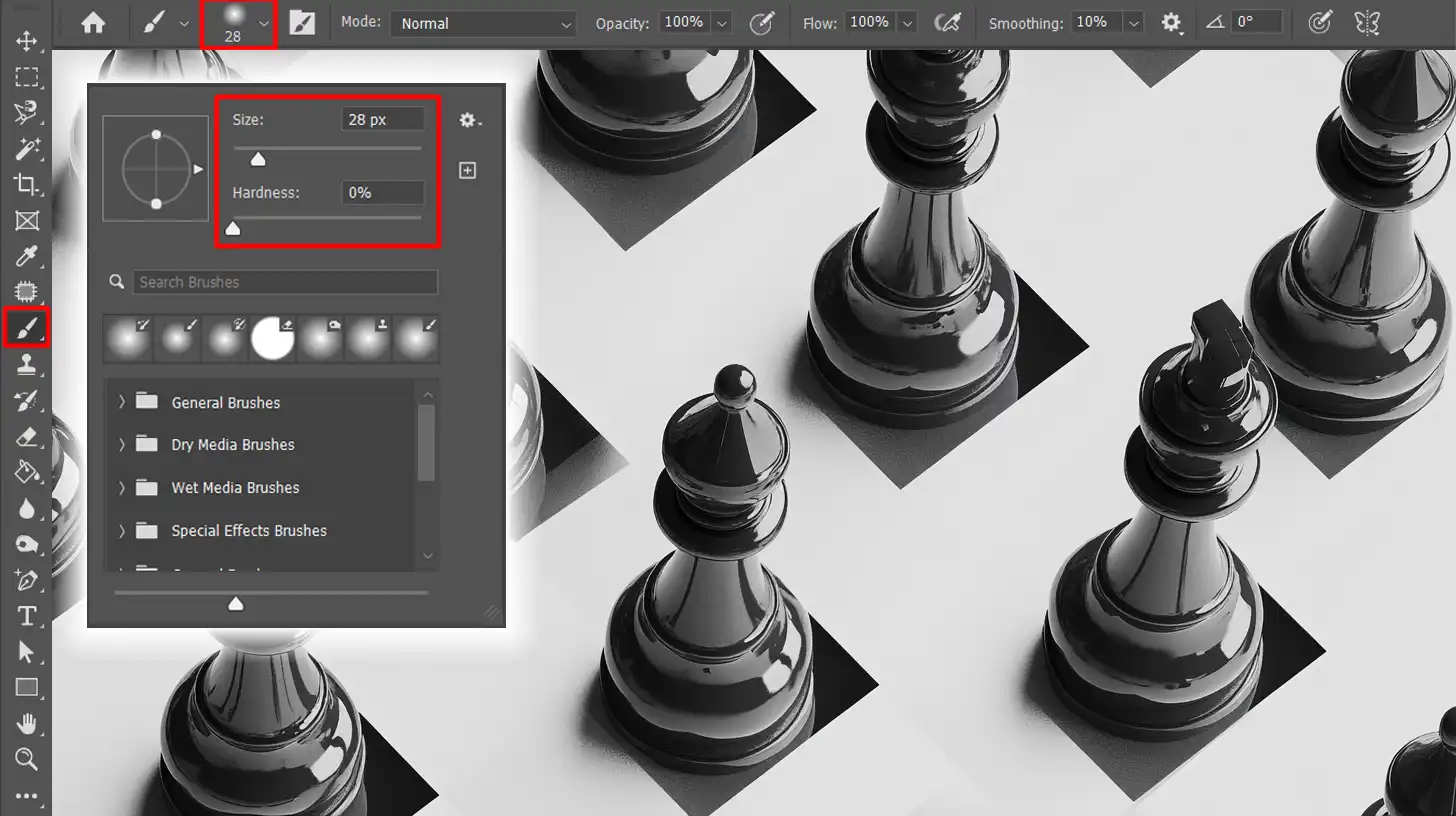
Step 2: Use Brushes
Switch to the Brush tool. Make sure to use black to hide portions of the image against the background and white to reveal them.
You can adjust the hardness and size of your brush for better control over how the subject blends with the background.
Step 3: Adjust Layer Properties
Use adjustment layers to tweak the properties of your mask. For example, you can alter brightness, contrast, and color balance. You have infinite possibilities to create striking images by modifying just one layer.
Layer masks are incredibly powerful. They enable you to make precise edits without permanently altering the original image. Mastering this technique can take your cutout game to another level.
Using Channels for Selections
Channels can provide detailed selections based on color and contrast. Here’s a brief look at how to use channels when learning how to cut out an image in Photoshop effectively:
Step 1: Open Channels Panel
You will find the Channels panel next to the Layer panel. It shows each color channel separately. Select the channel with the highest contrast for the object you want to cut out.
Step 2: Create an Alpha Channel
Duplicate the chosen channel to create an Alpha Channel. This new channel will be used for our selection process.
Step 3: Enhance Contrast
Use Levels or Curves adjustment tool to boost the contrast in your new Alpha Channel. The goal is to make the object as white as possible and the background as black as possible.
For effective adjustments, consider following some Photoshop Levels tips to help you achieve the best results. These tips will guide you in fine-tuning the levels for optimal contrast, ensuring a clean separation between the object and the background
Step 4: Fine-Tune with Brushes
Use the Brush Tool to paint any left-over details manually. Carefully refine the mask to ensure a clean cutout.
Step 5: Load Selection
Once satisfied, Ctrl+Click (Cmd+Click on Mac) the Alpha Channel thumbnail to load it as a selection. Then, return to the Layers panel and apply this selection to your desired layer.
Using channels is highly effective for images with distinct color differences between the object and its background. It can save time while providing greater precision in your cutouts.
Pro Tip: Don’t forget to zoom in while working on detailed sections. Small imperfections might not be visible at a standard zoom level! This ensures you don’t miss any important details.
Practical Applications and Tips
In Photoshop, knowing how to use the tools is important, but avoiding common mistakes is just as important for creating a new image. Let’s look at some common mistakes to avoid for a smoother editing experience.
This table highlights basic aspects to be mindful of while cutting out images, along with effective tools and techniques to streamline your editing process.
Aspect
Overview
Common Mistakes to Avoid
Beginners often over-rely on the Magic Wand Tool, leading to imprecise selections.
Adjustment Layers
These allow for non-destructive edits, enabling easy reversibility of changes.
Feathering Option
Feathering smoothens selection edges, creating seamless transitions between layers.
Quick Selection Tool
This tool allows you to paint over areas for fast selections, improving efficiency.
Keyboard Shortcuts
Using shortcuts speeds up the selection process and enhances overall workflow.
Select Subject Feature
This feature allows for quick isolation of subjects, especially in complex images.
Common Mistakes to Avoid
When learning how to cut out an image in Photoshop, it’s easy to fall into some common pitfalls:
First, beginners often rely too much on the Magic Wand Tool in Photoshop, thinking it will solve all their selection issues. While it's useful, it's not always precise. Aiming for perfection with just this tool can waste time and yield unsatisfactory results.
Next, many forget to use adjustment layers, which allow for non-destructive edits. This means changes can be easily reversed, a lifesaver for a beginner.
Lastly, avoid neglecting the feathering option. Feathering smoothens the edges of a selection, creating a seamless transition between layers. Skipping this step can make your cutout look harsh and unrealistic.
Tips for Faster Workflow
Now, let’s talk about speeding up your workflow in Adobe Photoshop:
The Quick Selection Tool is your best friend. It allows you to paint over the area you want to select and refine it quickly. Remember, while using the quick selection tool, hold down the Alt key to subtract from your selection.
Using keyboard shortcuts like pressing "L" for the Lasso Tool in Photoshop or "M" for the rectangular marquee tool can save you a lot of time, allowing you to quickly select tools without needing to click with the mouse button.
Additionally, mastering the Select Subject button can lead to faster, more automatic selections, especially in complex scenes.
Finally, use adjustment layers to fine-tune colors and contrast without changing the original image. The color range tool helps target specific hues for enhancement. Setting up Actions for repetitive tasks can also speed up your workflow.
Pro Tip: Always zoom in to catch small imperfections when you cut out an image, and consider usingPhotoshop’s marquee tool for precise selections around edges.
Frequently Asked Questions (FAQs)
What is the process to remove part of an image in Photoshop?
Open your image in Photoshop.
Select the 'Eraser Tool' from the toolbox.
Choose the appropriate eraser size and brush type.
Click and drag over the part of the image you want to erase.
How do I isolate part of an image in Photoshop?
Open your image in Photoshop.
Use the 'Quick Selection Tool' to select the area you want to isolate.
Refine the edge of the selection by clicking on 'Select and Mask...'
Once satisfied with the selection, copy it by pressing Ctrl+C (Cmd+C on Mac).
Paste it onto a new layer by pressing Ctrl+V (Cmd+V on Mac).
What are the steps to extract an object from an image in Photoshop?
Open your image in Photoshop.
Select the 'Pen Tool' or 'Lasso Tool' from the toolbox.
Carefully trace around the object you want to extract.
Right-click the selection and choose 'Layer via Copy' to create a new layer with the selected object.
How do I cut an image into a different shape in Photoshop?
Open your image in Photoshop.
Select the 'Custom Shape Tool' from the toolbox.
In the options bar, choose the shape you want to use for cutting.
Draw the shape over your image.
With the shape layer selected, hold Ctrl (Cmd on Mac) and click on the layer thumbnail to load the shape as a selection.
Select the image layer and press Ctrl+J (Cmd+J on Mac) to create a new layer with the image cut into the selected shape.
Learning how to cut out an image in Photoshop has been a game-changer for me. It has allowed me to create eye-catching visuals for both personal and professional projects, making my work stand out. Mastering this skill can significantly enhance your editing capabilities and open up new creative possibilities.
If you want to dive deeper into Photoshop and Lightroom, I highly recommend checking out my Photoshop Course and Lightroom Course. These resources have been invaluable in my journey, providing me with the knowledge and tools to excel.
Additionally, explore Adobe Photoshop and Adobe Lightroom to enhance your editing capabilities. With practice and the right tools, you’ll be able to transform your images with confidence.
If this article has helped you, then Like and Share it with your friends
$2,061.00Original price was: $2,061.00.$1,061.00Current price is: $1,061.00. 27584
Download Your Free Guide Now!
Discover the secrets of photography with our printable guide! Master essential techniques like aperture, shutter speed, and ISO to create stunning images. Get your free printable PDF now and start turning your snapshots into masterpieces!