Constrain Crop Lightroom: Align Your Edits Perfectly
Constrain Crop Lightroom: Align Your Edits Perfectly
Constrain crop Lightroom is a powerful feature that helps ensure your images are perfectly framed and aligned.
Mastering this tool can transform your photo editing process, allowing you to maintain consistent proportions and avoid common cropping errors.
Whether you’re adjusting the orientation of a single image or applying changes to a batch, understanding how to effectively use the crop tool can significantly enhance the quality of your final shots.
In this guide, we’ll explore the fundamentals of using the crop tool in Lightroom, from basic modifications to advanced techniques, ensuring your photos look polished and professional every time.
Table of Contents
Using the Crop Tool in Lightroom
Using the crop tool allows you to choose how to adjust the image orientation and framing, ensuring that it aligns with the camera intended perspective and enhances the shot and overall composition.
Understanding the crop factor is important when using the crop tool in Lightroom, as it helps you adjust and refine your image to match the intended framing and composition.
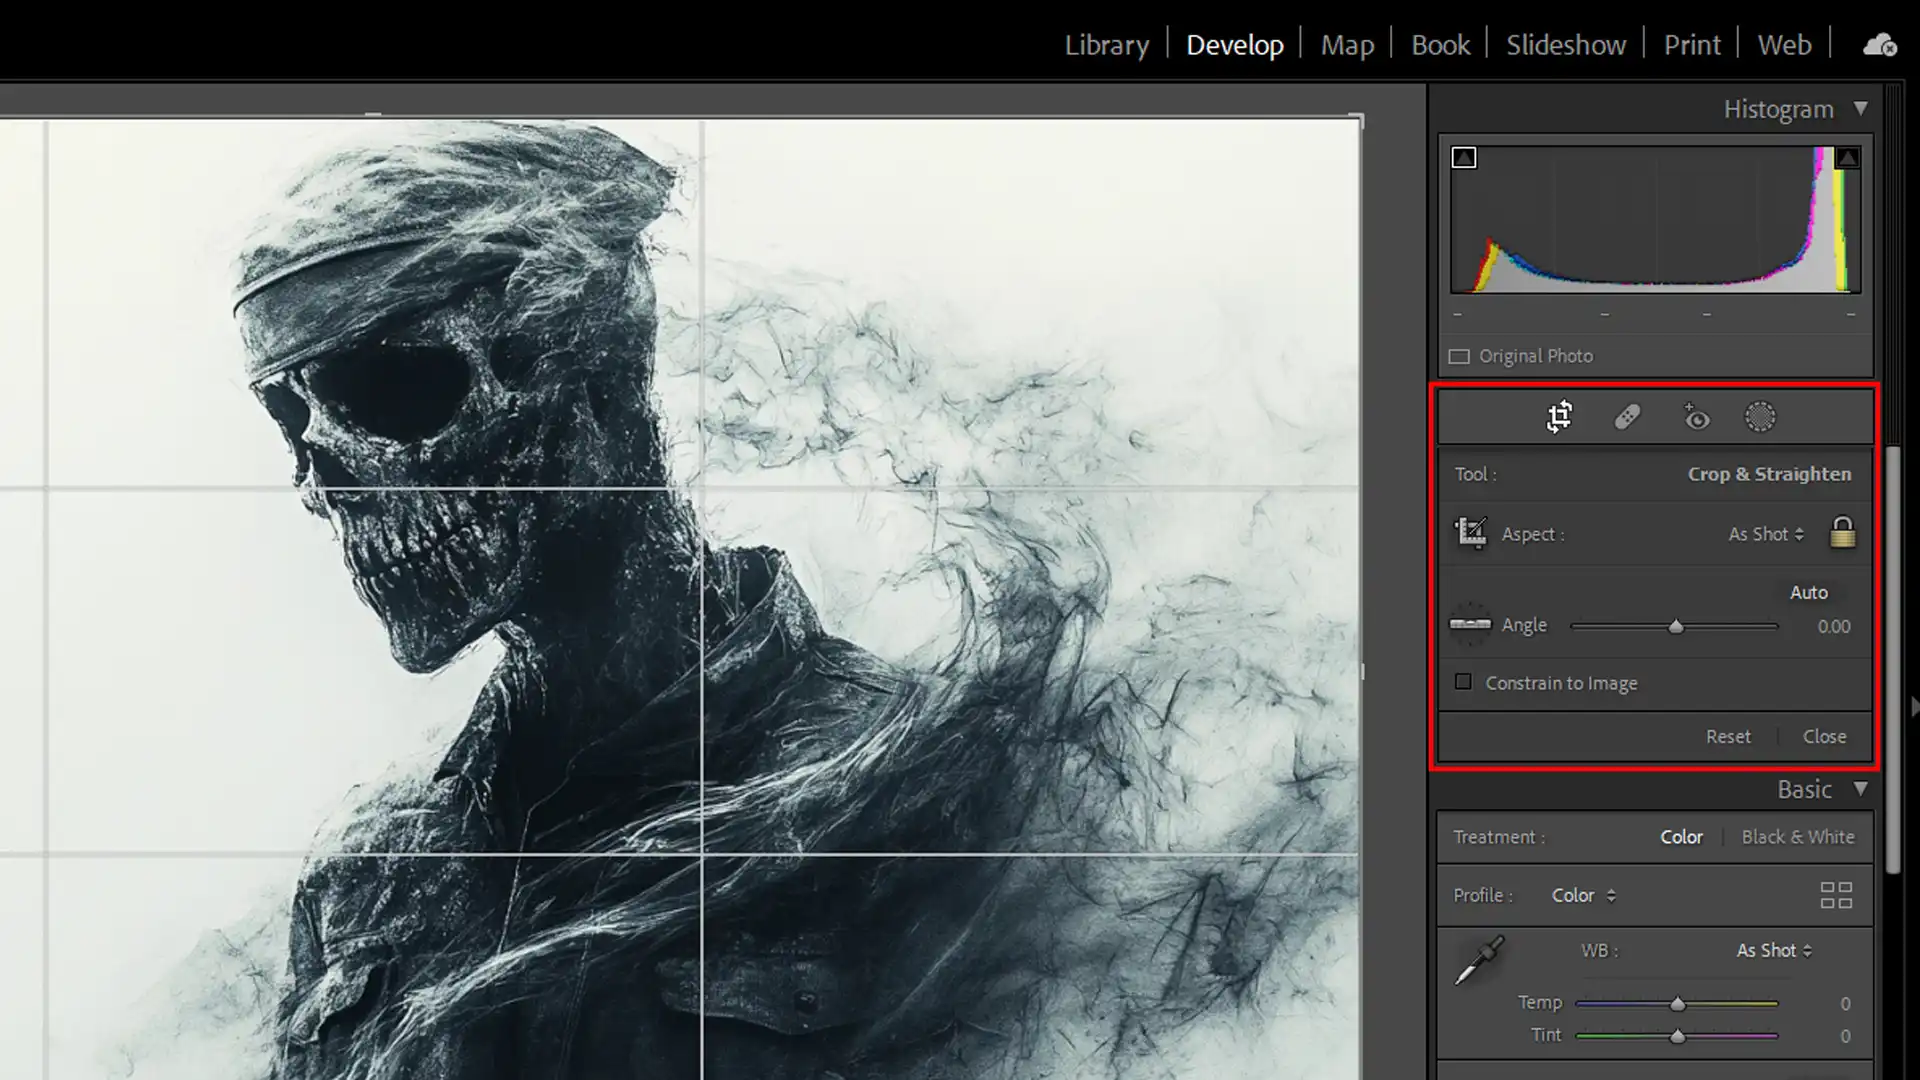
Accessing the Crop Tool
To access the crop tool in Lightroom, click the Develop module. This module offers powerful editing features for your images.
Once there, locate the toolbar on the right side of the screen.
Here, you will see an icon that looks like a rectangle – this is your crop tool.
Click it to start cropping your image.
Basic Crop Adjustments
After selecting the crop tool, a box appears around your image with handles at each corner.
Click and drag these handles to resize the image. To keep the aspect ratio constant, hold the Shift key while adjusting.
The restrict crop option helps you keep the original proportions. You can also rotate the image by moving the cursor outside the corners.
Advanced Crop Techniques
Advanced crop techniques involve explaining how to choose to select and choose to refine cropped images by adjusting their orientation, exposure, and even applying similar principles to video.
Ensuring each element is left perfectly aligned and visually balanced.
Straightening Images
Use click and drag the angle slider under the crop tool to straighten images.
Alternatively, use click the top line and hit and drag the level button to align horizontal lines.
Using the Aspect Ratio
The aspect ratio dropdown lets you select a specific aspect ratio. Common default options include 1:1, 4:3, and 16:9.
For custom sizes, choose the enter custom option.
This flexibility allows you to adjust your crop to fit any specific aspect ratio you need for your project.
By using the constrain aspect ratio, you can seamlessly transform and resize a batch of photos while keeping their proportions consistent and accurate.
Pro Tip: Use the constrain aspect ratio to keep your crops perfect. This prevents distortion when you resize, rotate, or transform your photos.
Additionally, exploring transform image techniques in Photoshop can help you refine your images even further, ensuring precise adjustments and a polished result
By applying the constrain aspect ratio, you ensure that your resize maintains the integrity of your image’s original composition and proportions.
Additionally, the constrain aspect ratio helps in achieving a professional and polished look for all your images.
For more advanced editing tools, tips and techniques, consider exploring Lightroom shortcuts to learn how to apply and learn from them to learn how to speed up your workflow and make the most out of your editing sessions.
Additionally, understanding the difference between Photoshop and Lightroom can be helpful to help you decide which software is best suited for your specific video editing needs.
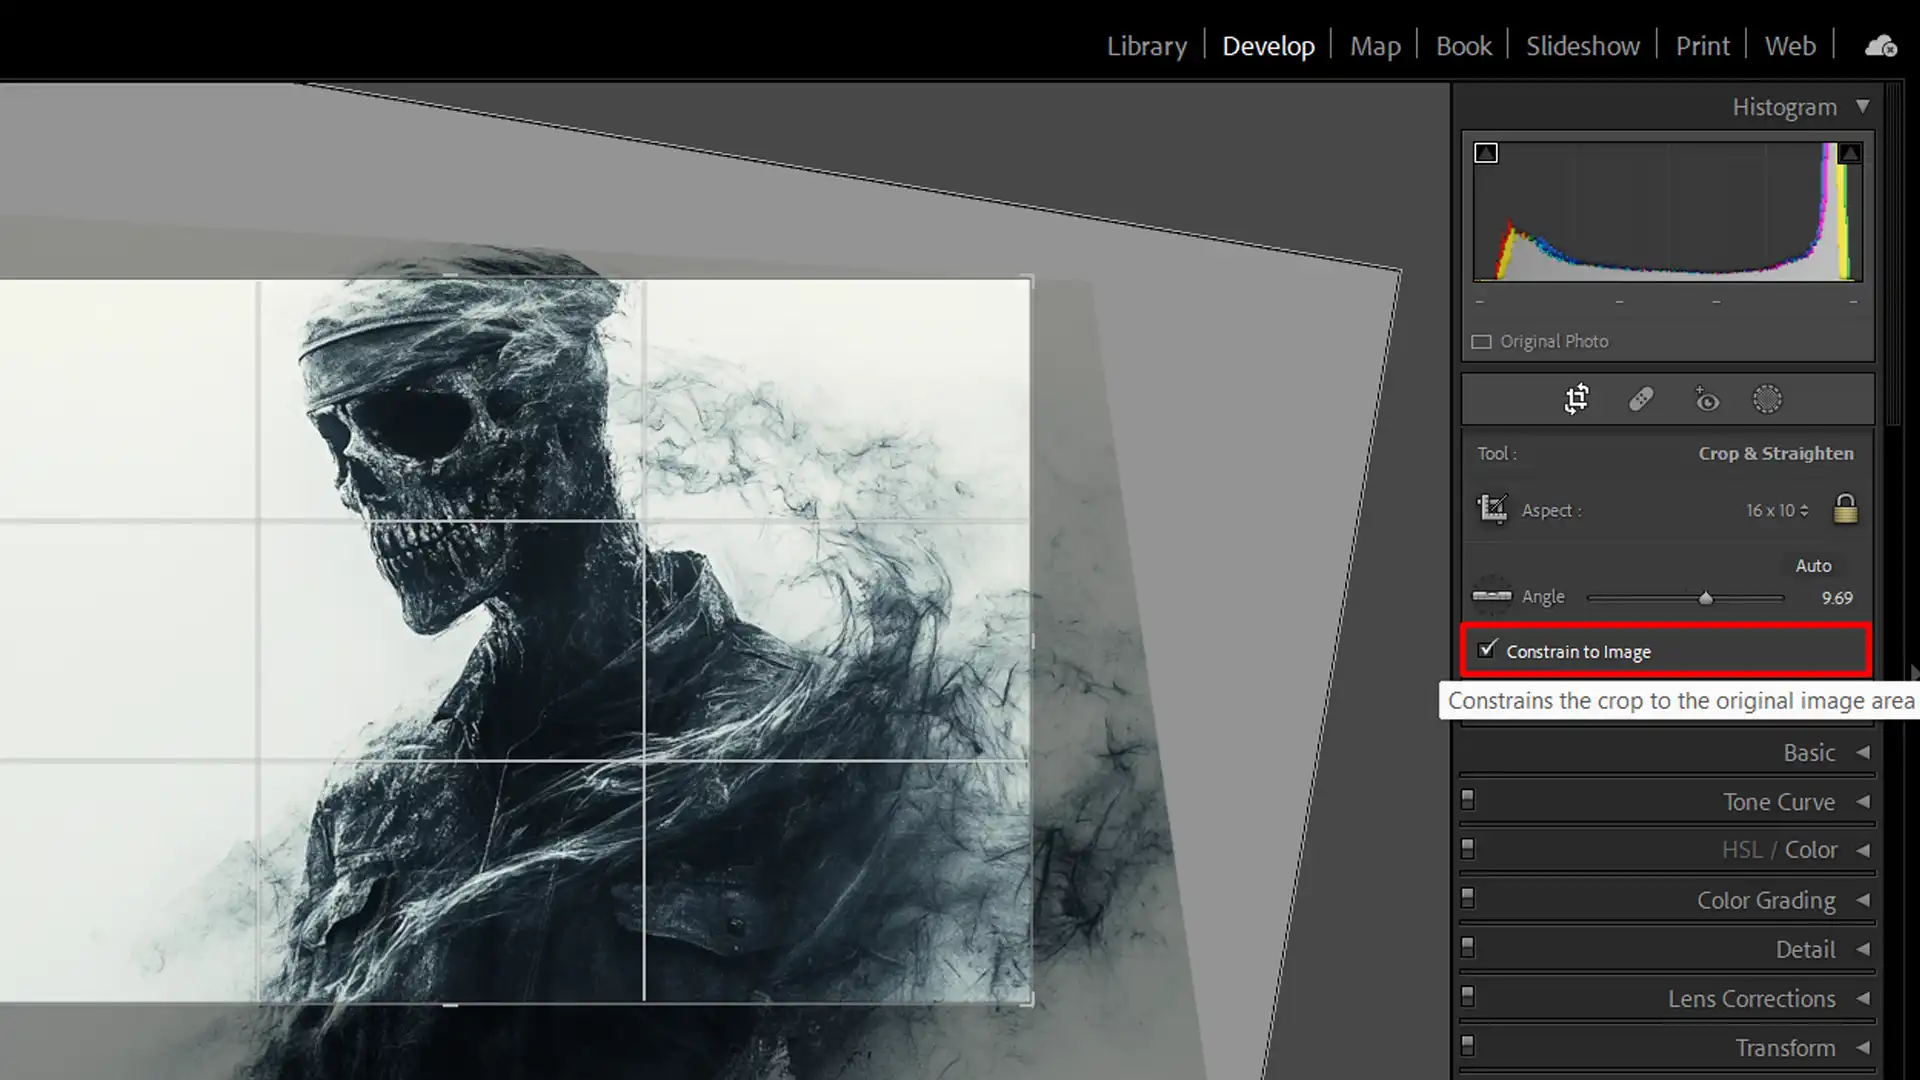
Understanding the Constrain Crop Checkbox
Understanding the restrict crop option is important for ensuring that your image retains its original proportions, as this feature prevents the image from being left distorted if left cropped or resized improperly.
Keeping the image consistent throughout your editing process.
What Does the Constrain Crop Checkbox Do?
The restrict crop option in Lightroom Classic is a must-know tools for anyone adjusting their photos. When you select this option, it automatically locks the aspect ratio of your photo.
This means that as you drag the crop handles, the proportions of your image remain the same.
It prevents distortion, making sure your images look just right, without unwanted stretching or squishing.
By applying the constrain crop feature, you effectively eliminate distortion, ensuring that every crop maintains the image’s original, specific aspect ratio and visual integrity.
How to Enable Constrain Crop Checkbox
To enable the restrict crop option, follow these steps:
Head to the Develop module in Lightroom Classic.
Click on the Crop tools icon in the toolbar (it looks like a little rectangle).
Find the restrict crop option right below the crop adjustment area.
Click the box to activate it.
Now, when you crop your photos, the aspect ratio stays locked.
Common Issues with Constrain Crop Checkbox
Even with all its benefits, the restrict crop option can sometimes cause confusion.
Here are some common problems:
Accidentally trimming out important parts: When locked in a specific aspect ratio, you might find it tough to include all elements you want.
Lack of creativity: Sticking to one ratio can limit how you frame your photo.
To fix these issues, uncheck select the option and choose to manually adjust and rotate the selected default crop to include all essential parts while experimenting creatively
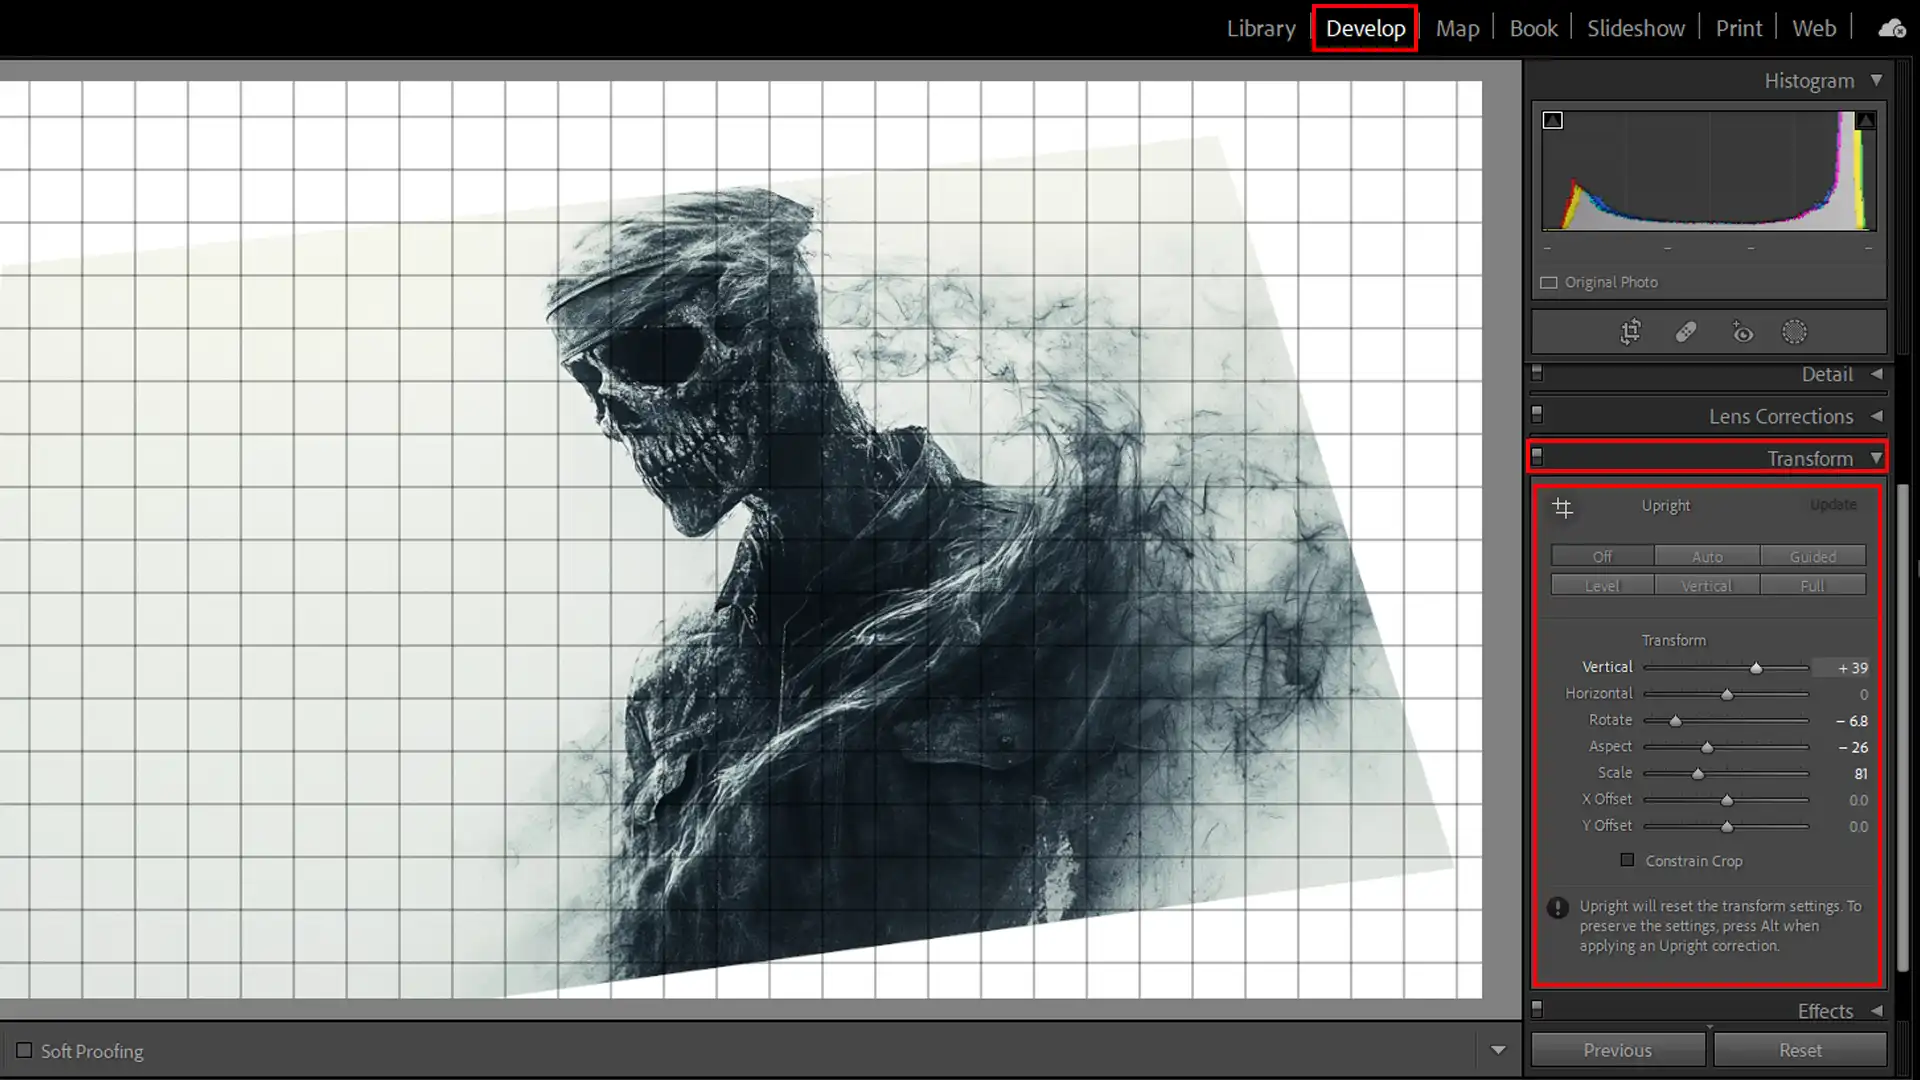
Pro Tip: Use the Transform panel in Lightroom to make perspective corrections to your photos.
This feature helps fix those annoying tilted buildings or crooked horizons without altering your aspect ratio.
The transform tools allow for precise adjustments, ensuring your image maintains its intended look while correcting any distortions.
While Lightroom excels in batch processing tools and organizational tools, Photoshop offers advanced retouching capabilities and more precise control over individual elements.
Practical Tips for Constrain Crop in Lightroom
If you’re diving into photo editing with Lightroom, mastering the constrain crop feature is critical. Using this effectively ensures that your photos keep the right proportions without stretching or squishing parts of the image.
Combining cropping with perspective adjustments in Photoshop for a polished result ensures your images are not only well-framed but also free of distortion and alignment issues.
This approach helps maintain the integrity of the original composition while enhancing the overall visual appeal.
Best Practices for Cropping
When you crop an image, always keep the significant parts in mind. Cutting out significant features can ruin an otherwise good photo. Lightroom’s crop tool is handy, but be cautious.
The constrain crop option keeps your aspect ratio intact, and that can save your whole composition. But sometimes, you might want to uncheck it for a creative adjustment.
If you have multiple images to edit, consider syncing your settings. This action will save time by applying the same crop to every image individually.
Maintaining Aspect Ratio
The aspect ratio is pivotal when cropping photos. When enabled, the constrain crop Lightroom feature will not allow dragging beyond the preset ratio.
This makes sure that whether you’re doing moving vertical lines, moving the bottom line, adjusting vertical lines or fixing perspectives, everything stays proportional.
Need to fix the perspective of a shot? Head to the transform panel. Here, you can make all the perspective corrections you need without worrying about ruining the aspect ratio.
Use the transform panel to straighten vertical and horizontal lines to add, increase, and maintain visual harmony.
Remember, the level button can help align and rotate your photos, ensuring you don’t inadvertently tilt or rotate them.
After making adjustments, keep your work by remembering to save your progress and check it periodically.
Pro Tip: Always try to create virtual copies of your image before making significant edits. This way, you can always go back and add something to the original if things don’t turn out the way you planned.
Additionally, learning how to crop in Photoshop can provide more flexibility for making precise adjustments, giving you greater control over your edits.
Common Mistakes While Using Crop Tool in Lightroom Classic
Common mistakes while using the crop tool often involve improperly transforming the cropped image, which can lead to unintended distortions or misalignments of lines that deviate from the camera original line of framing.
Mistake
Issue
Solution
Ignoring Aspect Ratio
Distorted image if ratio is not maintained
Always check and maintain the aspect ratio
Over-Cropping
Loss of important details
Avoid excessive cropping to preserve important elements
Not Enabling Constrain Crop
Proportions may be altered
Enable the constrain crop box to keep proportions
Forgetting to Sync Settings
Inconsistent edits across multiple images
Use Lightroom’s sync feature to apply settings uniformly
Misusing Transform Panel
Distortion of original aspect ratio
Adjust settings gently to correct perspective
Poor Vertical Alignment
Crooked photos appear unprofessional
Align vertical images properly
Failing to Create Virtual Copies
No backup if edits don’t go as planned
Create virtual copies for a fallback option
1. Ignoring Aspect Ratio
Using the apply or drag the crop tool without considering the aspect ratio can ruin your image. Always pay attention to the aspect ratio before you choose to apply, select, add or drag the crop handles.
2. Over-Cropping
Sometimes we get carried away and choose to crop too much. This can make the image lose important details. It’s tempting to add more, but don’t over-crop your images.
3. Not Enabling Constrain Crop Lightroom
When we forget to enable constrain crop, our images may lose their proportions. Always check the constrain crop box to maintain the desired aspect ratio.
4. Forgetting to Sync Settings
If you’re editing multiple images, sync your settings to save time. Forgetting to sync can result in inconsistencies across your images.
Lightroom Classic makes syncing easy.
5. Misusing Transform Panel for Perspective Corrections
The transform panel is great for perspective corrections. However, it’s easy to distort the original aspect ratio if not used properly.
Be careful to adjust gently.
6. Poor Vertical Alignment
When cropping vertical images, be sure to align them properly. A crooked photo looks unprofessional, and aligning it ensures a polished final image.
7. Failing to Create Virtual Copies
Before making major changes, create virtual copies. This provides a fallback option in case your edits don’t go as planned.
It’s a safety net for your editing workflow.
Pro Tip: Use the “O” key to cycle through crop overlays in Lightroom. It helps visualize different compositional guides and can improve your final crop.
Additionally, understanding which camera to choose for your photography and exploring options like free crop in Photoshop can significantly impact the quality of your images, as different cameras may have varying native aspect ratios and resolutions that complement your cropping and editing process in both Lightroom and Photoshop.
By avoiding common photo editing mistakes by mastering the crop tool in Lightroom, which helps ensure your images are perfectly framed and aligned without introducing unwanted distortions.
Frequently Asked Questions
What does constrain crop do in Lightroom?
Constrain cropin Lightroom automatically adjusts the crop boundaries to eliminate any white or empty spaces around the edges of your photo.
This feature is handy when rotating an image or adjusting its perspective, ensuring that the final image is clean and tightly framed.
How do I crop proportionally in Lightroom?
To maintain the proportions while cropping in Lightroom, press and hold the ‘Shift’ key while dragging the corners or sides of the crop frame.
This method keeps the aspect ratio constant, allowing for a balanced and proportional crop of your image.
How to do a perspective crop in Lightroom?
Perspective cropping in Lightroom can be achieved by using the ‘Transform’ tool.
Here’s how:
Select the 'Crop Overlay' tool from the panel.
Enable the 'Constrain to Warp' selection panel within the crop options.
Adjust the corners of the crop frame to match the desired perspective. The image will automatically adjust to the new perspective.
How do I change the crop overlay in Lightroom?
To change the crop overlay in Lightroom:
Activate the 'Crop Overlay' tool.
Press 'O' on your keyboard to cycle through different overlay options such as rule of thirds, golden ratio, and more.
Select the one that best suits your composition needs.
$2,061.00Original price was: $2,061.00.$1,061.00Current price is: $1,061.00. 27584
Download Your Free Guide Now!
Discover the secrets of photography with our printable guide! Master essential techniques like aperture, shutter speed, and ISO to create stunning images. Get your free printable PDF now and start turning your snapshots into masterpieces!