Lightroom Clone Tool: Mastering Precision in Photo Editing
Lightroom Clone Tool: Mastering Precision in Photo Editing
Ever struggled with removing unwantedobjects from your photos? The Lightroom Clone Tool can be your best friend.
In this article, I’ll guide you through the ins and outs of using this tool to enhance your images seamlessly.
Imagine transforming your pictures without a trace of imperfection, sounds incredible, right?
Whether you’re a beginner or a seasoned photographer, mastering this tool can elevate your work to the next level.
Ready to dive in and make your photos truly shine?
Let’s get started!
Table of Contents
Understanding the Lightroom Clone Tool
The Lightroom clone tool plays a vital role in photo editing. We’ll explore its functionality and benefits here. Let’s dive right into it and see how it can make your photos look great!
What is the Lightroom Clone Tool?
The tool in Lightroom, also known as the clone tool, helps you remove unwanted elements from your photos. Imagine you took a beautiful shot, but there’s an annoying dust spot or a stray object that spoils the view.
The clone tool allows you to select a “source area” in the photo that looks similar to the area you want to correct. Then, you can copy this section over the unwanted part, making it disappear.
By using the clone tool in Lightroom, you can seamlessly blend portions of your photos. This technique lets you hide distracting elements and fix imperfections in your photography with precision.
Editing in Lightroom Classic makes the process smooth.
Why Use the Lightroom Clone Tool?
One main reason to use the Lightroom clone tool is to handle distracting elements. When there are elements like dust spots or unintended persons in your perfect shot, the clone tool does wonders. It allows users to maintain the focus on key aspects of their photo by erasing distractions.
The tool in Lightroom is user-friendly, and with practice, anyone can master it.
Another advantage is the ability to adjust the opacity and feathering, which provides softer edges and realistic blending.
Professional photographers often rely on this tool to polish their projects.
Pro Tip: Hold down the control key while using the clone tool for precise adjustments. This can save time and improve accuracy in your edits.
Navigating the world of image editing can sometimes feel overwhelming. Luckily, tools like the clone tool in Lightroom make this task simpler.
Step-by-Step Guide to Using the Clone Tool
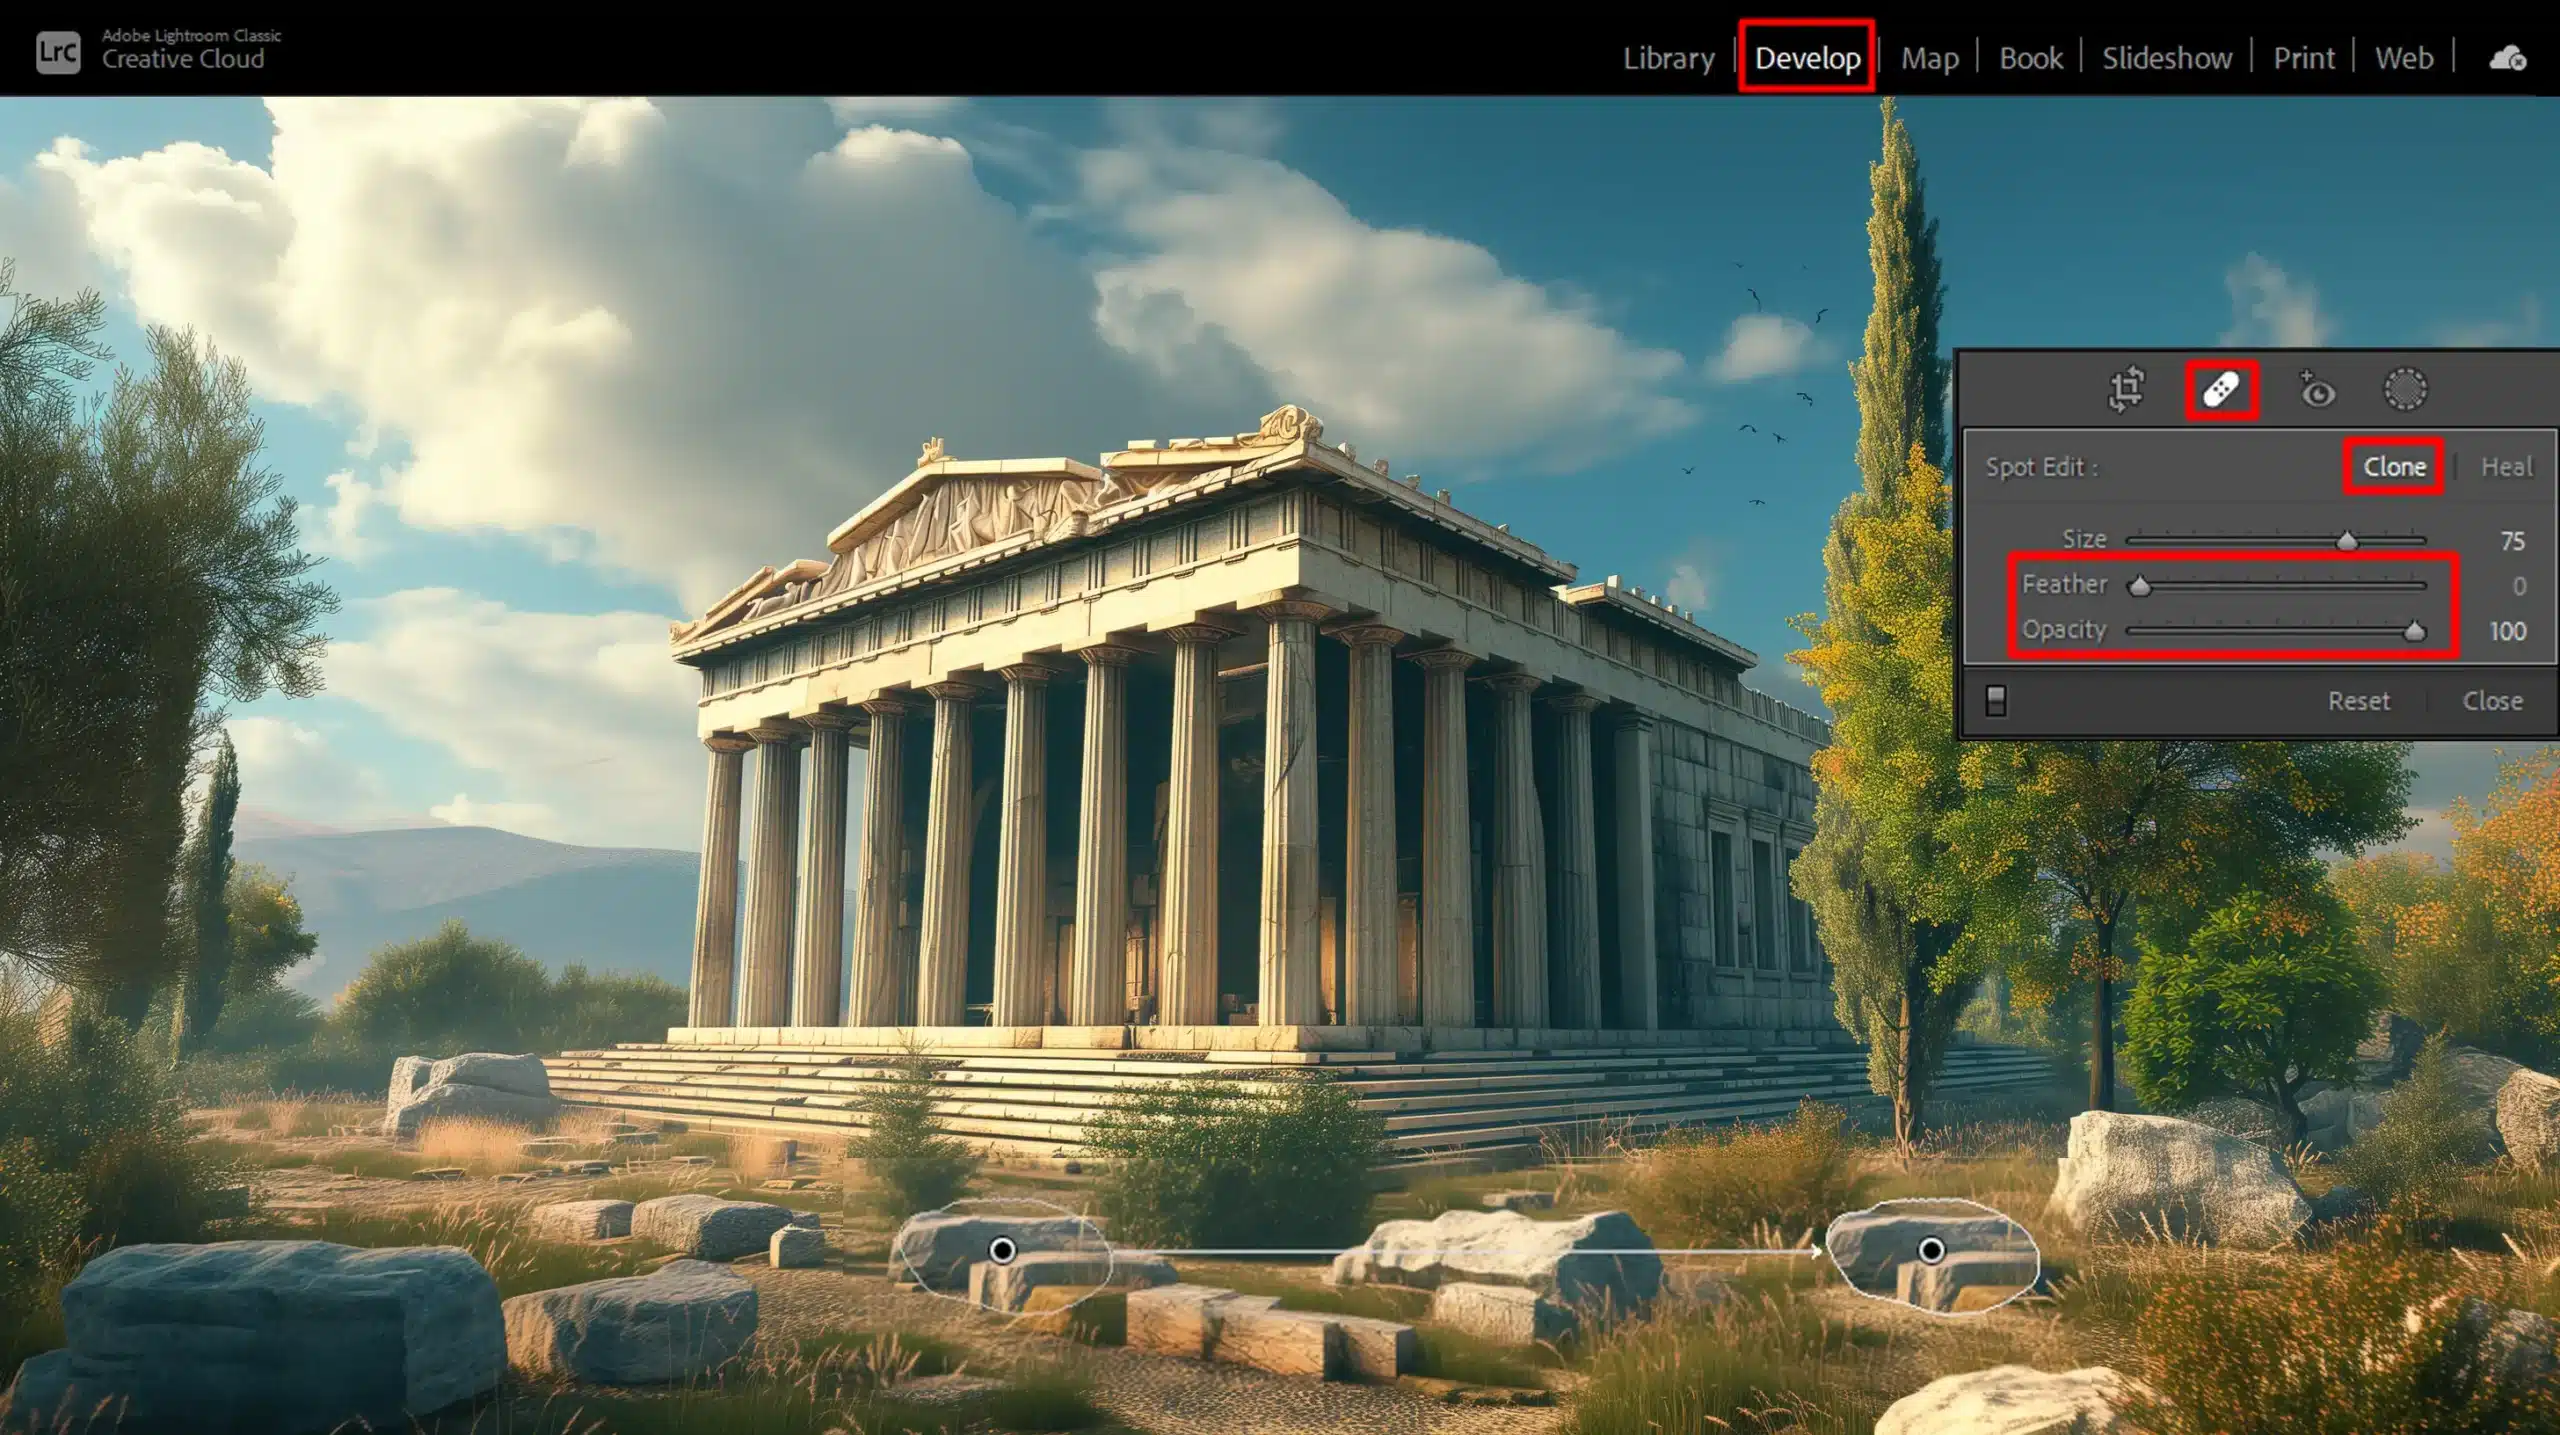
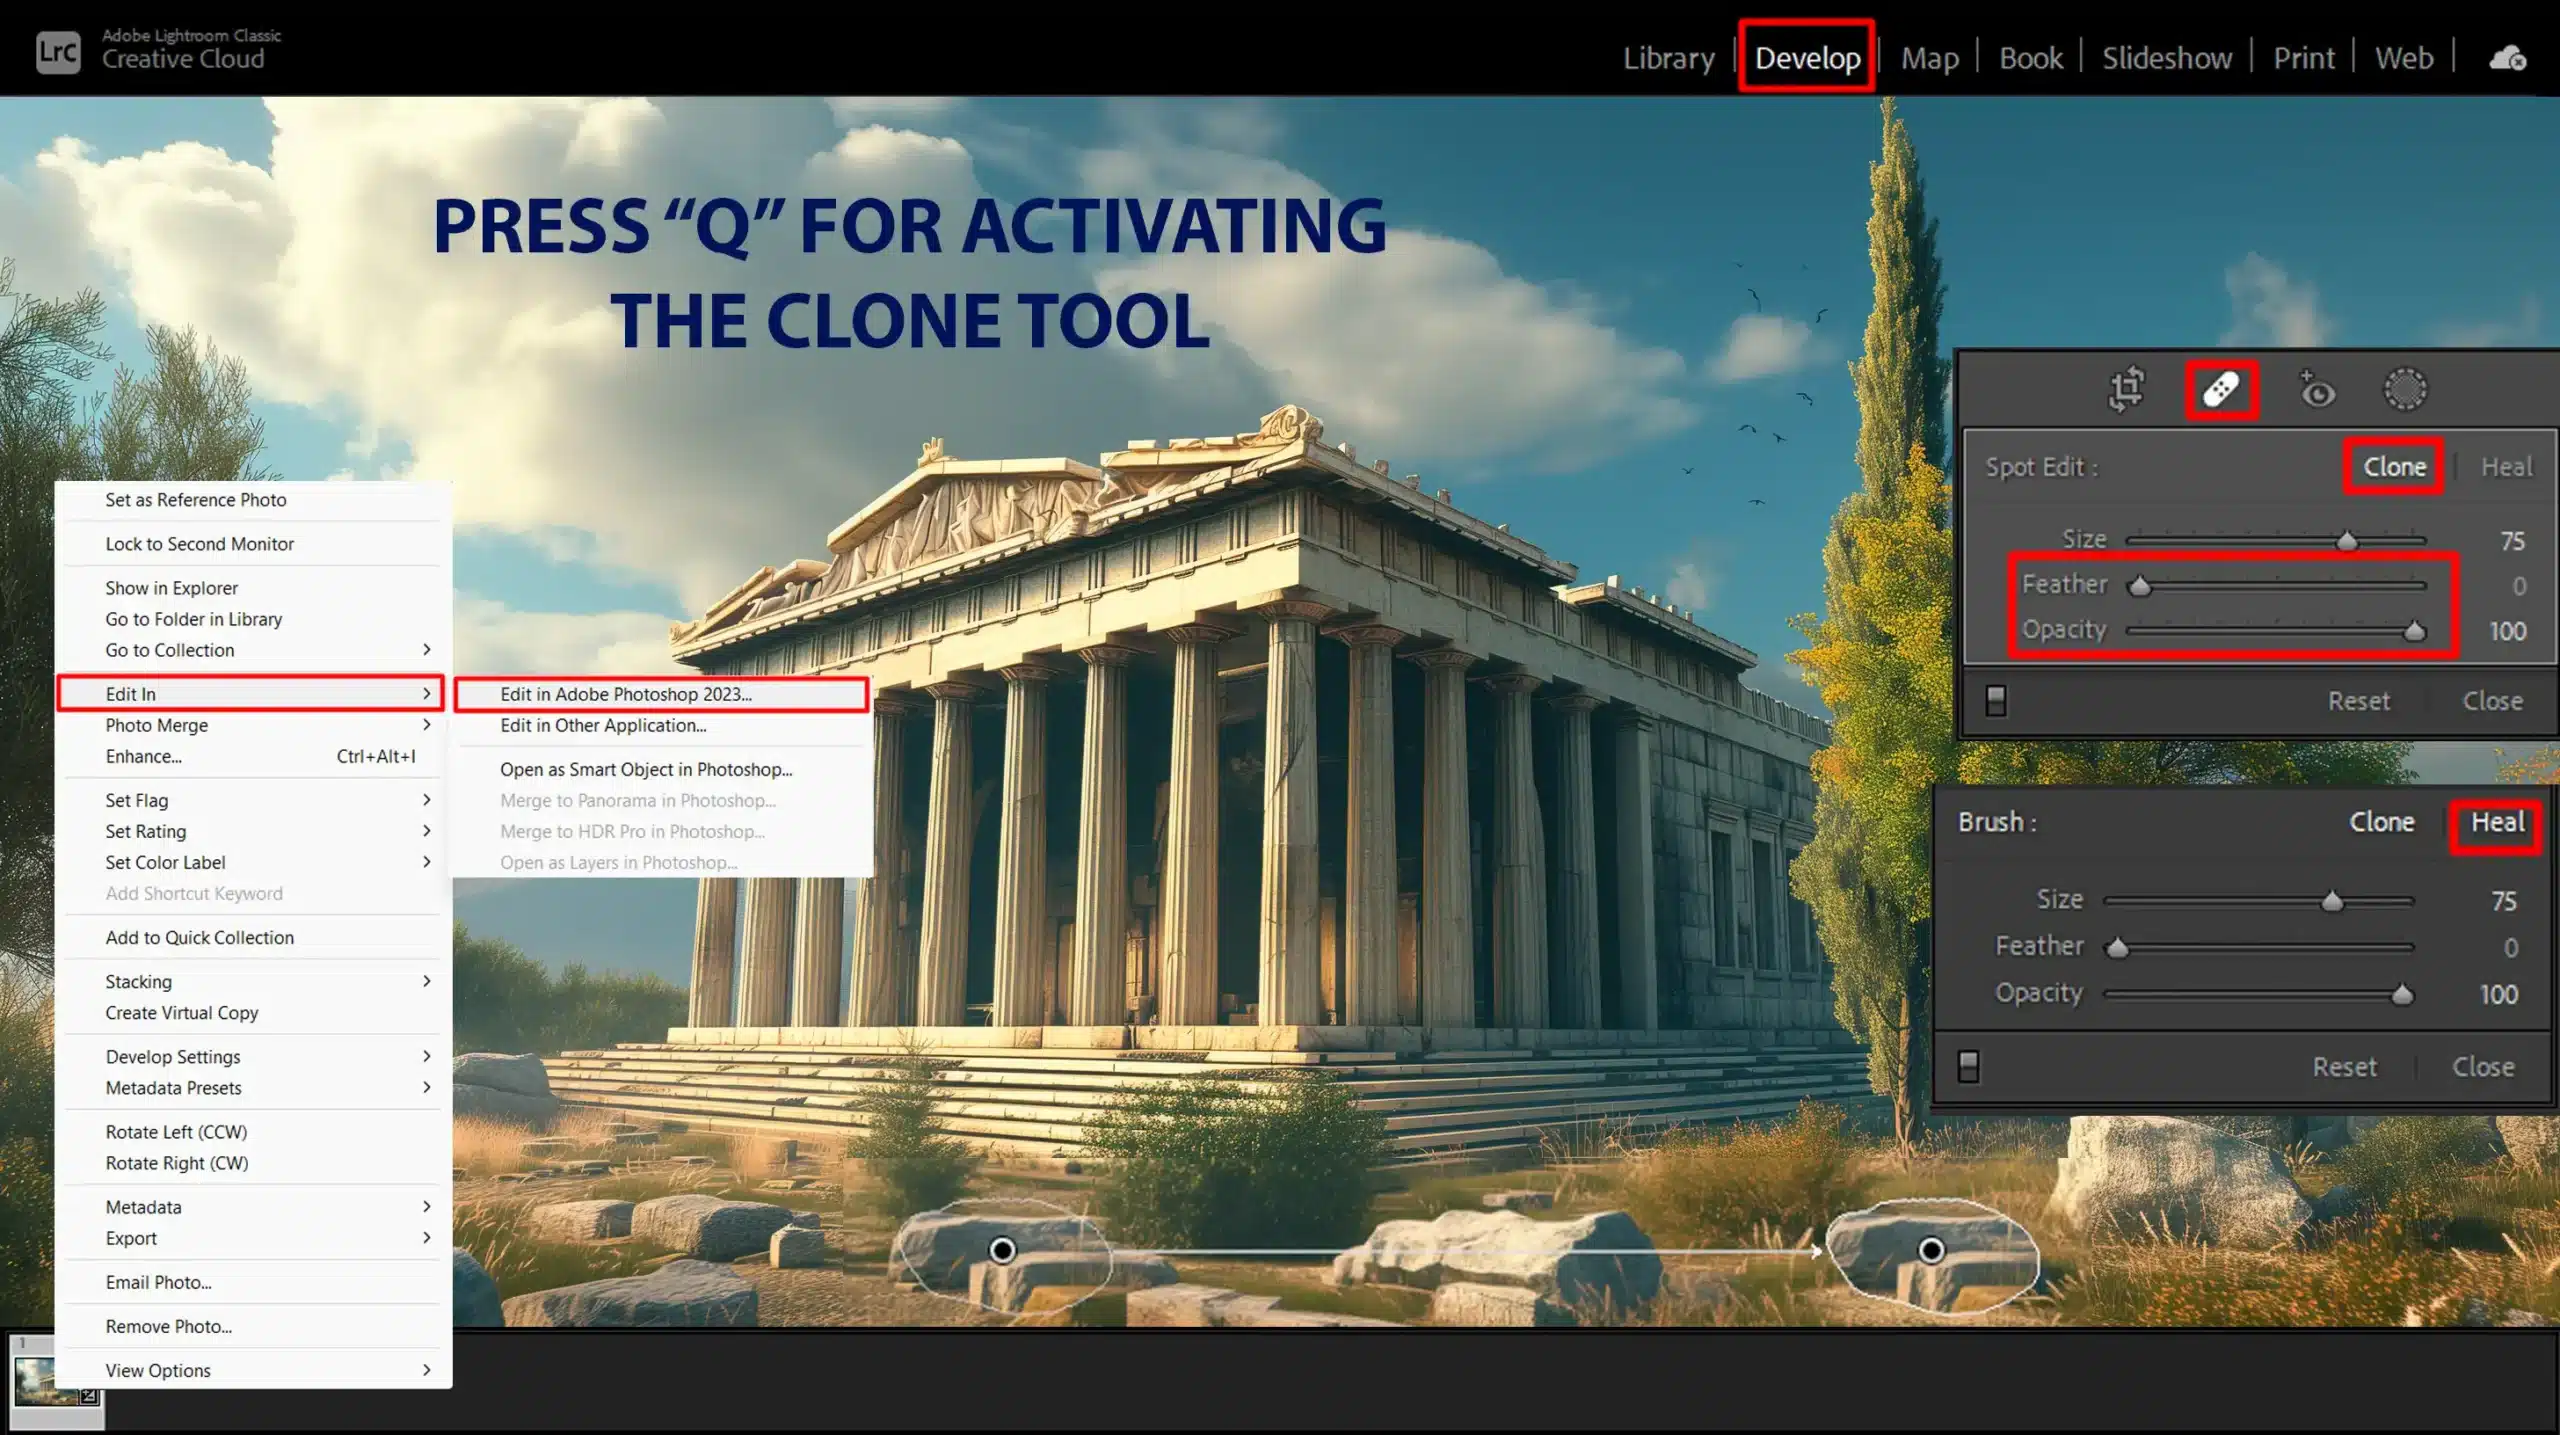
To begin, open your image in Lightroom Classic and navigate to the Develop section. This is where all the magic happens. Once there, select the clone tool found in the toolbar.
Select the Tool: Click the clone tool icon, which looks like a rubber stamp, located on the right-hand side of the Develop Module.
Choose a Source Area: Hold the control key and click on the area of the image you want to copy. This is your source area.
Apply to the Destination Area: Move the mouse pointer to the part of the image you want to edit and click again. This is your destination area. Adjust the size of the tool using the slider for better precision.
Adjust Opacity and Feathering: Use the tool overlay to blend the cloned area naturally with the rest of the image.
Common Mistakes to Avoid
Misplacing the source and destination areas often leads to more harm than good. Another common mistake is neglecting to adjust opacity and feathering settings.
Using a hard edge without feathering can result in unnatural patches. Always zoom in to ensure small details are accurately handled.
Users frequently overlook this, leading to noticeable discrepancies.
Advanced Techniques with the Clone Tool
Mastering the clone tool can significantly elevate your image editing skills. Consider working with multiple source areas for complex photos.
Create seamless blends by gradually layering clone stamps using different parts of the image.
Combining Tools: Use the clone tool alongside the healing tool on stubborn spots. This method utilizes both tools' strengths.
Utilize Shortcuts: Lightroom has numerous shortcuts that can speed up your workflow. For precise cloning, learn these and use them efficiently.
Experiment with Content Aware Remove: Adobe Photoshop's content aware remove is another powerful tool. It automates what you do manually in the clone tool, offering quicker results.
Pro Tip: Always save edits progressively, enabling you to revert changes if necessary. This practice can save countless hours of work.
Comparing Lightroom Clone Tool with Clone Stamp Tool
When comparing the Lightroom Clone Tool with the Clone Stamp Tools, you’ll find that both are designed to create seamless edits, but they function differently.
The Clone Tool in Lightroom is auto–adjusted to connect pixels intelligently, while the Clone Stamp Tools allows for more manual handling and precise placement on a PC.
Feature
Lightroom Clone Tool
Photoshop Clone Stamp Tool
Ease of Use
Easy, user-friendly
Requires more manual control
Auto-Adjustment
Automatic blending of pixels
Manual control over source and opacity
Editing Type
Non-destructive, virtual copies
Pixel-based, requires layer management
Ideal For
Quick fixes, basic retouching
High-detail work, complex edits
In practice, the CloneTool is often preferred for its ease of use, especially in post-processing, whereas the Clone Stamp offers detailed control when you need to display specific edits as explained.
Differences Between Clone Tool and Clone Stamp Tool
The clone tool in Lightroom and the clone stamp tools in Photoshop both use the clonefeature to fix imperfections. However, they have key differences.
Lightroom Clone Tool
In Lightroom, the tool in Lightroom helps you use the clone capabilities. You simply select a source area and drag it to cover up blemishes. It’s straightforward and non-destructive.
Photoshop Clone Stamp Tools
Photoshop’s clone stamp tools gives you more control. You can clone from multiple sources and alter opacity. But remember, it’s pixel-based so it can be more complex.
In Lightroom, edits are automatically saved. In Photoshop, you might need multiple layers to avoid unwanted consequences.
When to Use Each Tool
Knowing when to use the clonetool in Lightroom or Photoshop is crucial.
Here are the scenarios:
Use the Lightroom Clone Tool:
Quick fixes for dust spots.
Basic retouching tasks that don’t need layers.
Adjustments on multiple images quickly.
Use the Clone Stamp Tool in Photoshop:
High-detail work or when blending different elements of an image.
Cloning larger or complex areas where precise control is needed.
Edit-specific parts of a image where light and texture vary.
Understanding these scenarios will enable you to make better decisions. Think about your specific needs and choose accordingly.
Pro Tip: To swiftly use the clonetool effectively, note that combining it with the heal tool often yields the best results. This practice is recommended for a more polished finish.
To correct any issues or patterns created with the Lightroom Clone Tool, you can easily reset and ensure that you only delete unwanted elements, not the content you wish to retain.
Fixing Common Problems with the Clone Tool
Here, we dive into frequently encountered issues with the Clone Tool in both AdobeLightroom and Photoshop. One common problem is the inconsistency in cloned areas.
This usually happens when the source point was not carefully selected. Adobe Lightroom users can fix this by choosing a cleaner, more uniform area as the source.
A misstep in cloning can result in visible patterns or a repetitive look. To counter this, try varying your source area by frequently redefining the clone origin.
Adobe Photoshop offers more precise control in this regard, allowing for multiple sources and dynamic adjustments.
Other errors include the unnatural blending of textures.
This problem can be addressed by using the Heal tool in tandem with the Clone tool in Lightroom. The Heal tool helps blend the cloned area smoothly with surrounding pixels.
Tips for how to Reset and Delete Unwanted Elements, Not the Content
First, always prepare your workspace. Ensure your screen brightness is consistent to avoid discrepancies in the cloned areas. If you’re on Windows, consider using the built-in color calibration tools available or Adobe’s color management settings for best results.
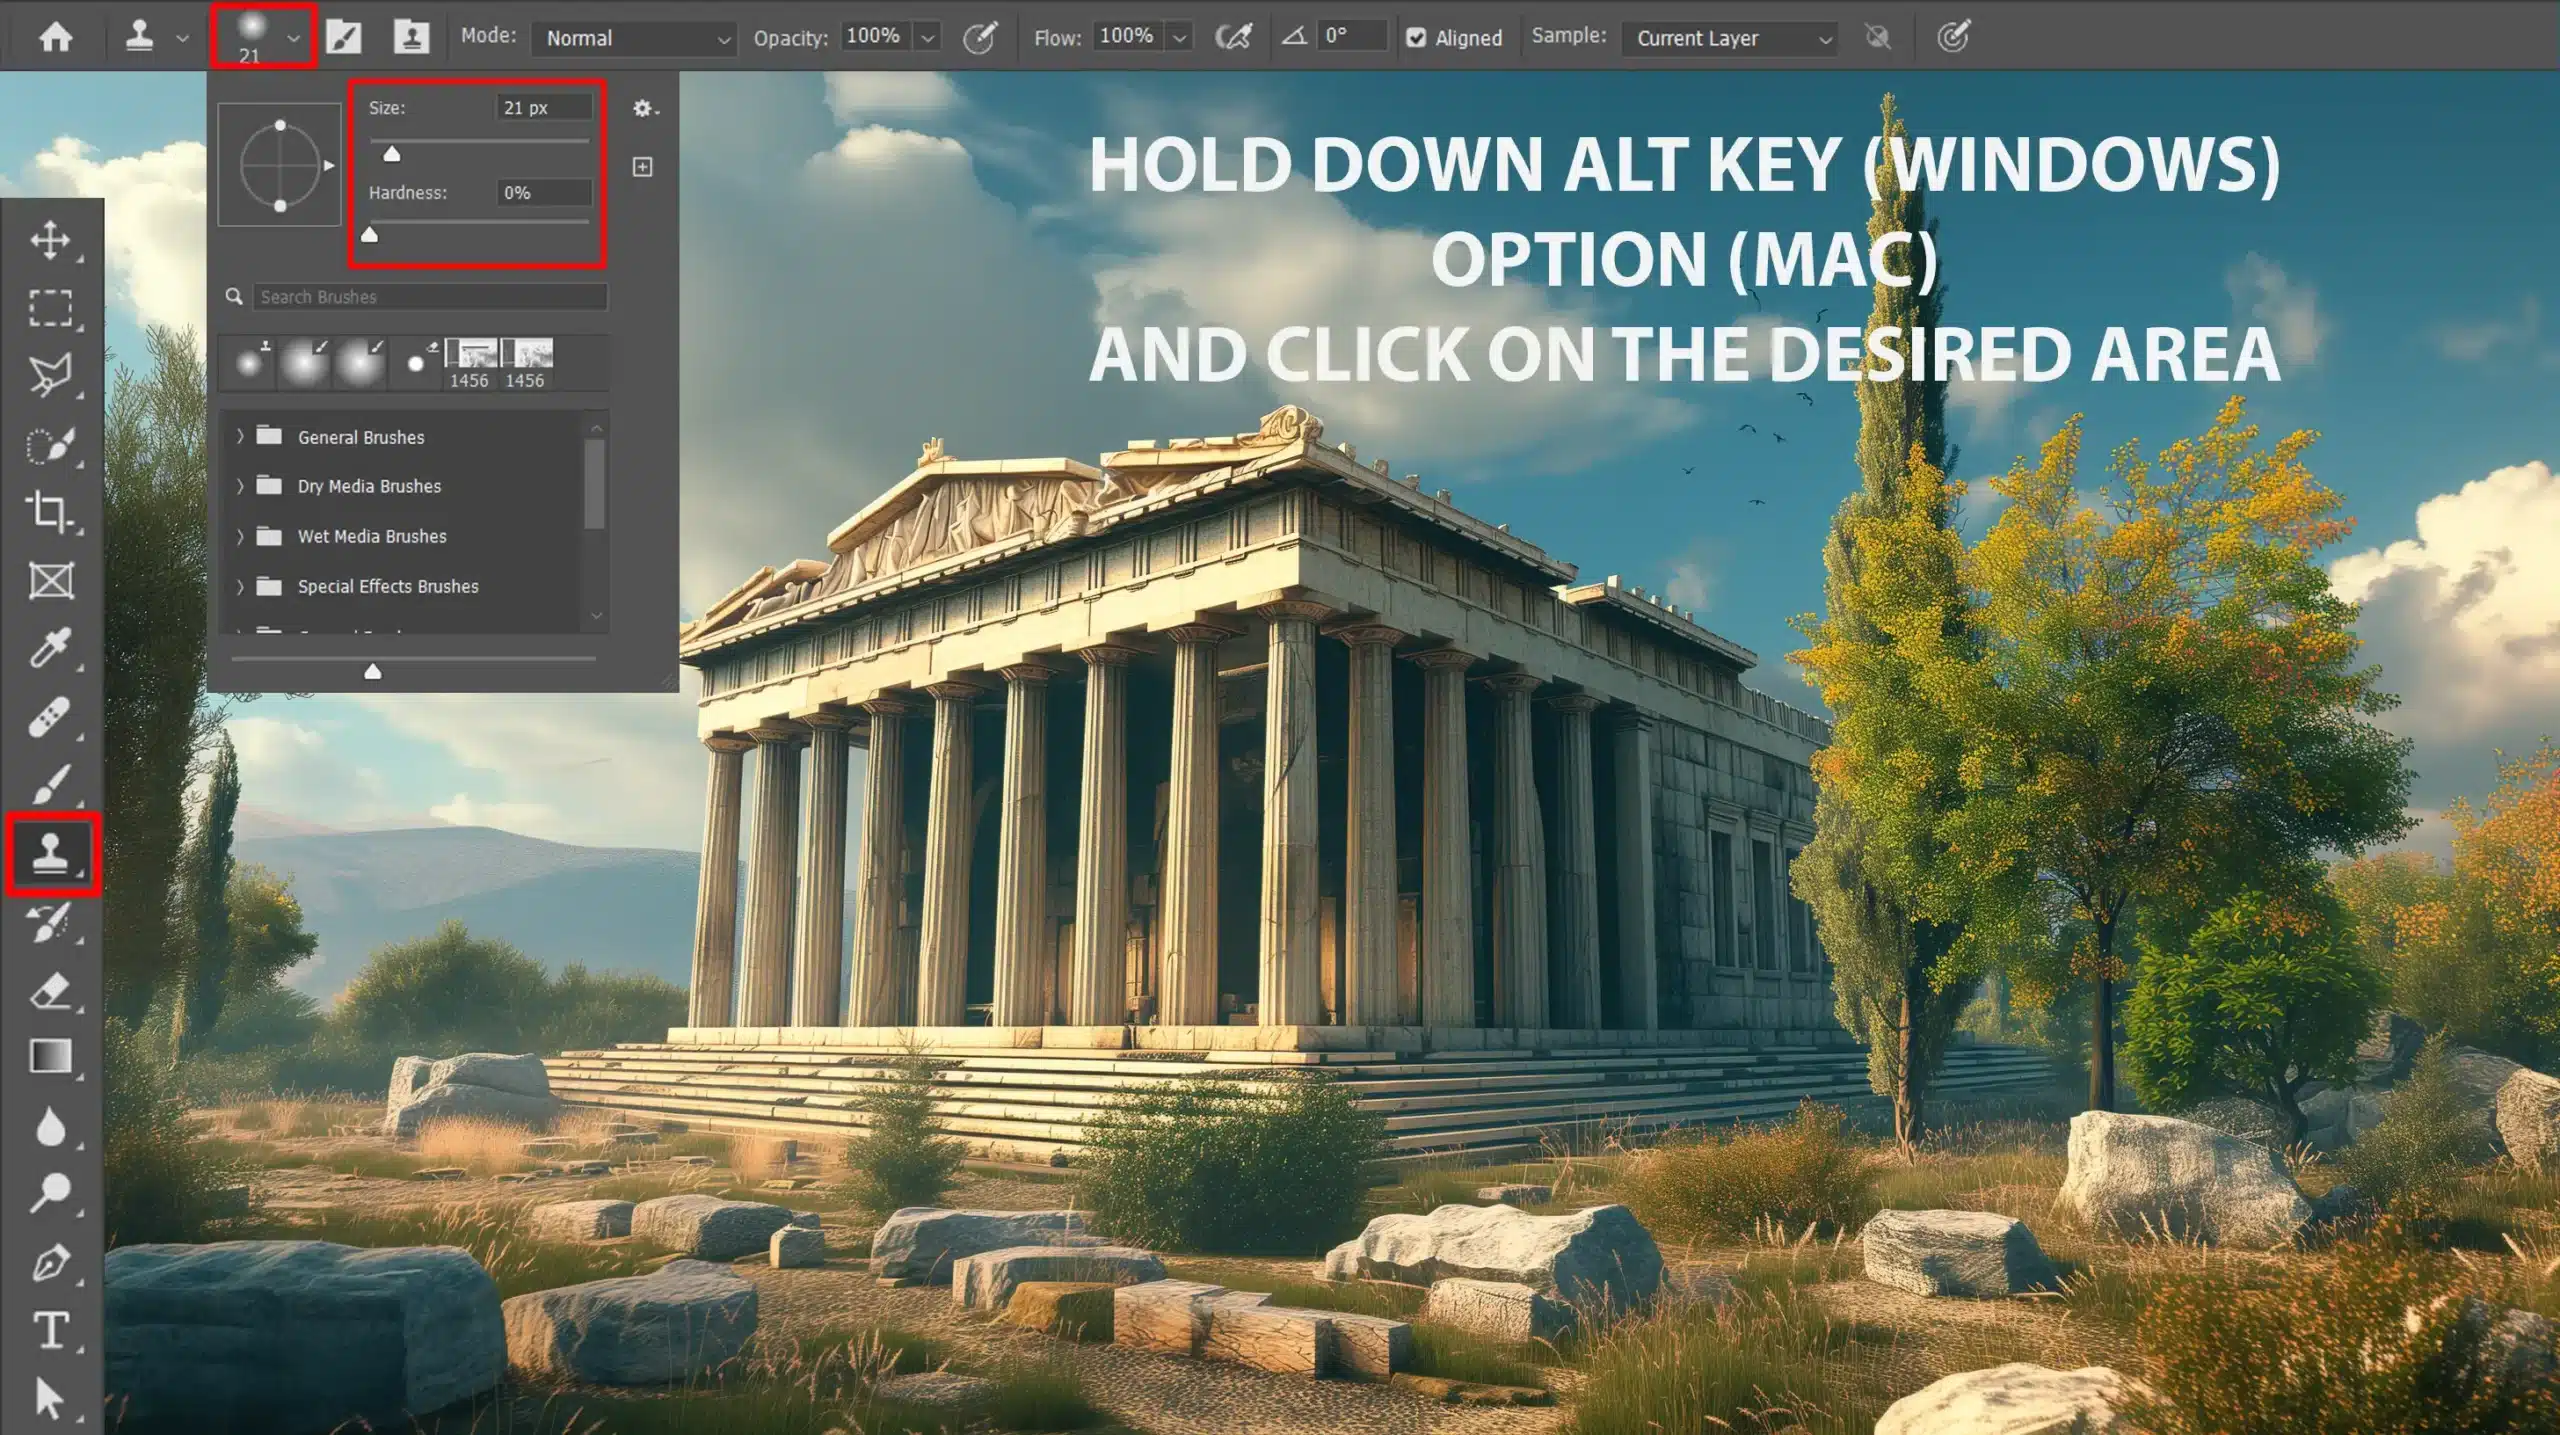
Next, zoom in. Working up close allows finer control and ensures better blending. In Photoshop, use the “Alt” key to sample multiple points. This technique avoids the patchy looks that sometimes emerge from repeated cloning.
In Lightroom, do not forget to use the “Feather” and “Opacity” sliders for a more natural finish. These settings help soften the boundaries and integrate the cloned area seamlessly.
Always save a screenshot of your work before and after the cloning process. This helps you track progress and can act as a reference if you need to undo steps later. Also, using screenshots for personal study helps understand what techniques work best under specific conditions.
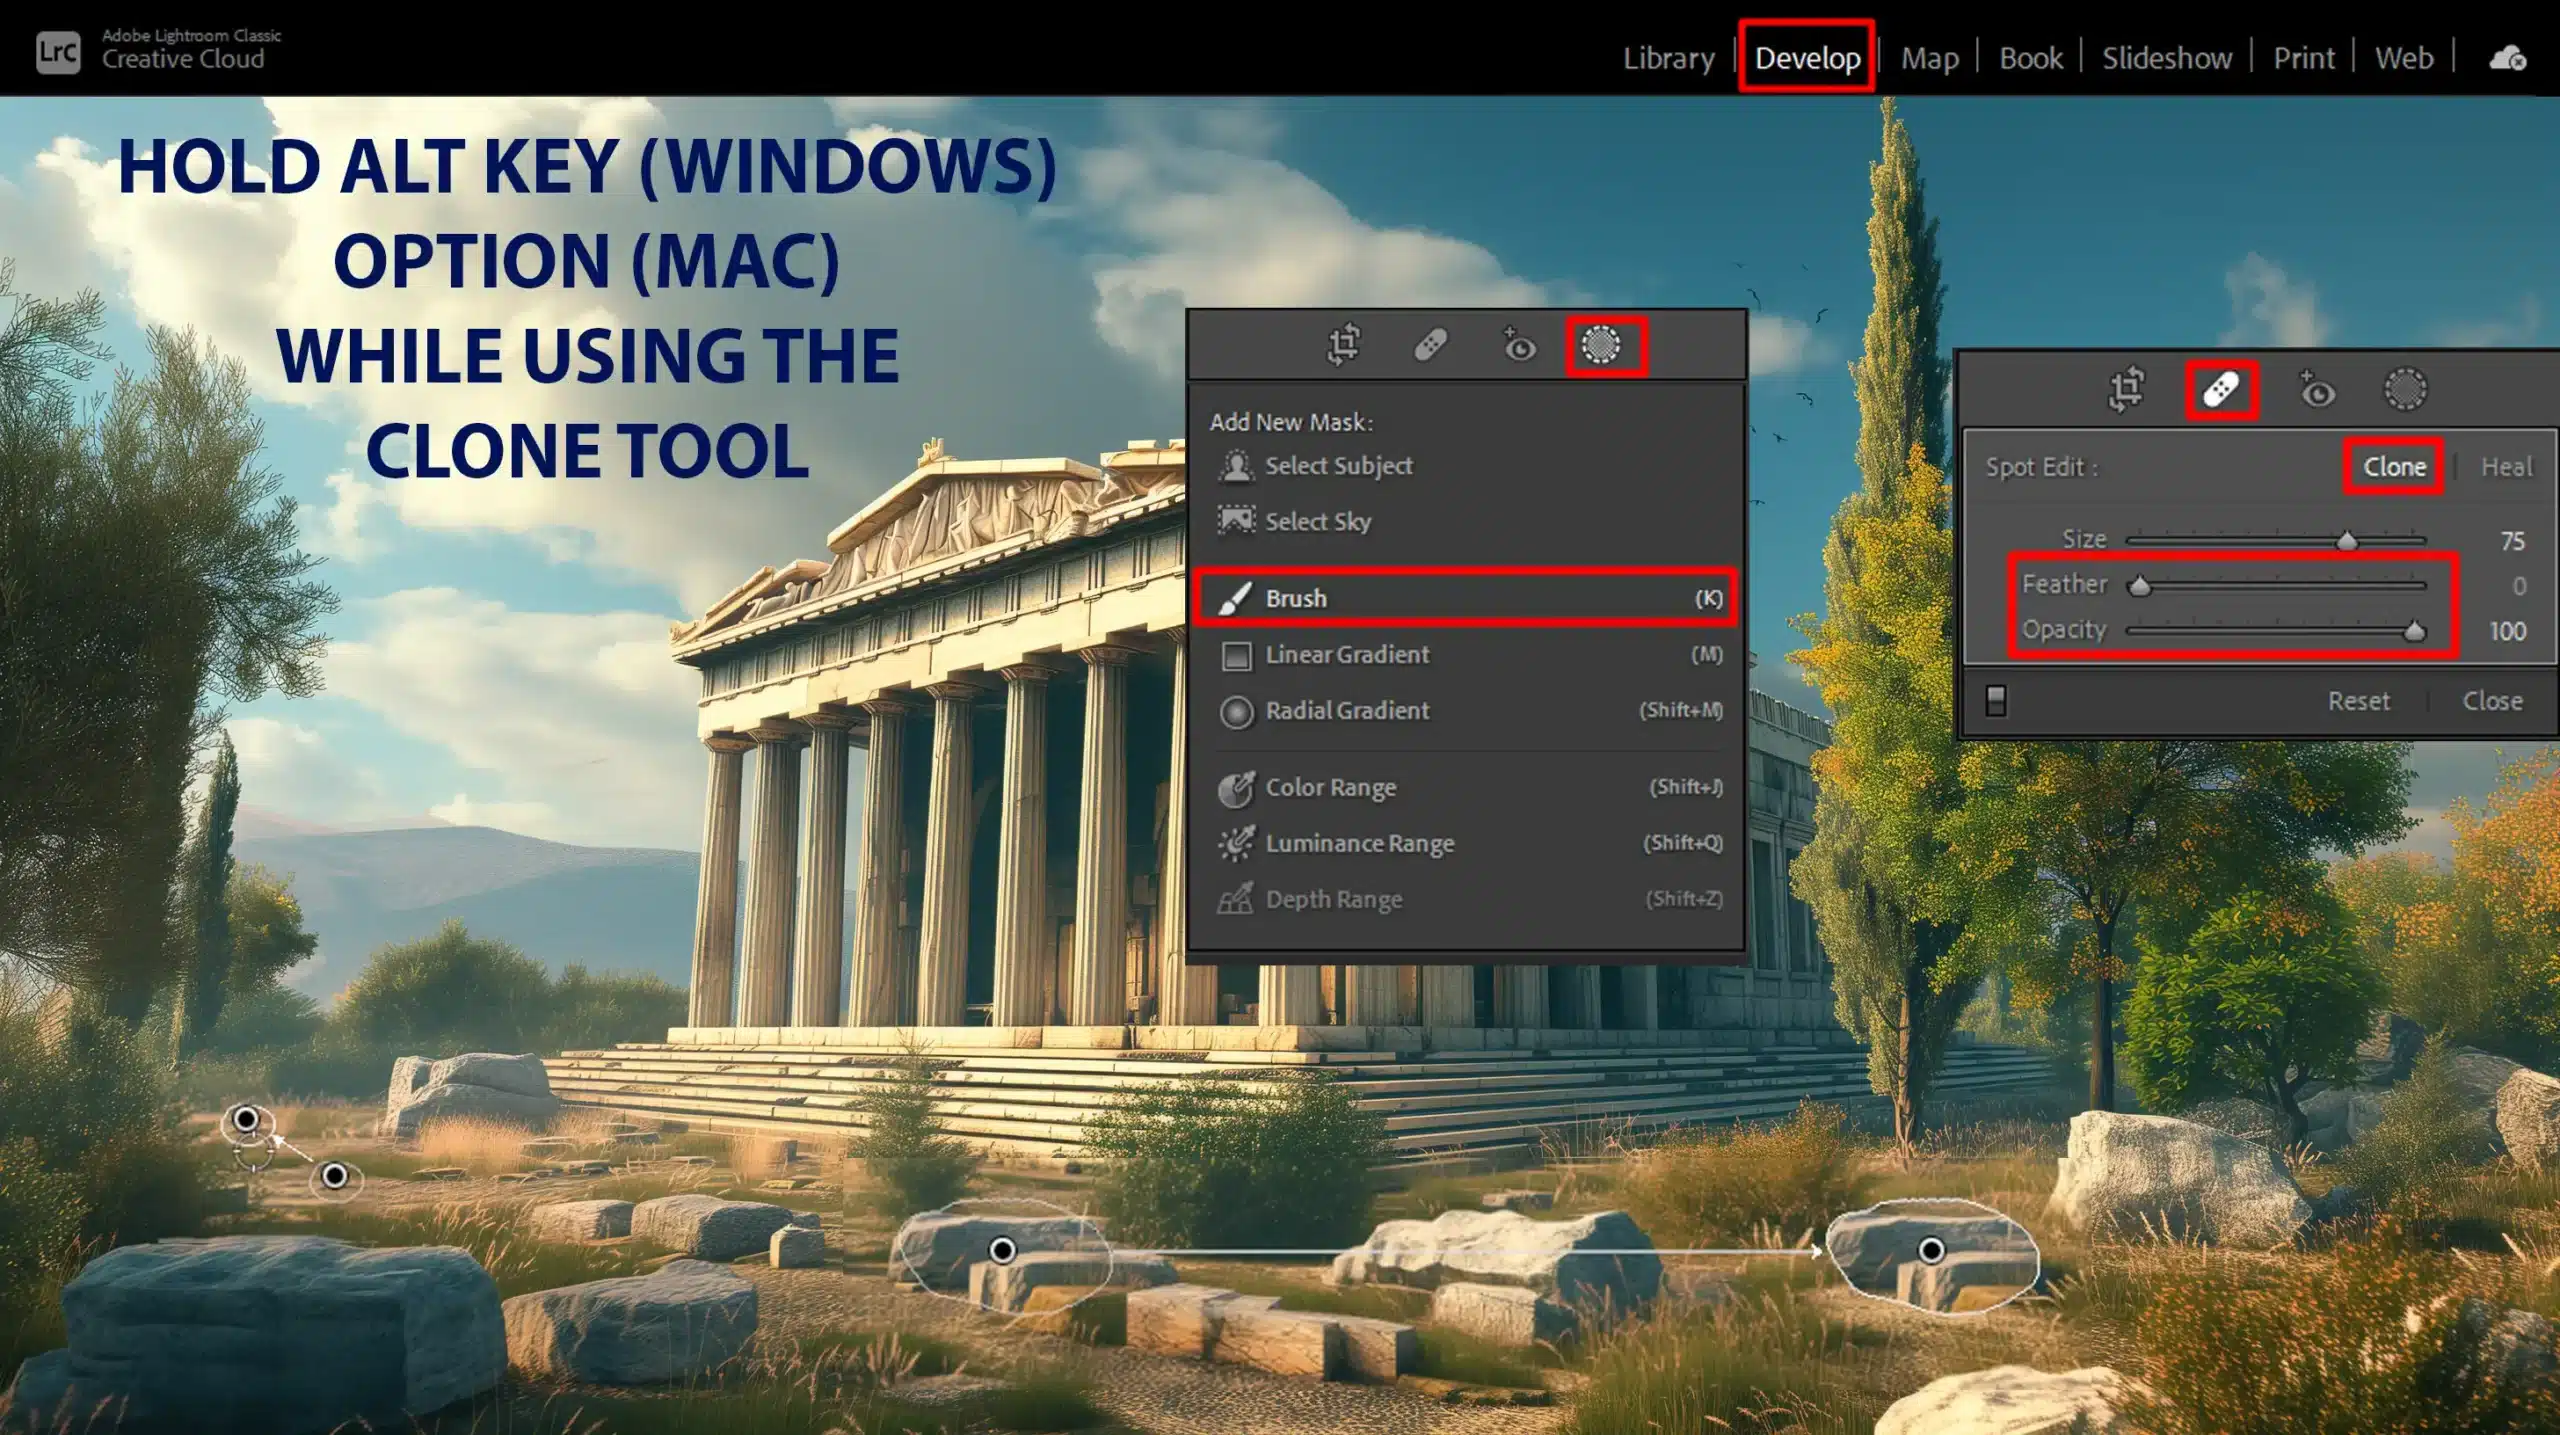
Pro Tip: Combine the Clone Tool with Lightroom’s Adjustment Brush to make minute adjustments. This provides an enhanced blending effect, useful for smaller details that require focused attention.
Remember, practice makes perfect. The more you use these tools, the better you’ll become at achieving seamless edits that enhance your photos without revealing your touch.
Real-World Applications of the Lightroom Clone Tool
The Lightroom Clone Tool is useful for a range of real-world applications, such as removing distractions by replacing them with pixels from other things in the background.
This tool helps achieve results that are often better than you might expect, providing a clean and polished final image.
Removing shadows in Photoshop is a crucial skill for many photographers. When exploring real-world applications of the Lightroom Clone Tool, you’ll find it invaluable for tasks like shadow removal.
Editing Portraits with the Clone Tool
The Lightroom Clone Tool helps you clean up portraits seamlessly. First, choose an area on the skin that matches well. Drag to cover blemishes or unwanted spots. This trick maintains a natural look. When done right, no one can tell the difference.
Pro Tip: handle wrinkles and minor lines carefully. Start by cloning small sections of the face. Always drag gently. This ensures that the edits blend naturally. Remember, subtlety is key here. You don’t want faces looking like plastic.
Lastly, don’t forget about your screen brightness. A consistent screen setting aids in accuracy. This simple step avoids surprises when seeing the image on other screens. Keep adjusting and experimenting to find your perfect method.
Proper lighting can make your edits look even more natural and polished.
Landscape Photography Enhancements
The Clone Tool isn’t just for portraits; it’s great for landscapes too. Imagine an amazing sunset with a distracting element. You can easily remove it by cloning adjacent areas.
Select a source point near the distraction and drag smoothly. You’ve just enhanced your landscape photo.
For uneven surfaces like grass or gravel, adopting a varied approach helps. Frequently redefine your source points. This action keeps cloned areas looking natural. Use short brush strokes and remember to drag smartly.
Sometimes, combining adjustments with the clone tool elevates your work. Utilize Lightroom’s brush tool for final touches. Finishing with this layer brings out detailed enhancements and makes the photo pop.
Pro Tip: save your work in different stages. Taking before-and-after screenshots motivates progress. You not only see improvements but also refine your technique over time.
When it comes to landscape photography enhancements, the Spot Healing Brush Tool is essential. This tool helps you quickly fix imperfections, ensuring your landscapes look pristine.
Frequently Asked Questions (FAQs)
Is there a Clone tool in Adobe Lightroom?
Yes, Lightroom offers a Clone tool which is part of its Spot Removal tool. This can be used to remove unwanted spots or objects from your photos.
What is the difference between clone and heal in Lightroom?
The Clone tool copies exact pixels from one part of the image to another, ideal for removing objects against a consistent background.
The Heal tool, on the other hand, also copies pixels but blends them with the surrounding area's color and texture, making it suitable for correcting imperfections like blemishes or dust on varied backgrounds.
How do I duplicate part of an image in Lightroom?
To duplicate part of an image in Lightroom, use the Clone tool. Simply select the tool, choose the area you want to copy, and then apply it to the area where you want the duplication to appear.
How do I duplicate edits in Lightroom?
To duplicate edits across multiple photos in Lightroom, use the 'Sync' feature. First, apply your desired edits to one photo. Then, select it along with the other photos you want to edit, and click on 'Sync Settings' to apply the same edits to all selected photos.
Conclusion
Using the LightroomClone Tool has been a game-changer for me when it comes to cleaning up my photos. Whether it’s removing a pesky dust spot or an unwanted object, this tool makes editing straightforward and effective.
I’ve found that with a little practice, you can get professional-looking results right from your computer.
If you’re interested in diving deeper into photo editing, you might find my Photoshop Course and Lightroom Course really helpful.
They cover everything you need to know about enhancing your images and mastering these tools.
For those just starting out, Adobe offers Photoshop and Lightroom software that can get you up and running quickly.
Give them a try and see how they can transform your photo editing experience!
If this article has helped you, then Like and Share it with your friends
$2,061.00Original price was: $2,061.00.$1,061.00Current price is: $1,061.00. 27584
Download Your Free Guide Now!
Discover the secrets of photography with our printable guide! Master essential techniques like aperture, shutter speed, and ISO to create stunning images. Get your free printable PDF now and start turning your snapshots into masterpieces!