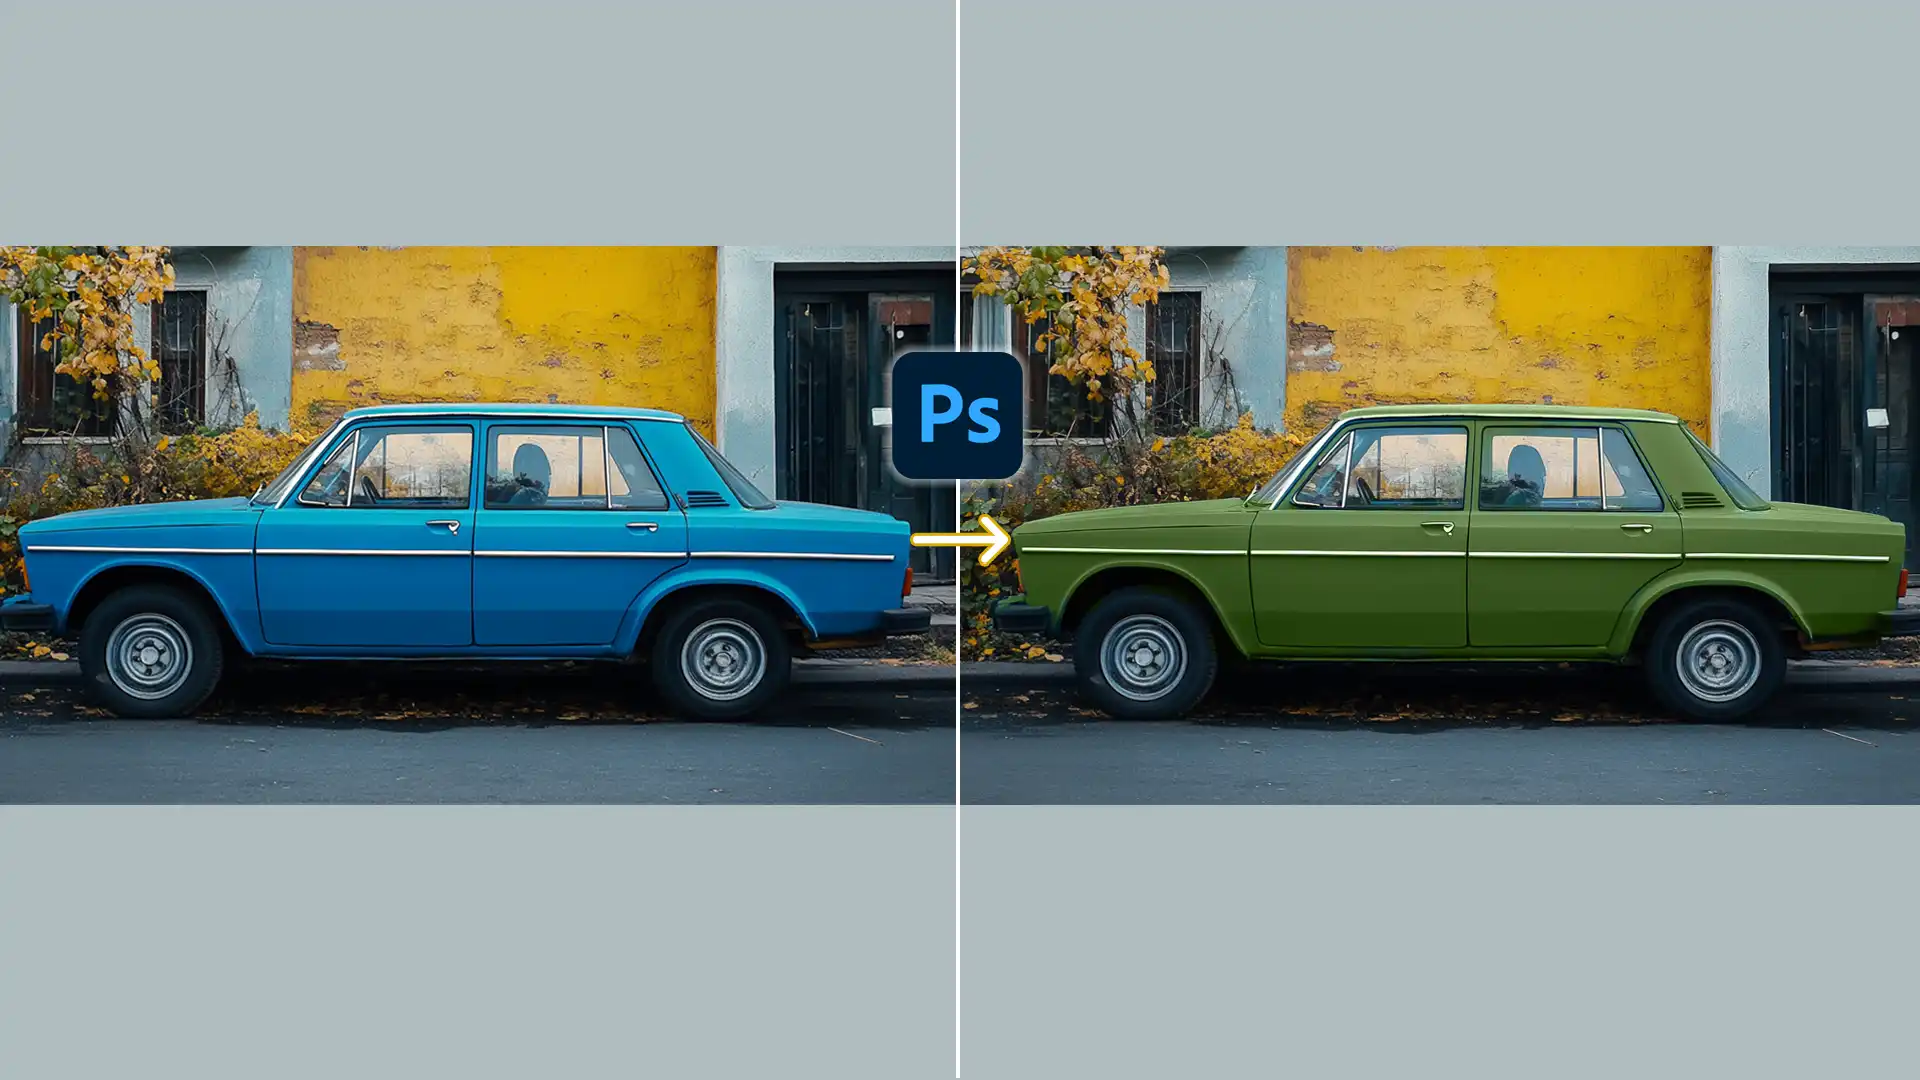
Are you curious about how to change color in Photoshop and transform your images with ease?
Whether you’re a budding photographer or a seasoned designer, mastering color change techniques can elevate your work to new heights.
In this article, I’ll guide you through the simple yet powerful steps to tweak, enhance, and completely transform colors in your photos. By the end of this read, you’ll not only have the know-how but also the confidence to make your visuals pop.
Stay with me, and let’s dive into the world of color transformation in Photoshop together.
Table of Contents
How to Change Color in Photoshop
Before diving into color changes, we must grasp color modes. Adobe Photoshop offers modes like RGB and CMYK.
RGB stands for Red, Green, Blue, ideal for digital images. CMYK is Cyan, Magenta, Yellow, and Black, used for printing.
Choose wisely based on the project’s end-use. Choosing correctly impacts the final image quality significantly.
Pro Tip: Learn how to change DPI in Photoshop for high quality prints.
Additionally, learn what pixels inch for print means so that you don’t run into any problems after you’re all done with your editing.
Using the Replace Color Tool in Photoshop
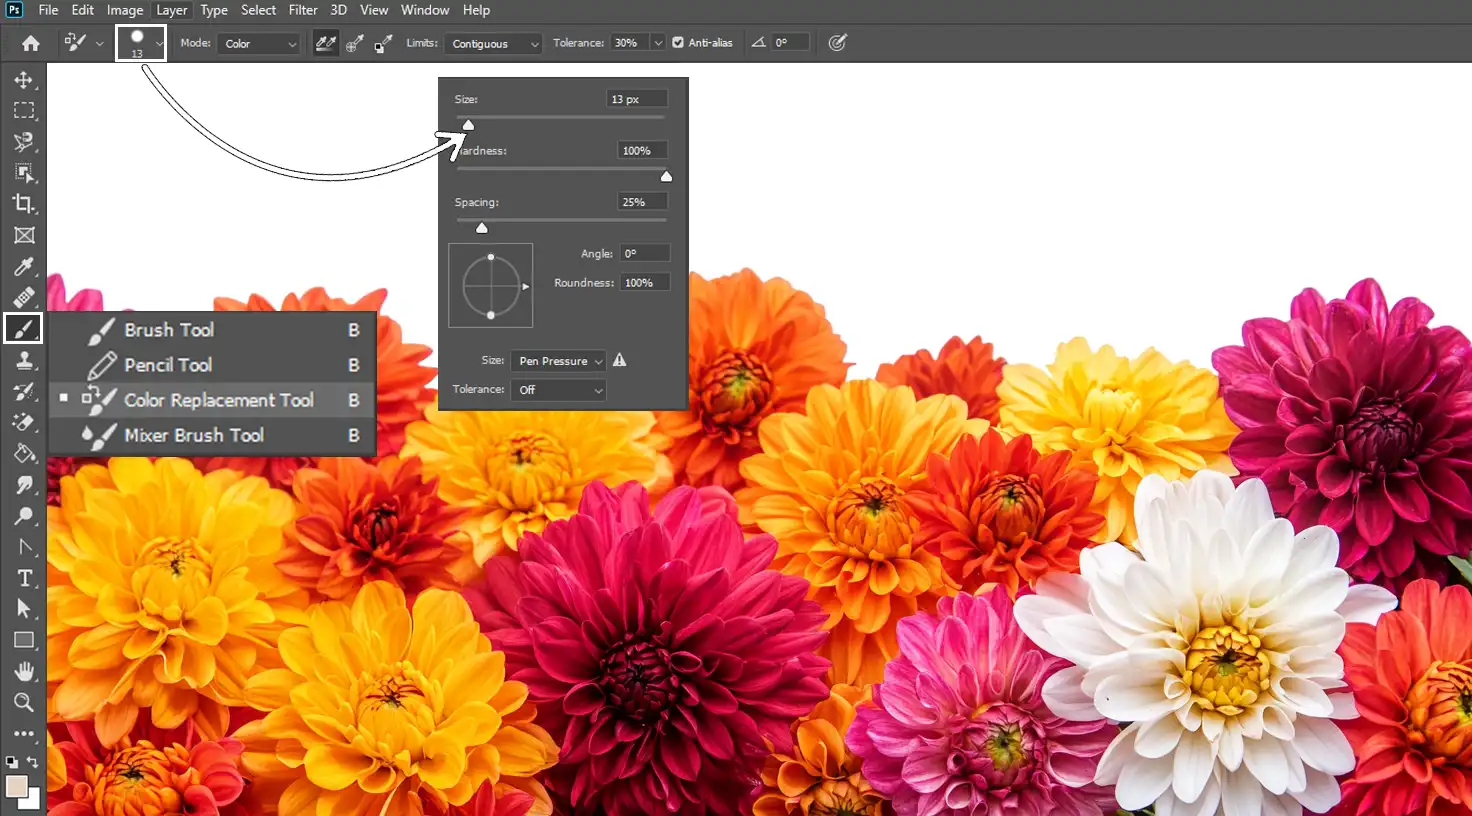
The replace color tool works wonders when editing detailed areas. You can change specific parts with precision.
- Use the Options Bar to adjust brush size to suit your need.
- Ensure Sampling options are set to the right mode.
This tool lets you target specific parts without altering the entire image. Perfect for replacing colors on detailed images.
Working with an Adjustment Layer
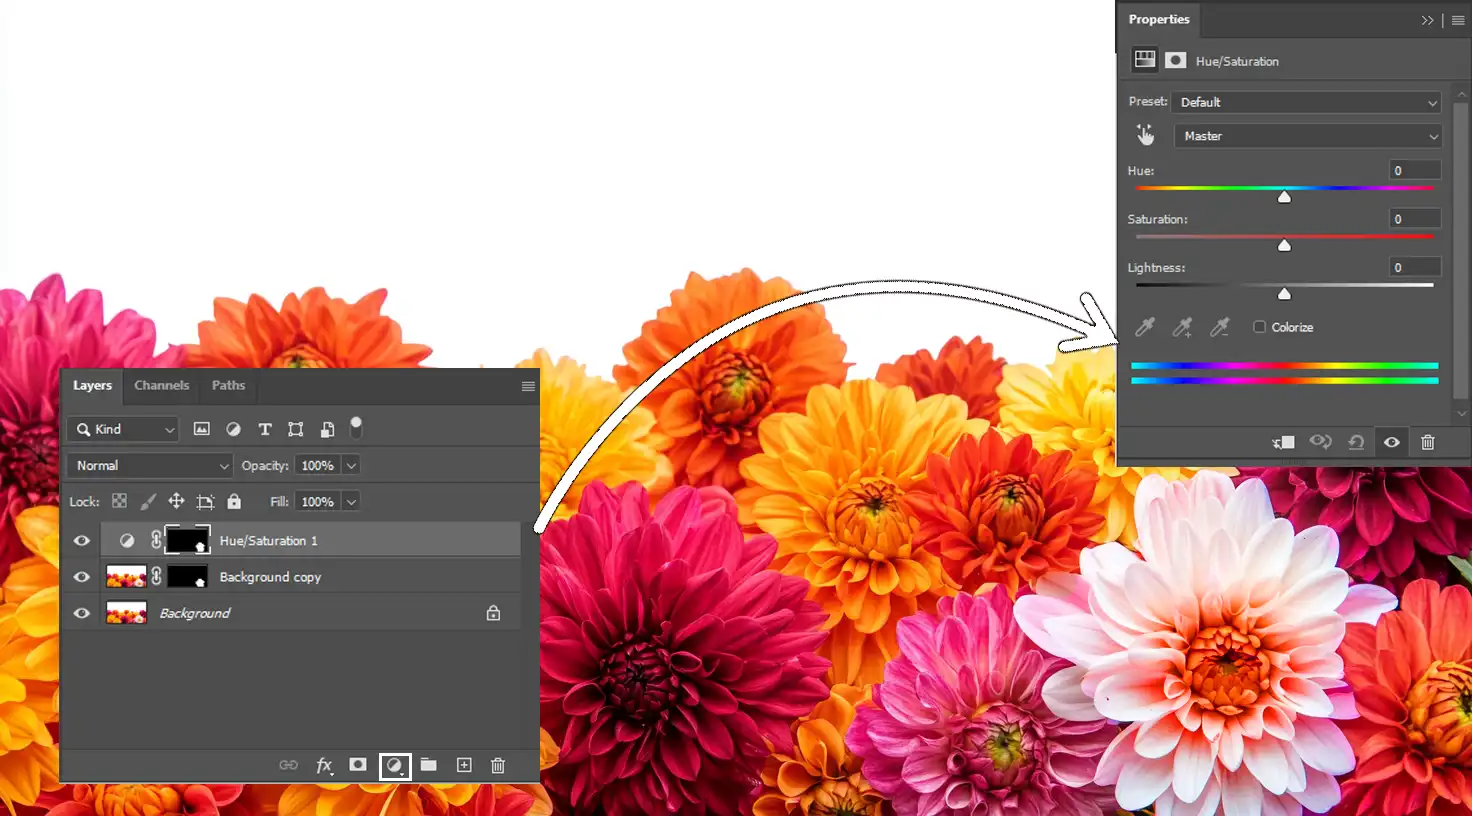
Adjustment layers don’t alter the original pixels, which is great for future changes.
Add a new adjustment layer by clicking the Adjustment Layer icon in the Layers Panel. Choose options like Hue/Saturation to change hues.
Using layer masks helps control where these changes apply. Depending on project goals, this can be a powerful tool.
Pro Tip: Learn how to change the color of a layer in Photoshop and the new layer shortcut in case you run into any problems.
Tips for Accurate Color Changes
For accurate color changes in Photoshop, follow these essential tips to ensure seamless adjustments:
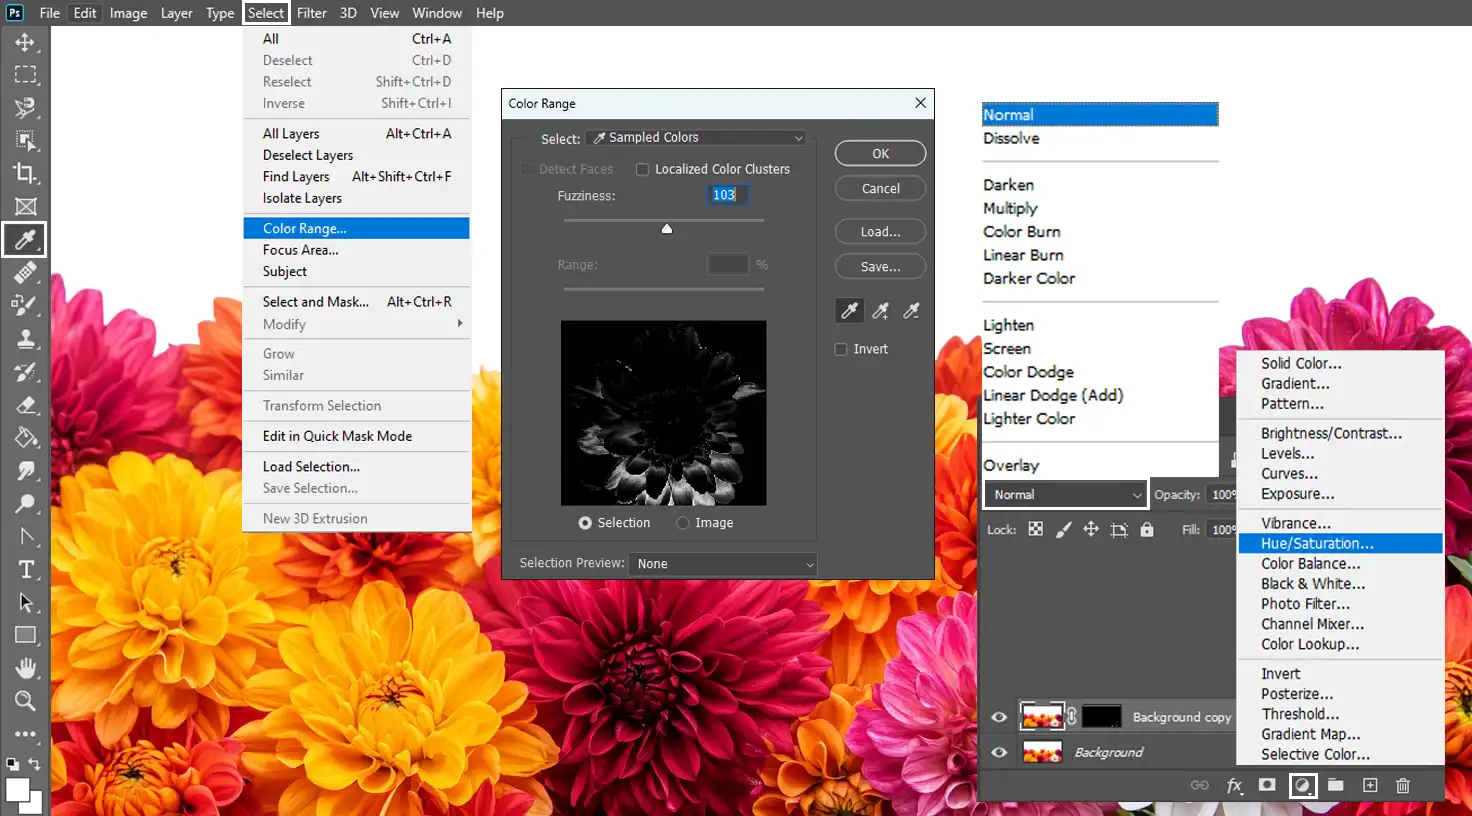
- To ensure accurate changes, use the Eyedropper Tool to select the existing color. This ensures uniformity across changes.
- Adjust the fuzziness slider for fine-tuning.
- For softer blends, experiment with the blending mode. Test combinations for best results.
- Adjust hue saturation using the sliders within the hue saturation adjustment layer. A small change makes a big difference.
Pro Tip: Always keep an active eye on the histogram panel. It gives insight into color balance throughout the entire image.
Mastering Adjustment Layers
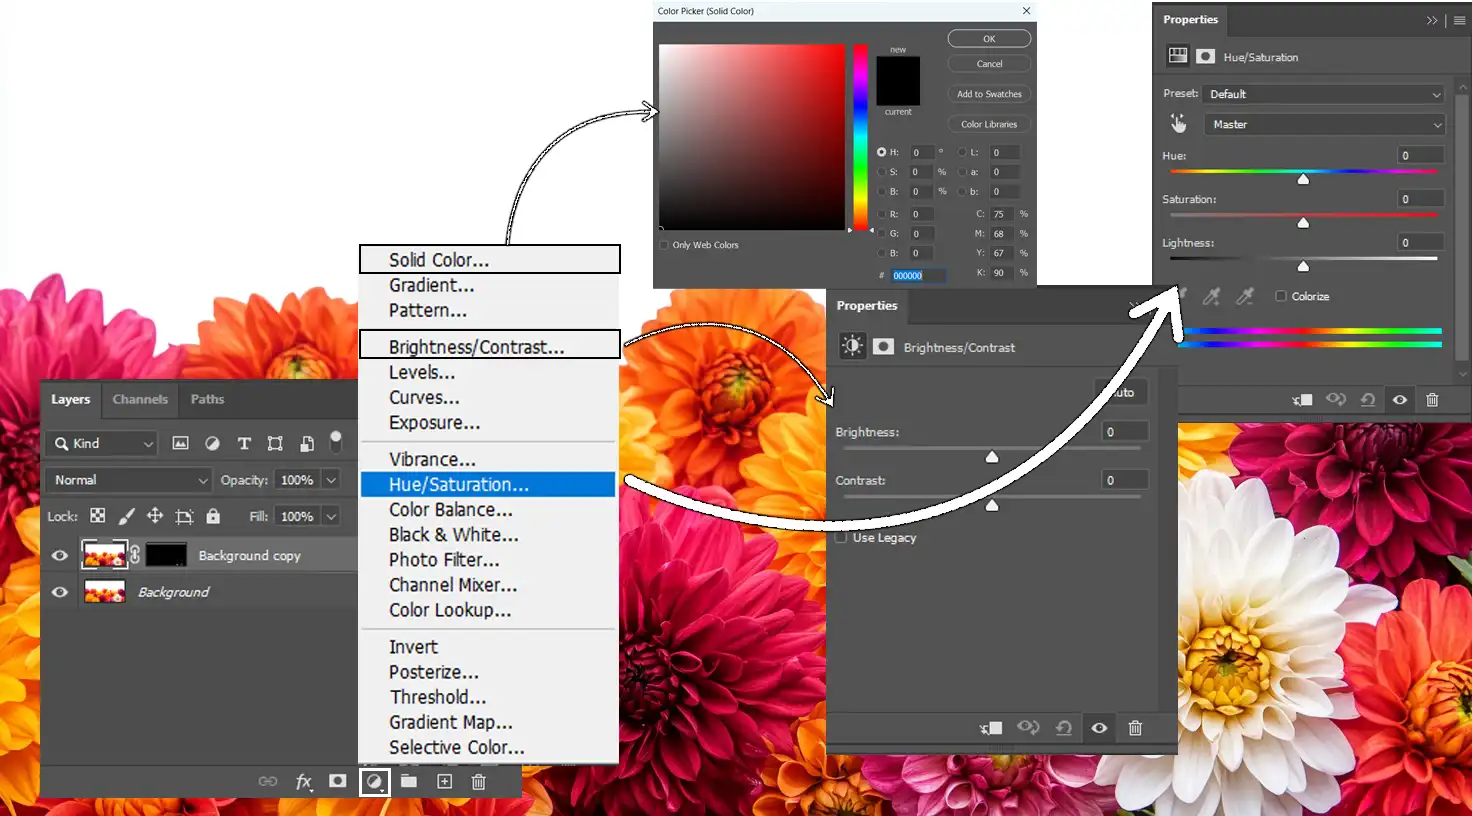
These layers in Adobe Photoshop open the door to a world of image possibilities. They allow us to tweak, twist, and transform without damaging the original.
There are several types to explore, each bringing its own magic.
- Hue/Saturation Adjustment: Think of this as your color DJ. It lets you adjust colors with dance-floor precision. With this layer, hue, saturation, and lightness sliders become your bustling party controls. Got an object that’s lacked in vibe? Use this tool.
- Brightness/Contrast: Life can be brighter on the other side. This type sharpens images by tweaking these elements, making them pop like popcorn in the microwave.
- Solid Color and New Fill Layer: These lay down a color blanket over your image. Adjust to create subtle backgrounds or bold overlays. They're tools for changing the color of an object in just a few clicks.
Creating and Applying Adjustment Layers
Creating these layers is a breeze. In Photoshop, locate ‘Adjustment Layer‘ via the Layers Panel. Click to reveal a banquet of options, each ready to cater to your creative hunger.
Adding Hue/Saturation adjustment involves swiping sliders. Grab the eyedropper tool and make deliberate selections.
Change the foreground color, and observe the transformation. For new color excitement, dive deep into the color picker pool.
If you’re feeling adventurous, try a solid color.
Pro Tip: Learn how layer color swap works to make this process even easier.
Adjustment Layer Best Practices
To get the best out of an adjustment layer, patience and practice are key. Avoid using too many layers, else your image might look like a circus act gone wrong.
Switch on the colorize option sparingly; it can harmonize disparate elements but may overwhelm if not moderated.
When dealing with color replacement, always aim for localized color clusters. Focus on small areas for accuracy.
And the brush tool? An essential ally.
Use it in transitions or corrections. Ensure your changes cater perceptively to every pixel’s desire.
Remember the importance of lightness sliders. Correct balance here makes your visual story feel like daylight; natural and inviting.
Lastly, nothing beats experimentation with the replacement color tool, replace colors, or even a hue blending mode.
Exploring the Color Replacement Tool in Adobe Photoshop
Now, we turn our attention to the color replacement tool. This handy feature changes the entire mood of an image in just a few clicks.
Yes, you could say Photoshop is magical, but it’s also a media professionals’ toolbox.
Ever wondered how to change a t-shirt color in a photo seamlessly? It’s not magic, it’s technique!
Below is a quick guide to help you understand each step and avoid common mistakes when using this feature.
Use this table as a reference for getting the most out of your color editing in Photoshop.
| Aspect | Overview |
|---|---|
| What is the Color Replacement Tool? | A Photoshop tool that lets you change specific colors in an image while preserving shadows and highlights. |
| How the Tool Works | Select the tool, choose a new color, then paint over the area to replace the color while keeping the image’s depth intact. |
| Using the Eyedropper Tool | Pinpoint specific colors in your image for a more precise color replacement experience. |
| Step-by-Step Guide | Open the image, select the Color Replacement Tool, pick a new color, and paint over the targeted areas with various sampling settings. |
| Common Mistakes to Avoid | Avoid skipping zoom, overlapping colors, neglecting shadows/highlights, and changing brush size frequently for better results. |
How the Color Replacement Tool Works
This tool works like this: select the tool, choose the new color, then click or drag over the area you want to change. It smartly maintains highlights and shadows while switching hues.
The eyedropper tool can pinpoint specific colors in your image, making this process even slicker.
You see, it detects the color range and applies the replacement color wherever it’s needed.
Pro Tip: Learn how to replace color in Lightroom as well to strengthen your skillset!
Step-by-Step Guide to Using the Tool
- Open your image in Adobe Photoshop.
- Select the color replacement tool from the toolbar. It shares space with the brush tools.
- Go to the color picker, select your desired new color.
- Ensure the brush size matches the area you want to modify.
- Adjust sampling settings: Continuous, Once, or Background swatch.
- Start painting over the area of the image you wish to change.
Common Mistakes and How to Avoid Them
- Not zooming in: small details get tricky. Zoom in to catch every rogue pixel. Utilize Photoshop Shortcuts to make this process quicker.
- Overlapping colors: impatience can lead to a mess. Proceed slowly for precision.
- Ignoring shadows and highlights: use the hue saturation adjustments for a more balanced look.
- Inconsistent brush size: keep a steady hand for a smooth finish.
Pitfalls are part of the learning curve.
As they say, the best way to learn is by doing and redoing. Messing up only invites growth.
Pro Tip: Not satisfied with your final product? Add a hue saturation adjustment layer. It tweaks the intensity and depth, taking your image to another level.
Common mistakes appear when editing all sorts of different types of photography so learn ahead of time how to fix them.
Utilizing Layer Masks for Color Changes
Now, welcome to the wonderful world of layer masks. They play such a crucial role in Photoshop!
They allow you to make targeted adjustments without altering the original image permanently.
What’s great about this technique is that it gives you a chance to experiment with different looks by using hue saturation adjustments and color picker tools.
The idea of layer masks is straightforward. You paint on the mask to hide or reveal parts of the image underneath it.
Applying a Layer Mask Effectively
Let’s talk about how you can make layer masks work for you:
- First, pick the area you want to change using the color range feature. The color range feature helps select specific tones in your image.
- Once highlighted, create a new adjustment layer with a layer mask.
- Use the brush tool to achieve seamless transitions between different colors. Use soft brush strokes to ensure smooth blending.
- Adjust the hue slider within the hue saturation adjustment section to tweak each tone precisely.
You’ll find that the flexibility of layer masks allows adjustments to the whole composition without affecting the harmonious balance of your images.
Isn’t that great?
Advanced Techniques with Layer Masks
Once you’re comfortable with the basics, let’s dive into more advanced techniques:
- Combine multiple layer masks for meticulous edits. Replace one color while simultaneously adjusting another with ease using hue saturation.
- Explore creative discoveries by playing around with the Replace Color Tool in Photoshop for exciting variations.
Nothing beats the thrill of taking control over individual elements within an image. It’s like conducting a symphony, where every element plays its part perfectly thanks to the hsl sliders you expertly maneuver.
Photoshop offers the freedom to transform your imagery vision into reality.
Pro Tip: Experiment with hue saturation in Photoshop to test various moods before settling on what best fits your narrative. Time spent experimenting often leads to unique outcomes and might just save your workday.
These techniques are useful for many types of photography whether it be street photography or wedding photography.
So, why not try these out today? Your masterpieces await revelation. Transforming mundane images into captivating stories now seems accessible and within reach.
Frequently Asked Questions
How do I change the color of something in Photoshop?
Here are the step to change the color of a specific object in Photoshop:
- Open your image in Photoshop.
- Select the layer of the item you want to change.
- Go to Image, then Adjustments, and select Hue/Saturation.
- Use the Hue slider to shift the colors and the Saturation slider to adjust the intensity.
- Click OK to apply the changes.
How do I selectively change colors in Photoshop?
- Open your image and select the Quick Selection Tool.
- Use it to select the area where you want to change the color.
- Once selected, go to Image, then Adjustments, and choose Hue/Saturation.
- Adjust the Hue, Saturation, and Lightness sliders to get your desired color.
- Click OK to apply your changes.
How do I change the color of the image?
Here’s how to change the color of an image in Photoshop:
- Open your image in Photoshop.
- Go to Image in the top menu, select Adjustments, and then click on Color Balance.
- Adjust the color levels for the shadows, midtones, and highlights.
- Preview the changes and adjust as necessary before clicking OK.
How can I adjust color in Photoshop?
- Open the image you want to adjust.
- Navigate to Image, then Adjustments, and select Levels or Curves.
- For Levels, move the input sliders to fine-tune the intensity of the colors.
- For Curves, adjust the curve line to alter the image’s tonality and color balance.
- Click OK to apply your adjustments.

Conclusion
Learning how to change colors in Photoshop, as well as Lightroom, has been a game-changer for my creative projects. With the right tools and techniques, I’ve been able to transform my images with vibrant hues or subtle tones.
While the process was initially daunting, it quickly became intuitive with practice. This skill has enhanced my work and boosted my confidence in editing.
If you want to master color changes in Photoshop, I highly recommend my Photoshop course and Lightroom course. They simplify complex concepts with step-by-step instructions, making it easy to learn and apply these techniques.
Read more about Photoshop:


