Change Canvas Size Photoshop: Master the Canvas Tool
Change Canvas Size Photoshop: Master the Canvas Tool
Have you ever felt stuck trying to change canvas size Photoshop?
Today, we’ll learn how adjust and change canvas size Photoshop can make all the difference whether you’re a budding photographer or just want to perfect an art project.
This simple skill can transform how your images look and feel, offering you complete control over your digital canvas.
Let’s dive right into making your pictures pop with precision and ease!
Table of Contents
How to Change Canvas Size in Photoshop
When working with Photoshop, adjusting the canvas size can be important for fitting your project requirements.
This guide will walk you through each step.
Learn how to change canvas size Photoshop effectively to achieve the perfect dimensions for your creative needs.
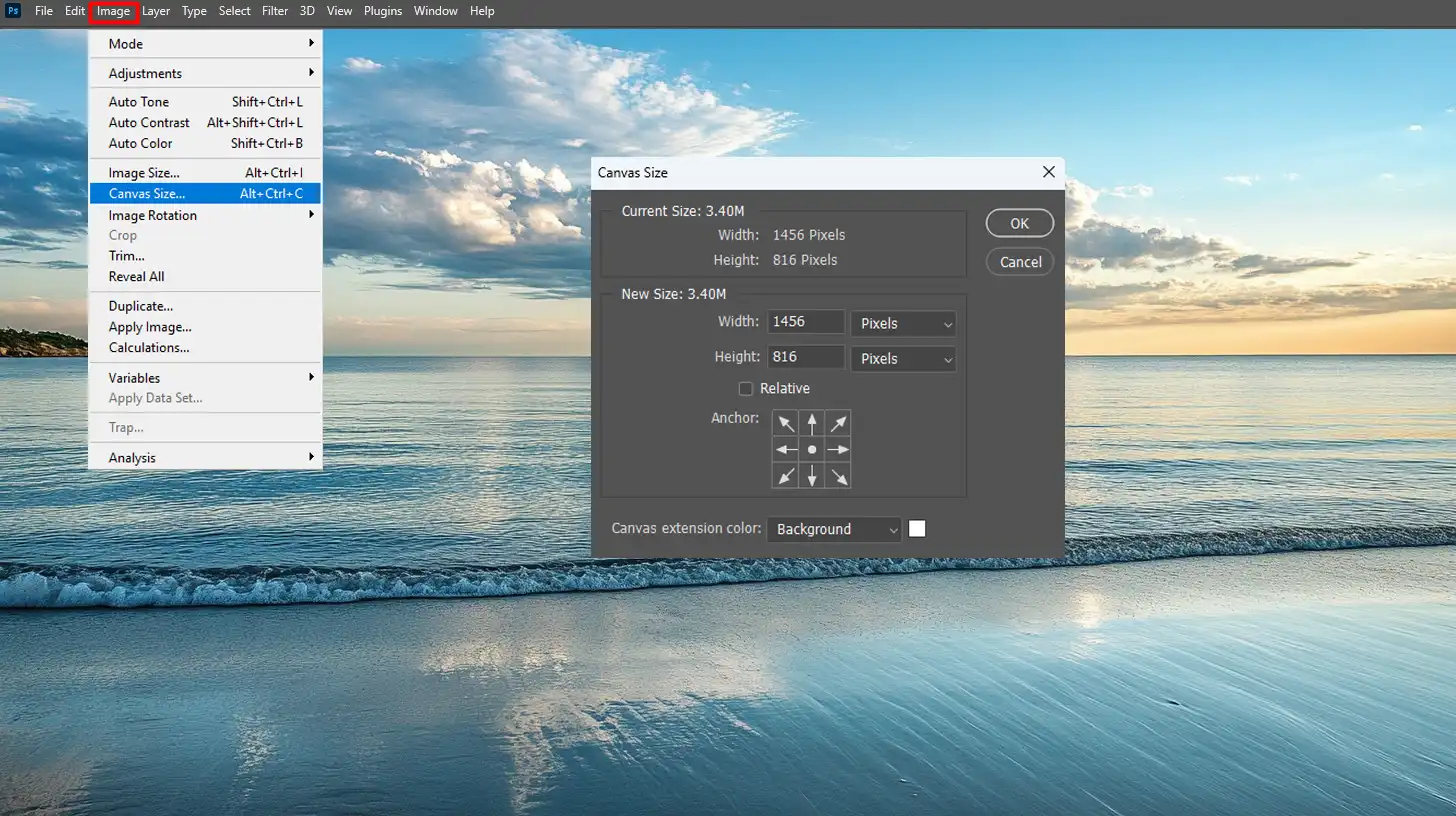
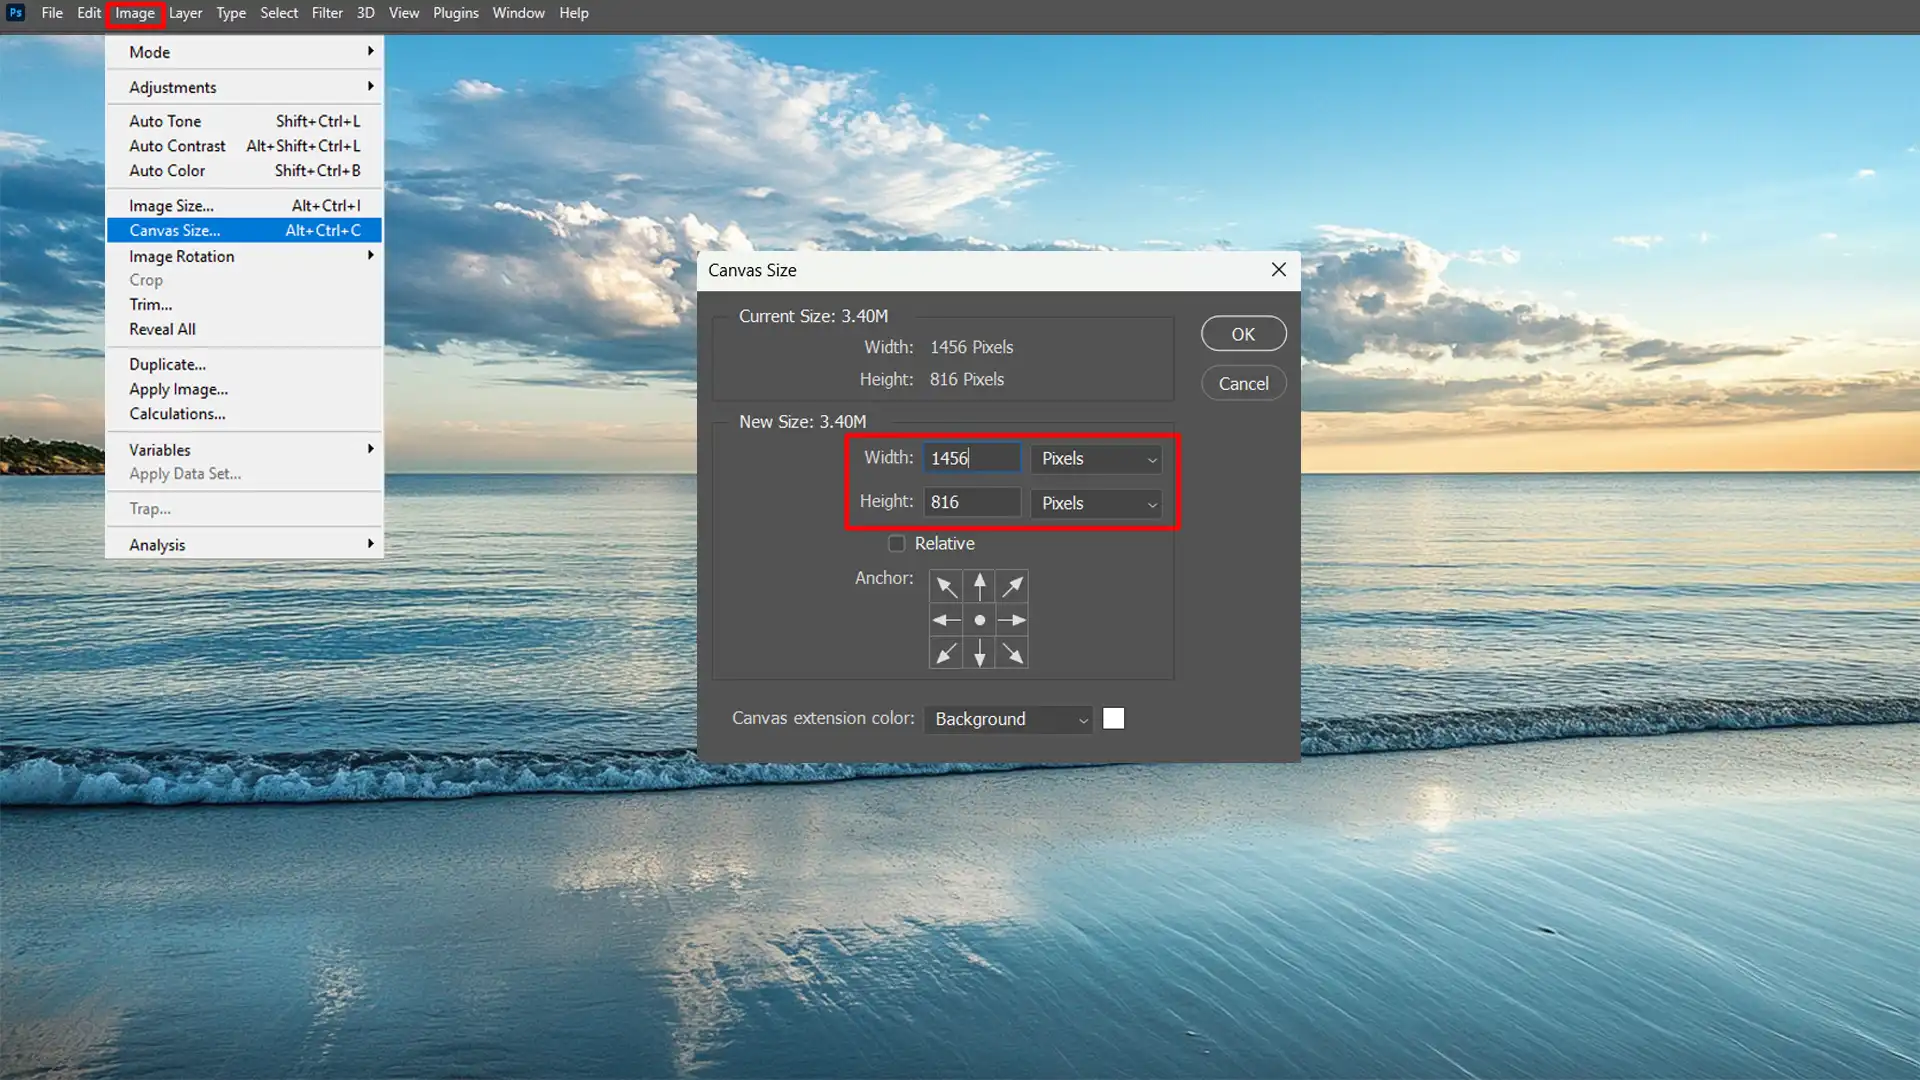
Accessing the Canvas Size Tool
To begin, open your actual image in Photoshop. Then, access the canvas size tool by clicking Image from the top menu bar and selecting Canvas Size.
The canvas size dialog box will appear.
To rotate the canvas in Photoshop, first focus on accessing the Canvas Size Tool. This tool helps you manage the canvas dimensions and orientation, making it easier to adjust your image’s angle.
Adjusting Width and Height
In the canvas size dialog box, adjust the width and height boxes.
Keep in mind that changing these settings modifies your canvas dimensions:
Enter new values in inches, pixels, or other units.
Ensure you choose suitable numbers based on your project's needs.
For example, if you want a more blank space for text placement, increase only the width value.
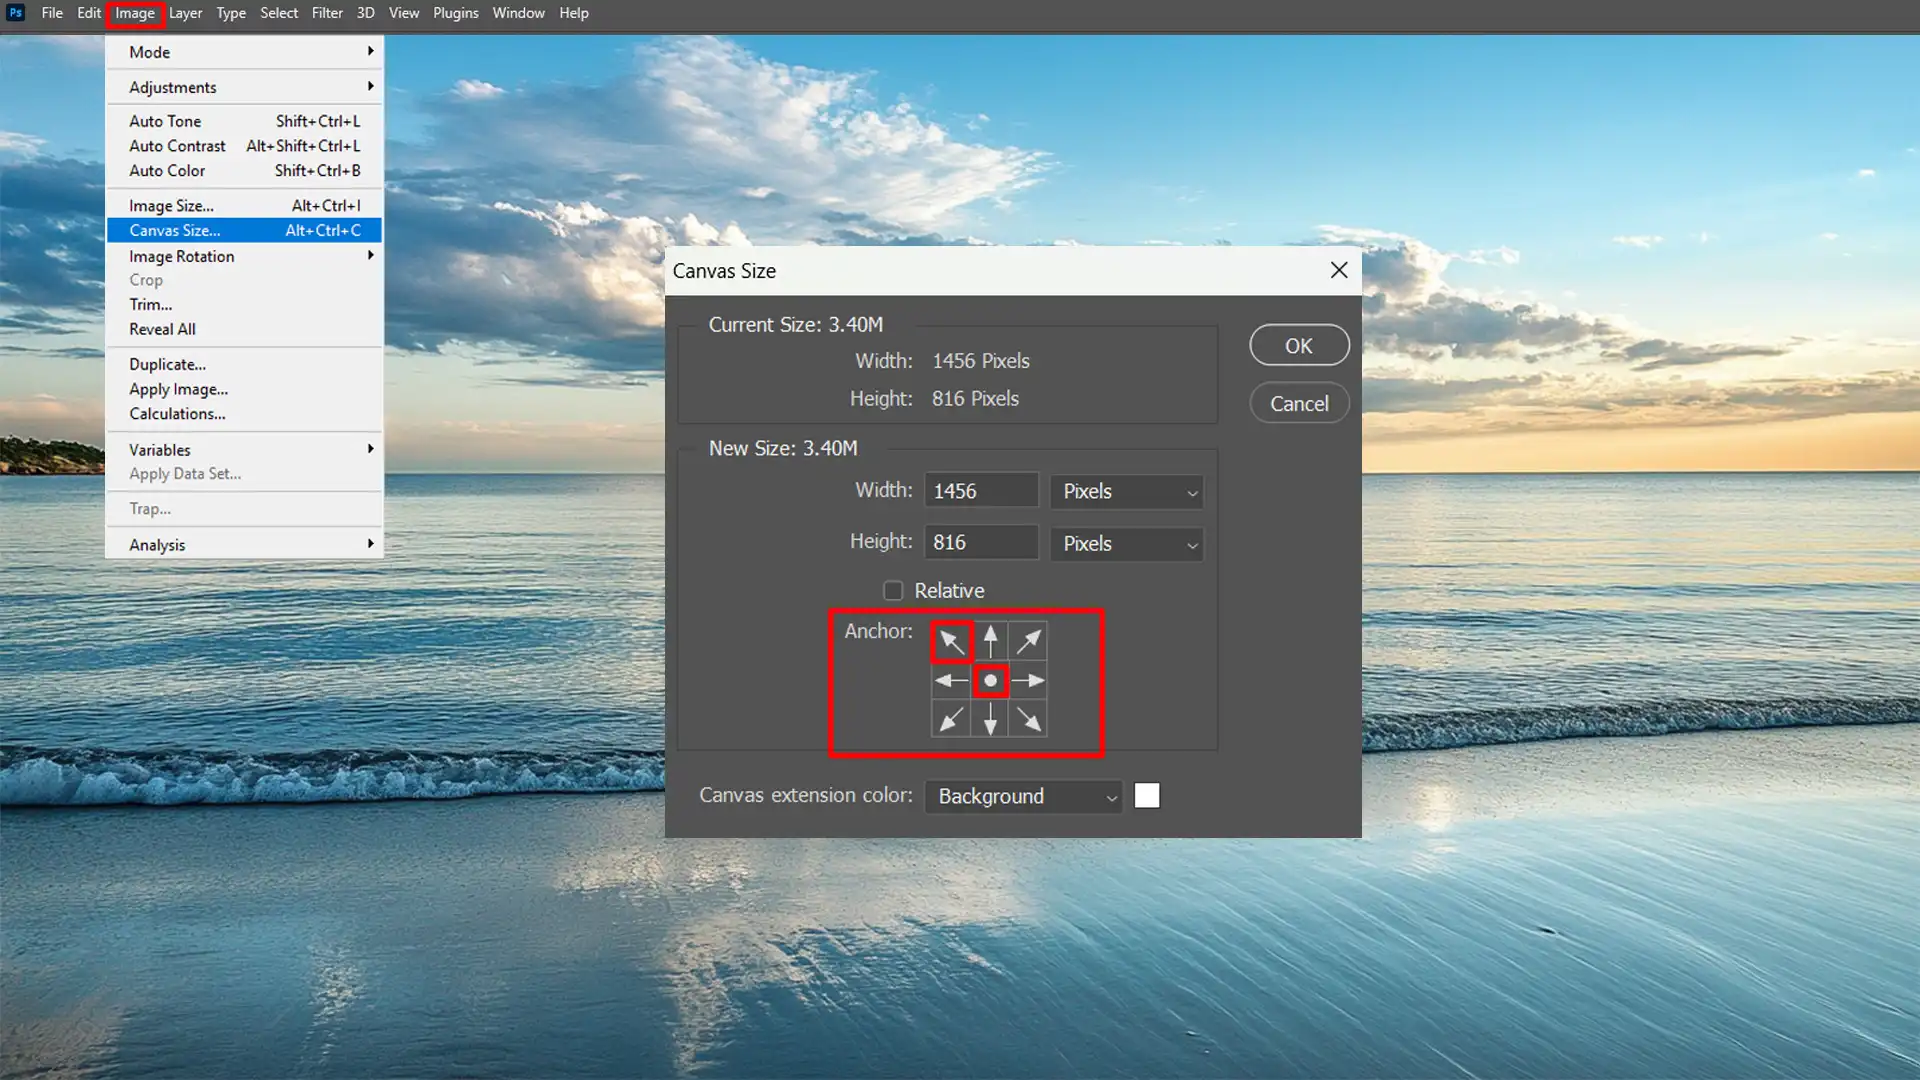
Setting the Anchor Point
This determines how the changes affect your canvas alignment.
You will see nine squares representing different anchor points:
The middle square adjusts equally around all edges.
Top-left aligns adjustment to extend downward and right.
Choose an appropriate point relevant to what portion of your canvas needs more space.
For example, if you want a more blank space for text placement, increase only the width value and to effectively utilize this extra space for a Photoshop text box.
Previewing and Applying Changes
Before you apply changes, preview them by checking out handy features of Photoshop’s workspace:
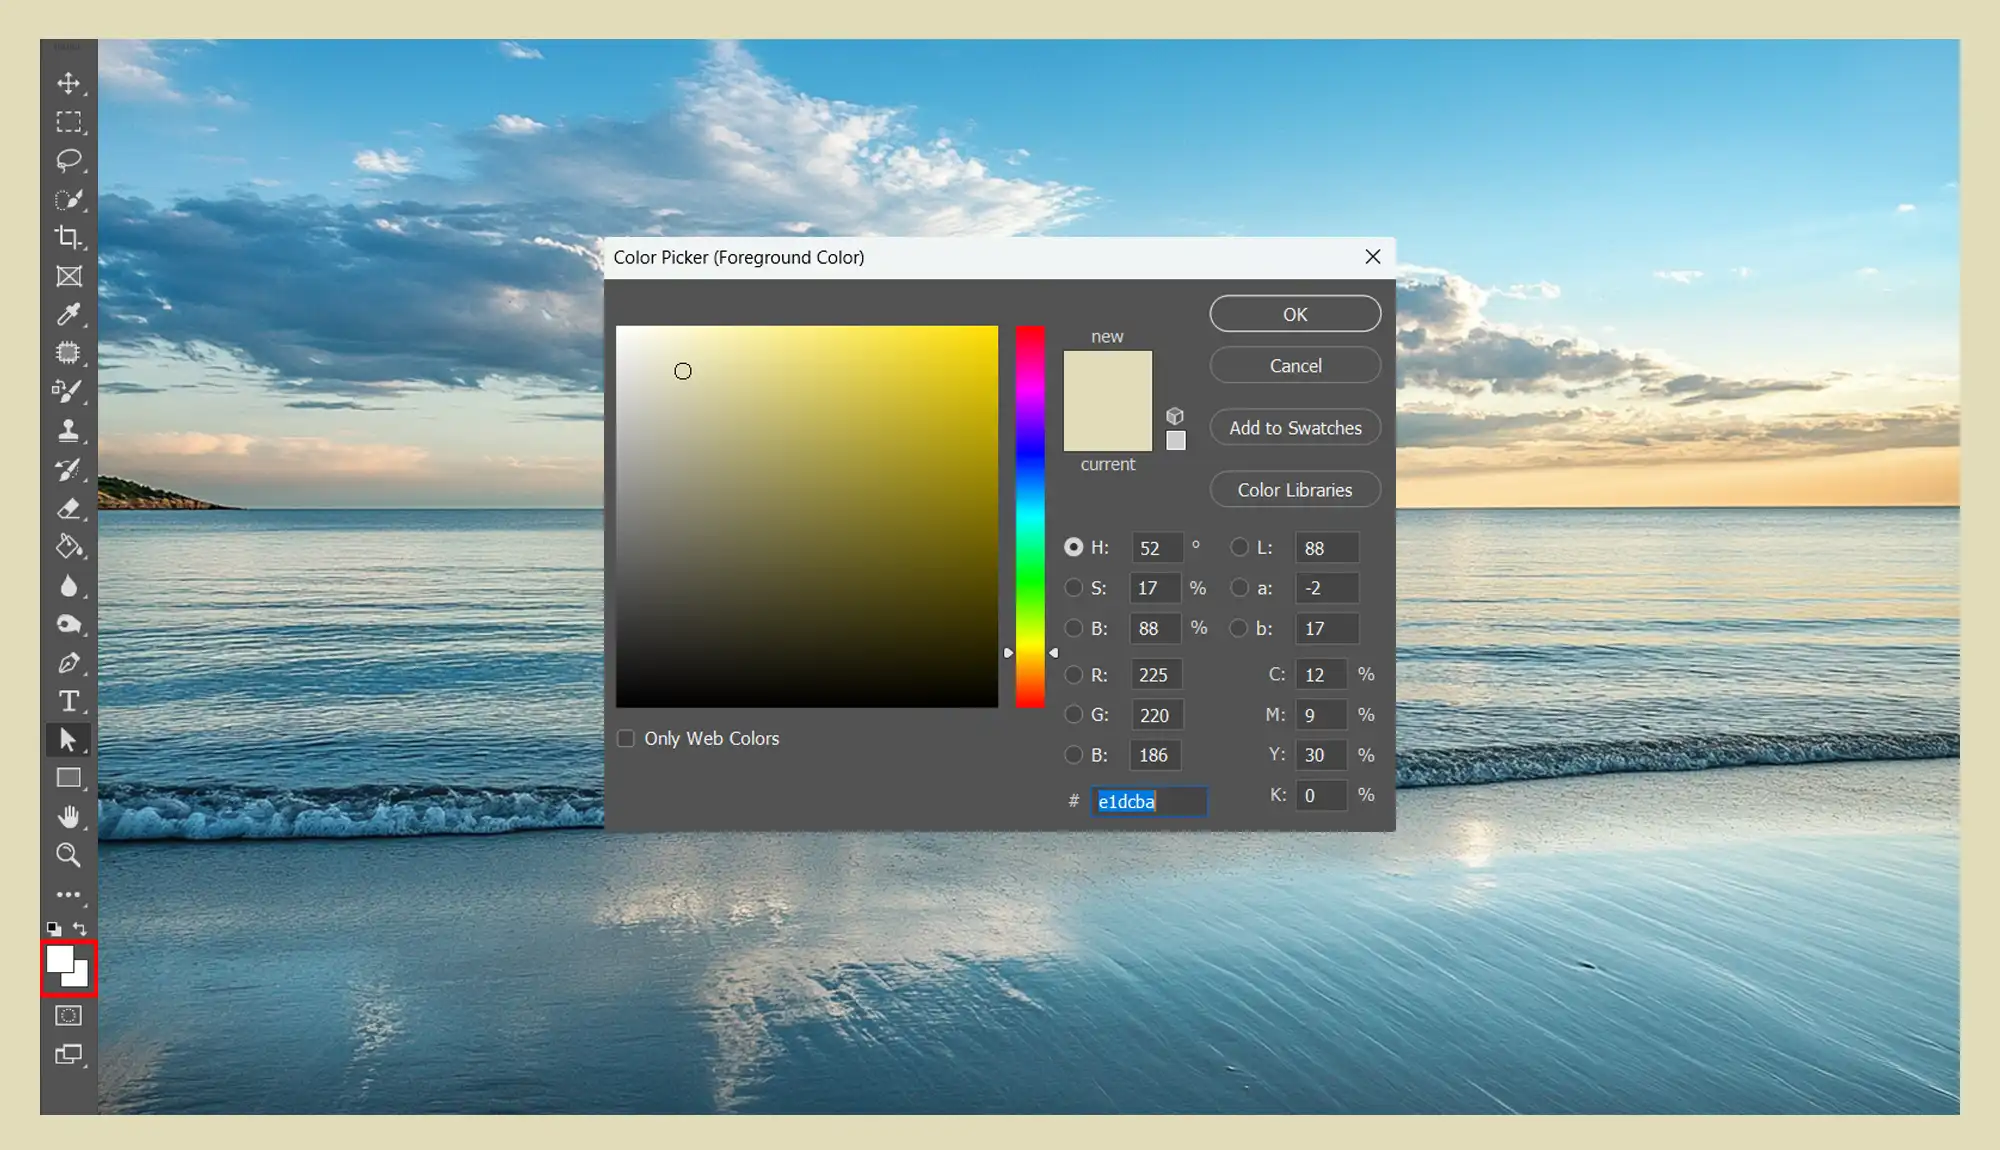
Choose a color from the color picker for any new areas (like using a solid or transparent background).
Verify extensions on each side via a small preview within the window.
Once satisfied with previews and selections, click OK to apply adjustments.
To effectively manage previewing and applying changes, it’s important to understand the Photoshop interface effectively, this allows you to see adjustments before finalizing them, ensuring your edits fit perfectly.
Saving the Modified File
After resizing:
Go to File and select Save As.
Name your file differently from its original image name or save it within another location, ensuring no overwriting occurs accidentally!
Ensure correctness by reviewing every detail before finalising modifications made during this process.
This helpful practice encourages repeating these steps regularly whenever changes become imperative throughout designing sessions!
Following these steps ensures smooth modification experiences, significantly enhancing overall productivity without complications arising suddenly due to improper execution!
Resizing Images in Adobe Photoshop
Resizing images in Adobe Photoshop is a useful skill for any digital artist.
Whether you’re prepping photos for the web or print, knowing how to resize images effectively ensures your work looks its best.
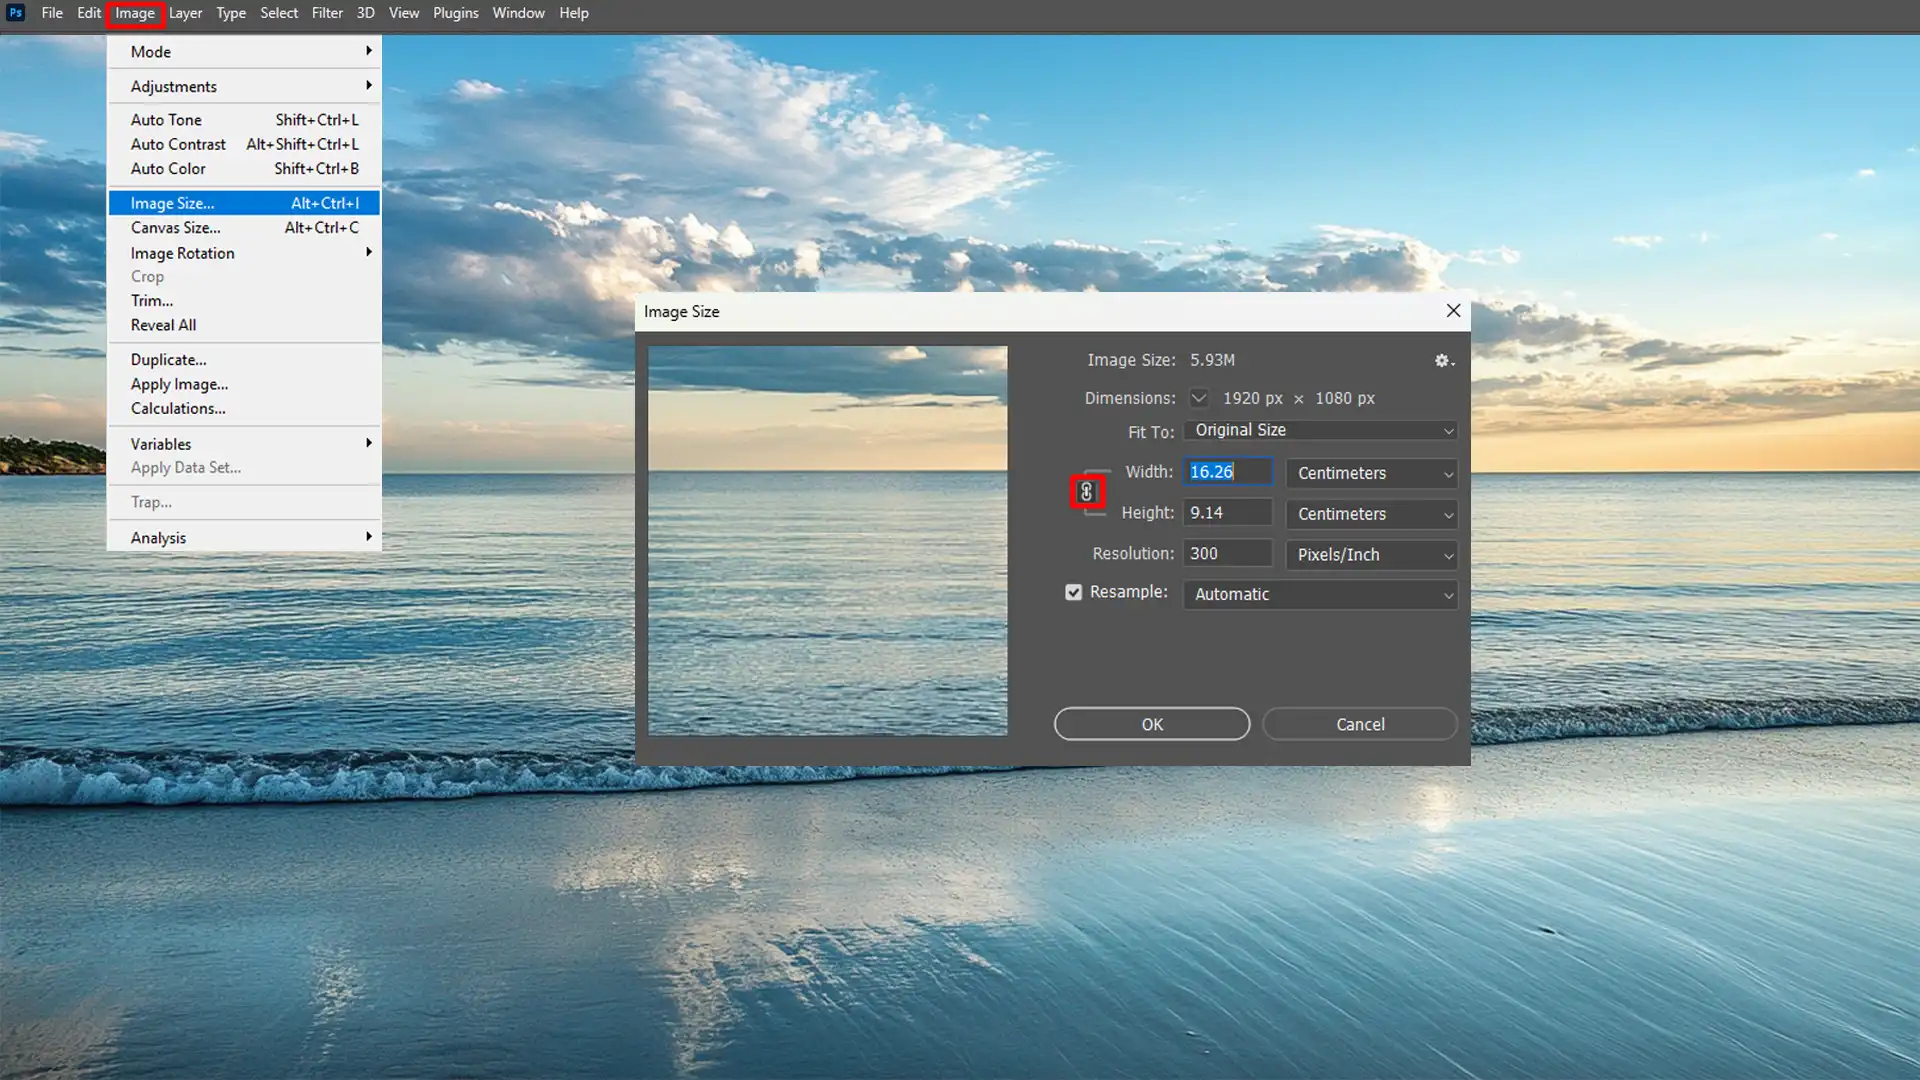
Opening the Image Size Dialog Box
To begin resizing, open the Photo Size dialog box. Then, go to “Image” in the top menu and select “Image Size.”
This will open a window where you can adjust various aspects of your file.
Open "Image"menu and select "Image Size"
Once there, you'll see options like width, height, and resolution
Choosing Resolution and Dimensions
In the photo size dialogue box, you can set the desired resolution and dimensions.
First, input your preferred values for width and height.
Ensure the constrain proportions checkbox is selected to maintain the original dimension ratio.
When choosing resolution and dimensions, understanding pixel dimensions is important. Properly setting pixel dimensions ensures your image maintains quality across different sizes
Points to Remember:
The width and height boxes allow precise measurements to be set.
Adjusting resolution impacts print quality.
For web use: 72 pixels per inch (PPI); for print: 300 PPI.
I once printed an image with a low resolution by mistake. It didn’t look good! So always double check your settings.
Understanding Resampling Options
When resizing an actual image, the resampling function changes pixel dimensions.
You can choose between methods like Bicubic Smoother or Bicubic Sharper.
With generative AI expand in Photoshop, understanding resampling options is fundamental. Learn how to effectively use AI to enhance image size while grasping the nuances of resampling
Resampling Methods:
Here’s a list of the methods and their best uses:
Bicubic Smoother: Best for enlarging images.
Bicubic Sharper: Best for reducing photo size.
Experiment with different methods until the results meet your expectations.
Applying Changes to Resize Image
After choosing your dimensions and resampling method, hit OK to apply changes. The existing image will resize instantly in your Photoshop workspace.
Simple but effective steps ensure images are correctly resized without losing quality or detail.
If there’s space around or you’re planning extra additions later on, consider adjusting the canvas using the rotate canvas next time.
By following these tips efficiently, I consistently maintain high-quality work while managing multiple projects effortlessly!
Optimizing Canvas for Different Media Outputs
Optimizing your canvas for different media outputs can significantly impact the final look of your design.
Customizing your canvas sizein Photoshop is important for web use, print media, or video projects.
Customizing Canvas for Web Use
Optimizing your canvas size when designing for the web helps ensure fast load times and crisp images.
Steps to Customize Your Canvas:
Open Photoshop and create a new file.
Set the canvas size suitable for web use, usually measured in pixels.
Use the crop tool to refine edges if necessary.
Adjust the background layer to enhance visual appeal.
For example, I often start with a 1920×1080 pixel canvas, then adjust margins using precise measurements to keep everything responsive.
Understanding the Background Layer in Photoshop
The transparent background layer in Photoshop is the foundation of your image. It’s usually locked to prevent accidental changes.
You can unlock it by double-clicking on the layer in the Layers panel.
This layer provides a base upon which you can build additional layers, add effects, and make adjustments to create complex compositions while keeping the image intact.
To master background layer techniques in Photoshop, it’s important to start with understanding the background layer in Photoshop. This foundation helps you effectively manipulate and enhance your images
Adjusting Canvas for Print Media
Optimising your canvas for print involves choosing the correct resolution and dimensions to ensure high quality prints.
Create a new document and select 'Print' from the presets.
Set the canvas size based on your output requirement (A4, Letter).
Ensure you have enough bleed area by adding 3-5mm around each edge.
Consider using CMYK color mode from the color picker for accurate color reproduction.
One time, I designed a wedding invitation card that required an extended canvas due to intricate borders.
Following these steps guaranteed perfect prints without losing any elements.
To resize an image for printing, start by adjusting the canvas for print media. This ensures your image fits perfectly in print dimensions.
Setting Up Canvas for Video Projects
When working on video projects, it’s important to set up your canvas correctly to match industry standards (such as 1080p or 4K).
Open Photoshop and choose 'Film & Video' presets while creating a new file.
Based on project needs, select the appropriate wideness and height, usually 1920x1080 pixels or more.
Use guides within Photoshop to ensure safe zones (action and title).
Adjust settings like frame rate depending on whether you work with NTSC or PAL formats.
I once needed more space on my canvas when editing an animated intro sequence.
By changing relevant values and extending my workspace, I ensured all motion elements stayed within viewable areas on different screens.
For web: Prioritize file size and pixel dimensions.
For print: Focus on resolution and color accuracy.
For video: Ensure dimension ratios match standard broadcasting specifications.
By tailoring these settings appropriately across various media outputs, web articles look polished online.
Printed materials will remain sharp, and videos remain visually compelling regardless of screen type!
Adjusting Canvas Dimensions with the Crop Tool
When resizing images in Adobe Photoshop, use the crop tool to modify the canvas dimensions. Access the canvas size in Photoshop to expand or reduce dimensions.
For extended areas, adjust the canvas extension color via the canvas extension color menu, selecting a suitable color to blend seamlessly with your image.
To ensure a polished look, carefully choose the canvas extension color from the canvas extension color menu. This color will fill any added space around your image, maintaining visual harmony.
Experiment with different canvas extension colors to match your project’s needs and achieve the desired aesthetic effect.
When considering a free crop in Photoshop, adjusting your canvas dimensions can be significant. Learn how to use the crop tool to refine your canvas size effectively
Troubleshooting Common Canvas Size Issues
Dealing with canvas size issues can be frustrating. This section covers problems and how to fix them.
Dealing with Aspect Ratio Problems
When resizing, the dimension ratio might cause unintended distortions.
Always check your canvas size and the dimension ratio of the image.
Use relative values for adjustments in the options bar to keep proportions.
Select "Constrain Proportions" when you're resizing an image.
Remember, using the crop tool helps maintain the correct aspect when scaling down or adjusting parts of your canvas.
Using the Crop Tool in Photoshop
The crop factor in Photoshop is a fundamental feature that allows you to trim and refine your images to enhance their composition and focus.
Here’s how to use it effectively:
Step
Action
Select the Crop Tool
Open your image in Photoshop. Select the Crop Tool from the toolbar on the left side of the screen. Press the C key on your keyboard to activate it quickly.
Adjust the Crop Area
Click and drag the corners or sides of the crop border to adjust the area you want to keep. Use the handles to resize the crop area. Hold the Shift key while dragging to maintain the dimension ratio.
Set Dimension Ratio
In the options bar at the top, set a specific dimension ratio if needed. Choose from preset aspect ratios or enter custom values for width and height.
Position the Crop Area
Move the crop area by clicking inside the crop box and dragging it to the desired position. Align the crop area to critical elements in your image to improve composition.
Apply the Crop
Press Enter (Windows) or Return (Mac) to apply the crop once satisfied with the crop area. Press Esc to cancel the crop if needed.
Fine-Tuning
After cropping, adjust the image further if necessary. Use the Transform tool to make minor adjustments to the cropped area.
If you’re wondering how to crop in Photoshop, mastering the crop tool is important. Using the Crop Tool in Photoshop effectively allows you to refine your image, perfecting composition and focus.
Enlarge images incrementally to reduce pixelation.
Always start with a higher resolution if you need a larger canvas later.
For sharper results, try applying sharpening tools after resizing.
Adjustments in resizing layers help enhance these fine details.
Handling Errors When Changing Canvas Size
Errors are common during canvas adjustment.
If you can’t see newly added sections:
Check if they lie within the entire editable area of your workspace.
Remember to change canvas size in Photoshop style to ensure no part goes beyond viewable boundaries.
When altering dimensions, avoid confusing “ChangeCanvas” with “Crop.”
These two actions serve different purposes and affect your final output differently.
Frequently Asked Questions (FAQs)
How do I resize the canvas in Photoshop?
In the menu bar at the top of the Photoshop interface, click “Image” to open a dropdown menu. From there, select “Canvas Size.”
Alternatively, you can achieve the same result by pressing “Alt + Ctrl + C” (Mac users can adjust the shortcut as needed).
How do I change the canvas size?
Using the Select and Move Tool, click on the canvas size label or border to select the canvas. To resize dynamically, click and drag the canvas border handles.
Dragging the border crop handles without any keyboard modifiers will resize the canvas non-uniformly.
Hold the Shift key to maintain proportional resizing.
How do I change the artboard size in Photoshop?
With the Artboard or Move tool selected, click on the artboard’s label to select it.
Then, choose a new preset size from the tool options.
To resize the artboard to a custom size, adjust its boundaries by dragging the handles.
How to resize a page in Photoshop?
To resize, navigate to Image > Image Size and input the desired dimensions in the “Width” and “Height” fields.
Ensure the “Constrain Proportions” box is checked to keep the image’s dimension ratio consistent.
Knowing how to change canvas size Photoshop can be a game-changer for your projects. I’ve found that using the crop tool and adjusting the canvas extension color can really help in fitting your image perfectly into the space you need.
It’s all about making sure everything looks just right, whether you’re expanding your canvas for more content or trimming it down to focus on fundamental details.
If you’re looking to dive deeper into Photoshop and Lightroom, check out my Photoshop Course and Lightroom Course. They offer great tips and techniques to enhance your skills.
$2,061.00Original price was: $2,061.00.$1,061.00Current price is: $1,061.00. 27584
Download Your Free Guide Now!
Discover the secrets of photography with our printable guide! Master essential techniques like aperture, shutter speed, and ISO to create stunning images. Get your free printable PDF now and start turning your snapshots into masterpieces!