
Photoshop Neural Filters have revolutionized photo editing, sparking excitement among both beginners and professionals. With just a few clicks, you can transform and enhance your images.
It’s just like having a magic wand for your digital creations. These powerful tools allow you to refine portraits, add artistic effects, and much more, opening up endless possibilities for creative projects.
Whether you’re aiming for subtle improvements or bold transformations, Photoshop Neural Filters make photo editing easier and more accessible than ever. Ready to explore their potential?
Let’s dive into the world of neural filters and see how they can elevate your work.
Table of Contents
What are Photoshop Neural Filters?
Photoshop neural filters are tools that leverage artificial intelligence and machine learning to creatively transform your images.
These filters enable rapid edits and artistic transformations within Adobe Photoshop. Whether you’re looking to smooth skin, restore old photos, or apply creative effects, these filters facilitate numerous modifications swiftly.
Ready to explore the possibilities?
Exploring Different Types of Neural Filters
Now, let’s look at various neural filter types
Portrait Filters
Portrait neural filters are designed to enhance facial features. A popular choice, skin smoothing, allows users to achieve polished results without extensive manual retouching.
Want to transform your original image into something magazine-worthy?
These filters are your go-to! They work wonders with portraits, creating a clean, refined look.
Landscape Filters
Landscape neural filters effortlessly bring the vividness of nature into your photos.
With options like landscape mixer, you can change seasons, edit lighting, or even merge elements from different scenes to create a dream-like composition.
The simplicity of the neural filters panel allows for seamless integration of these changes.
Creative Filters
Ready to unleash your creativity?
Creative neural filters offer artistic transformations such as color transfer and style transfer. These allow users to experiment with bold changes, turning ordinary photos into pieces reminiscent of famous art.
These filters serve as a fun playground where imagination knows no bounds.
Bonus Tips and Tricks
- When starting out, it's wise to work on a duplicate layer of the original image in your photoshop document. This way, if you're not satisfied with the outcome, you can easily revert back. You'll thank yourself later!
- Keeping our skills sharp is crucial when exploring Photoshop neural filters. Experimenting with new neural filters ensures we're up-to-date with the amazing possibilities offered by technology. Remember, it's all about having fun while creating magic!
- Pro Tip: To enhance the focus subject with a natural background, try using the depth blur for a stunning effect!
How to Access Neural Filters in Photoshop
Alright folks, let’s dive into the world of neural filters.
- Open your original image. Head over to the ‘Filter’ menu on the top bar.
- You’ll find the magical words, "Neural Filters". Click it, and the neural filters panel appears.
- This space contains filters like the colorize filter, perfect for those old black and white photographs.
- Use a manual retouching mode, especially if it's your first time.
- Hit the toggle switch next to the filter.
Behold as artificial intelligence transforms your image with the power of machine learning. Easy, right?
Now, always, and I mean always, keep a duplicate layer masked handy. This saves your morning coffee disaster picture before the digital magic attempted to rescue it.
Troubleshooting Access Issues
If you can’t access neural filters, check your internet connection. Yes, Photoshop needs online access for some of these futuristic features.
If that’s not your problem, check if your operating systems are up-to-date. Outdated systems and new tech don’t mix.
Trust me, it’s like trying to fit a cassette tape into an MP3 player.
If you’re still stuck, perhaps the filters are in beta. In which case, you may need to update Photoshop.
Check the Neural Filter tab to ensure you didn’t accidentally turn off any filters. Or maybe install the latest version.
In some instances, neural filter compatibility could also be dependent on the smart object or current layer in use.
Switch layers to see the changes. Remember, the current layer might not support all filters. Thus, a new layer or a different one helps.
Pro Tip: For those who love the beauty of nature, try the landscape mixer. It’s a game-changer for adding a sprinkle of magic to those scenic shots. If you’re looking to enhance your workflow, consider learning some essential Photoshop Shortcuts to speed up your editing process.
For those interested in exploring more creative avenues, you might want to delve into the world of NFTs and Photography. It’s an exciting frontier where digital art meets blockchain technology, offering photographers new ways to showcase and monetize their work.
Benefits of Using a Smart Filter
Photoshop and Lightroom can transform your editing experience by offering powerful tools like smart filters.
Let’s explore some benefits that make smart filters a go-to for any photo editor.
Non-Destructive Editing
Non-destructive editing allows us to keep the original image intact while making all the adjustments we desire. This means fewer worries about mistakes; just one click can take you back to where you started.
With options like the neural filter panel, filters in Photoshop become more versatile.
For example, the neural filters help with tasks such as photo restoration and enhancing facial features without altering the original image. The flexibility non-destructive editing provides is ideal for experimenting without the fear of irreversible changes.
Flexibility and Customization
The next benefit ties directly into flexibility and customization. With smart filters, each smart filter applies separately, which means you have ultimate control.
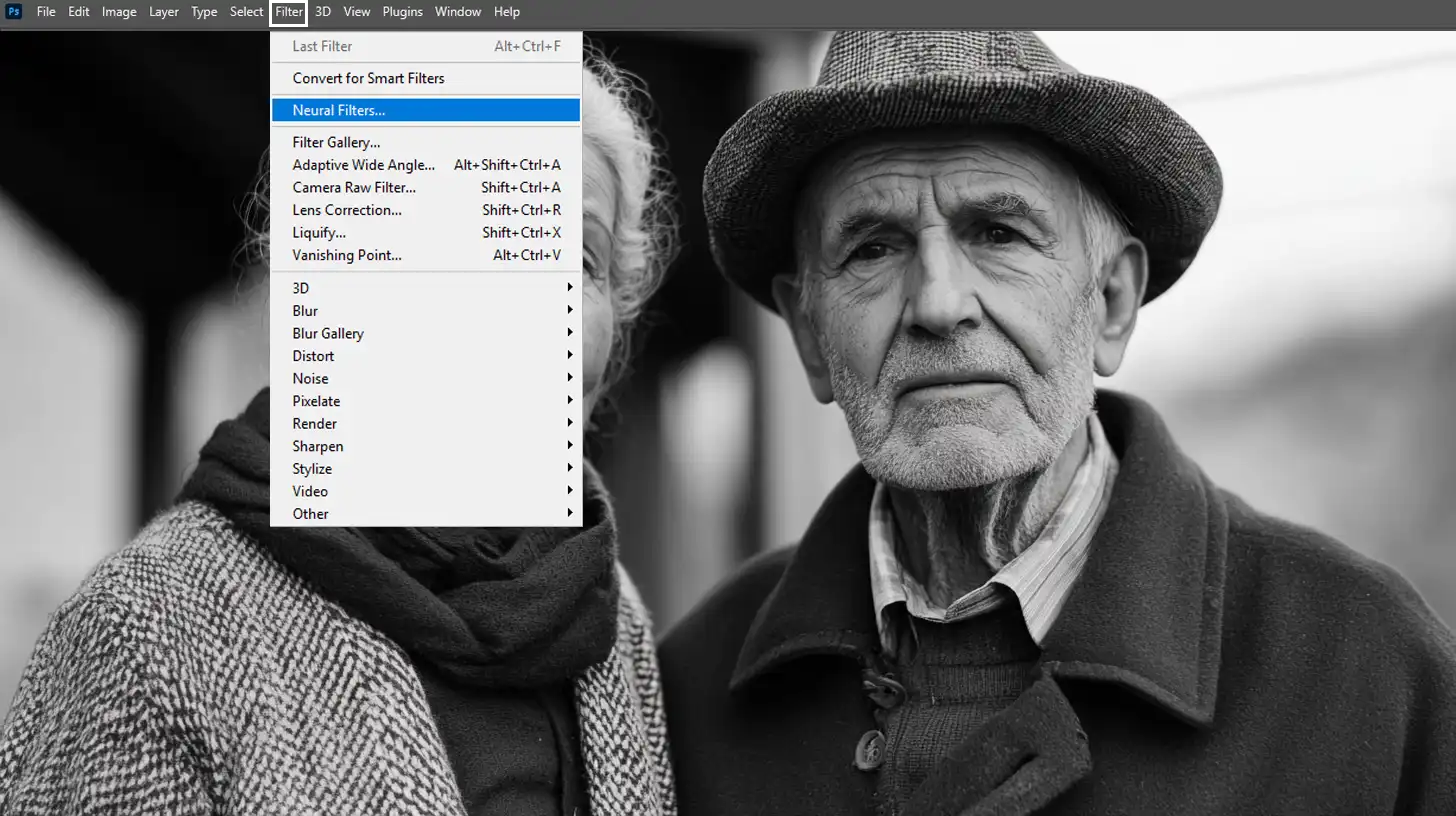
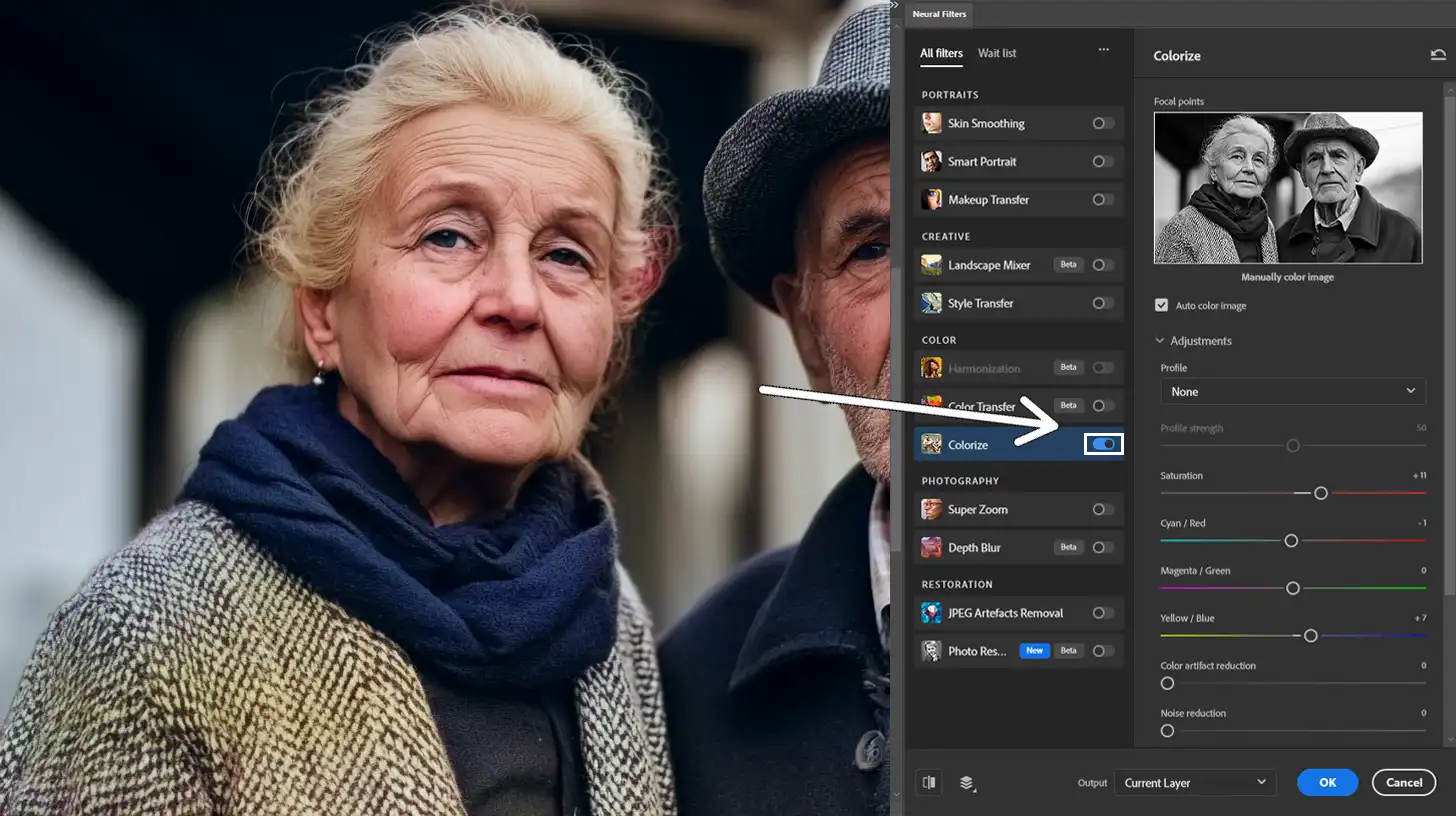
If, for instance, you’re enhancing black and white photos and decide that a filter isn’t quite right, it’s easy to dive back in and tweak or remove it altogether.
Want to try different styles with landscape mixer or style transfer? No problem!
Change your mind? That’s just fine, no commitments here!
Customization becomes especially useful with neural filters in Photoshop when working with depth blur or skin smoothing. You get a plethora of options that let creativity thrive without restrictions.
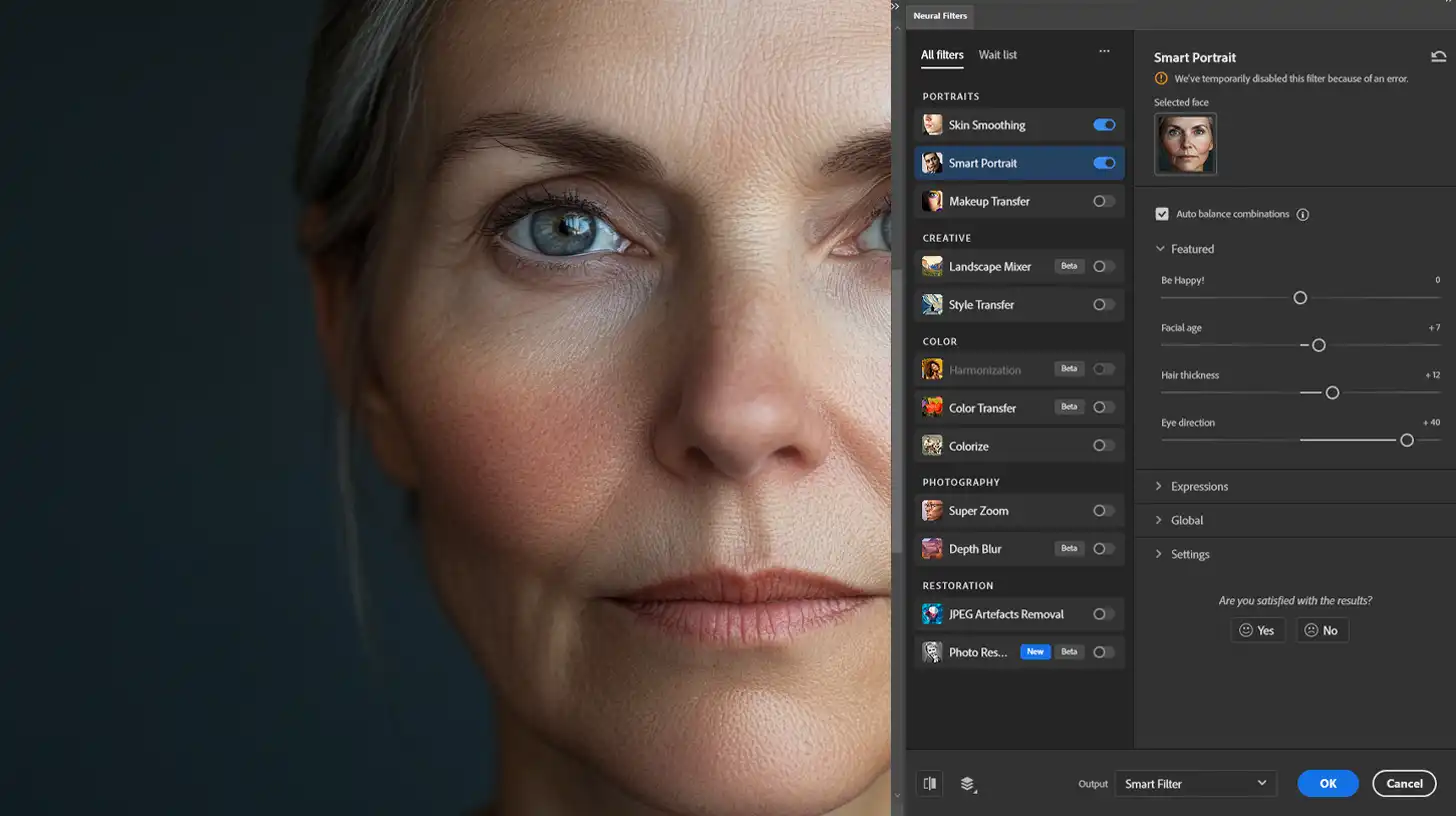
When using a beta filter or the smart portrait filter, flexibility ensures updates don’t disrupt workflow but enhance your editing journey.
And honestly, who doesn’t enjoy a little machine learning magic sprinkled into their editing routine? It feels like having an assistant but without the extra salary.
It’s a fun and practical way to tackle retouches and jpeg artifacts removal, isn’t it?
Pro Tip: For an extra creative boost, try the color transfer filter. Choose a reference image with the artistic styles you wish to emulate. Then, apply them to your new layer for a unique, artful look.
Additionally, understanding the difference between Photoshop and Lightroom can further enhance your editing skills. While both offer unique features, knowing when to use each can optimize your workflow and results.
Whether you’re a seasoned professional or just starting to learn photography articles, incorporating smart filters into your editing process can elevate your work to new heights.
Tips and Tricks for Using Neural Filters Effectively
Let’s take a look at some tipc and tricks I am sure you will find useful on your journey.
Best Practices
- Start with a Clean Workspace: Organization rules the day when using neural filters. Trust me, wrestling with layers isn't fun. Begin by labeling layers clearly. This trick saves both sanity and time in the long run.
- Less is More: While it's tempting to pile on filters like there's no tomorrow, restraint can be your friend. Experiment, yes, but keep edits subtle to maintain natural looks. It's not a makeover, it's enhancement.
- Save Multiple Versions: Don't forget to save multiple versions as you go. You might love today's edit, but tomorrow's taste could be different. With smart filters, you're free to explore without any big risk.
Common Mistakes to Avoid
- Zoom Out: One mistake? Forgetting to zoom out. We can get so involved in the details that we lose sight of the big picture. Step back from time to time. Imagine how others will see the final piece.
- Variety in Filters: Avoid over-relying on one neural filter. Yes, they amaze, but variety can make a world of difference.
- Use Reference Images: Another pitfall: neglecting the reference image option. Using it smartly can align your style intentions beautifully. It’s easy to overlook, especially when focused on enhancing facial features.
- Understand Blending Modes: Watch out for blending modes. The wrong one can lead to chaos, making all those painstaking edits look off. Take your time to understand what each blend mode does.
- Test Beta Filters: Always try before buying into beta filters. New may equal exciting, but only if they mesh with your workflow. Test them out with photo restoration tasks; they offer great room for experimenting without large risks.
Finally, remember, neural filters are here to help and not override creativity. They should be an ally, not a crutch.
Pro Tip: Dive into machine learning options. It sounds technical, but even a toe dip enhances your edits. Start small, then expand.
For those looking to refine their skills further, understanding the Difference Between Photoshop and Lightroom can be crucial. Each tool offers unique features that can complement your editing style.
Additionally, exploring Photoshop Beta versions can provide insights into upcoming features and enhancements.
Frequently Asked Questions (FAQs)
What system is required for Adobe Photoshop neural filter?
- Operating System: Windows 10 (64-bit) version 1809 or later; macOS 10.14 or later
- Processor: Intel or AMD processor with 64-bit support; 2 GHz or faster with SSE 4.2 or later
- RAM: 8 GB or more (16 GB recommended)
- Graphics card: NVIDIA GeForce GTX 1050 or equivalent; NVIDIA GeForce GTX 1660 or Quadro T1000 is recommended
- Internet: Required for initial activation and access to neural filters
Why can't I download neural filters Photoshop?
- Internet Connection: A stable internet connection is required to download and use neural filters.
- Subscription: Ensure you have an active Adobe Creative Cloud subscription.
- Compatibility: Check if your system meets the minimum requirements for neural filters.
- Software Version: Update Photoshop to the latest version to ensure compatibility with neural filters.
How do you get neural filters in Photoshop?
- Step 1: Open Photoshop and navigate to the 'Filters' menu.
- Step 2: Select 'Neural Filters' from the dropdown menu.
- Step 3: In the Neural Filters window, browse through the available filters and download the ones you need by clicking the cloud icon next to them.
Do neural filters need internet?
- Initial Download: Yes, an internet connection is required to download neural filters.
- Regular Use: Some filters can work offline after they are downloaded, but updates or new filters will require an internet connection.
Conclusion
Photoshop neural filters have transformed my approach to photo editing. As someone who’s spent hours perfecting images, this tool has become indispensable.
It simplifies complex tasks like skin smoothing, adjusting lighting, or changing facial expressions, all while keeping a natural look. This efficiency lets me focus more on creativity, rather than technical details.
For anyone wanting to enhance their editing skills, I highly recommend exploring these features. Check out my Photoshop course and Lightroom course for in-depth tutorials on mastering these powerful tools.
Integrating neural filters into your workflow will save time and unlock new creative possibilities.
Read more about Photoshop:Â