Professional Techniques for Creating Rounded Corners in Photoshop
Professional Techniques for Creating Rounded Corners in Photoshop
Round corners in Photoshop can elevate your designs, giving them a sleek, modern touch that grabs attention.
Whether you’re working on digital illustrations, web designs, or photo editing, rounded corners offer a polished, professional look. This simple technique is easy to apply, even for beginners, and can instantly enhance the aesthetic of your project.
In this guide, I’ll walk you through the steps to making rounded corners in Photoshop, explaining both how to do it and why this design choice can transform your work.
Let’s explore the potential of this versatile effect!
Table of Contents
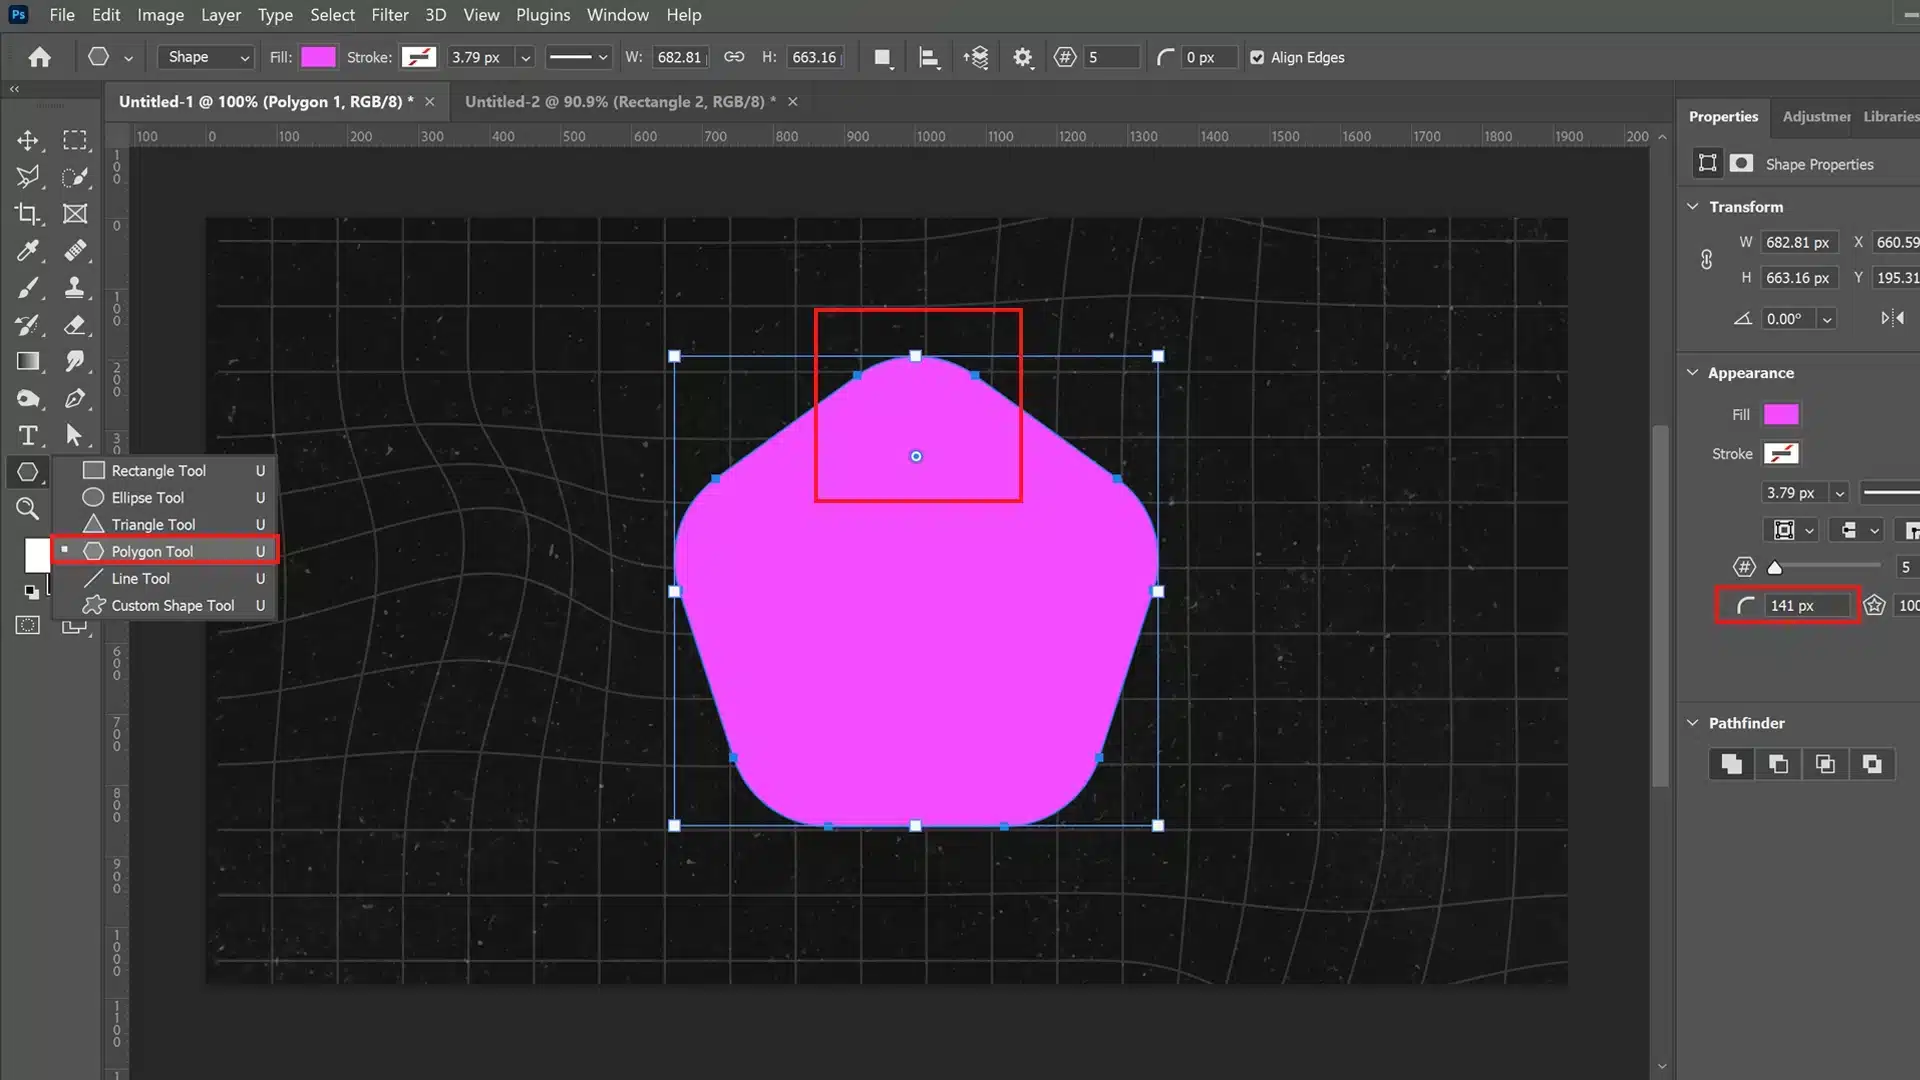
Mastering Round Corners in Photoshop
Rounding corners can transform the look of any image, giving it a softer, more stylish feel.
If you’re accustomed to sharp corners, rounded ones might seem new. But fear not; the process isn’t as daunting as it first appears.
Using the Rounded Rectangle Tool
The rounded rectangle tool is your ally here. Follow these steps:
Open Photoshop.
Select the shape tool from the toolbar, then choose the rounded rectangle.
Draw a rectangle by clicking and dragging on your canvas.
Adjust the corner radius in the options bar at the top to round the edges smoothly.
Once drawn, this rounded rectangle turns into a shape layer visible in your layers panel. By clicking the shape layer, you can modify its properties anytime.
This method allows flexibility, helping you experiment with different corner radii without hassle. The lock icon in the layers panel ensures stability when needed.
For precise adjustments, use the link icon to keep proportions intact.
Using the Properties Panel
Once you’ve drawn your rectangle, the properties panel becomes essential.
With the shape layer selected, head to this panel. Here, you’ll find settings for the corners.
It’s straightforward to alter individual corners if you don’t want them uniform. This tool provides easy control over your design.
Remember, each small change can make a big difference.
The properties panel’s control lets you be creative. Adjusting the corner radius, whether for all four corners or just one, becomes intuitive.
This flexibility determines every detail of your rounding corners effect, offering an opportunity to learn Photoshop’s deeper capabilities.
Pro Tip: Use the alt key while dragging handles in the properties panel. It allows independent control of one corner, forming unique shapes tailored exactly to your vision.
Customizing Shapes with Round Corners
Moving beyond the basics, let’s explore how to tailor shapes with rounded corners to fit your specific design needs.
Creating Custom Shapes
Let’s talk about creating those slick looking rounded corners. It’s not complicated, I promise!
Steps to Create Rounded Corners:
Select the rectangle tool from the toolbar. It's that little rectangle icon, usually hiding near the top.
Click on it, and you'll unlock a world of possibilities. Now, you can draw yourself a neat rectangle shape right on the canvas.
After drawing your shape, navigate to the layers panel. You can see your new shape layer there. Click it to make further adjustments.
In the options bar at the top, you’ll find the corner radius settings. This is where the fun begins. You can adjust the numbers to round your corners just how you like them. Experiment a bit and see what sticks.
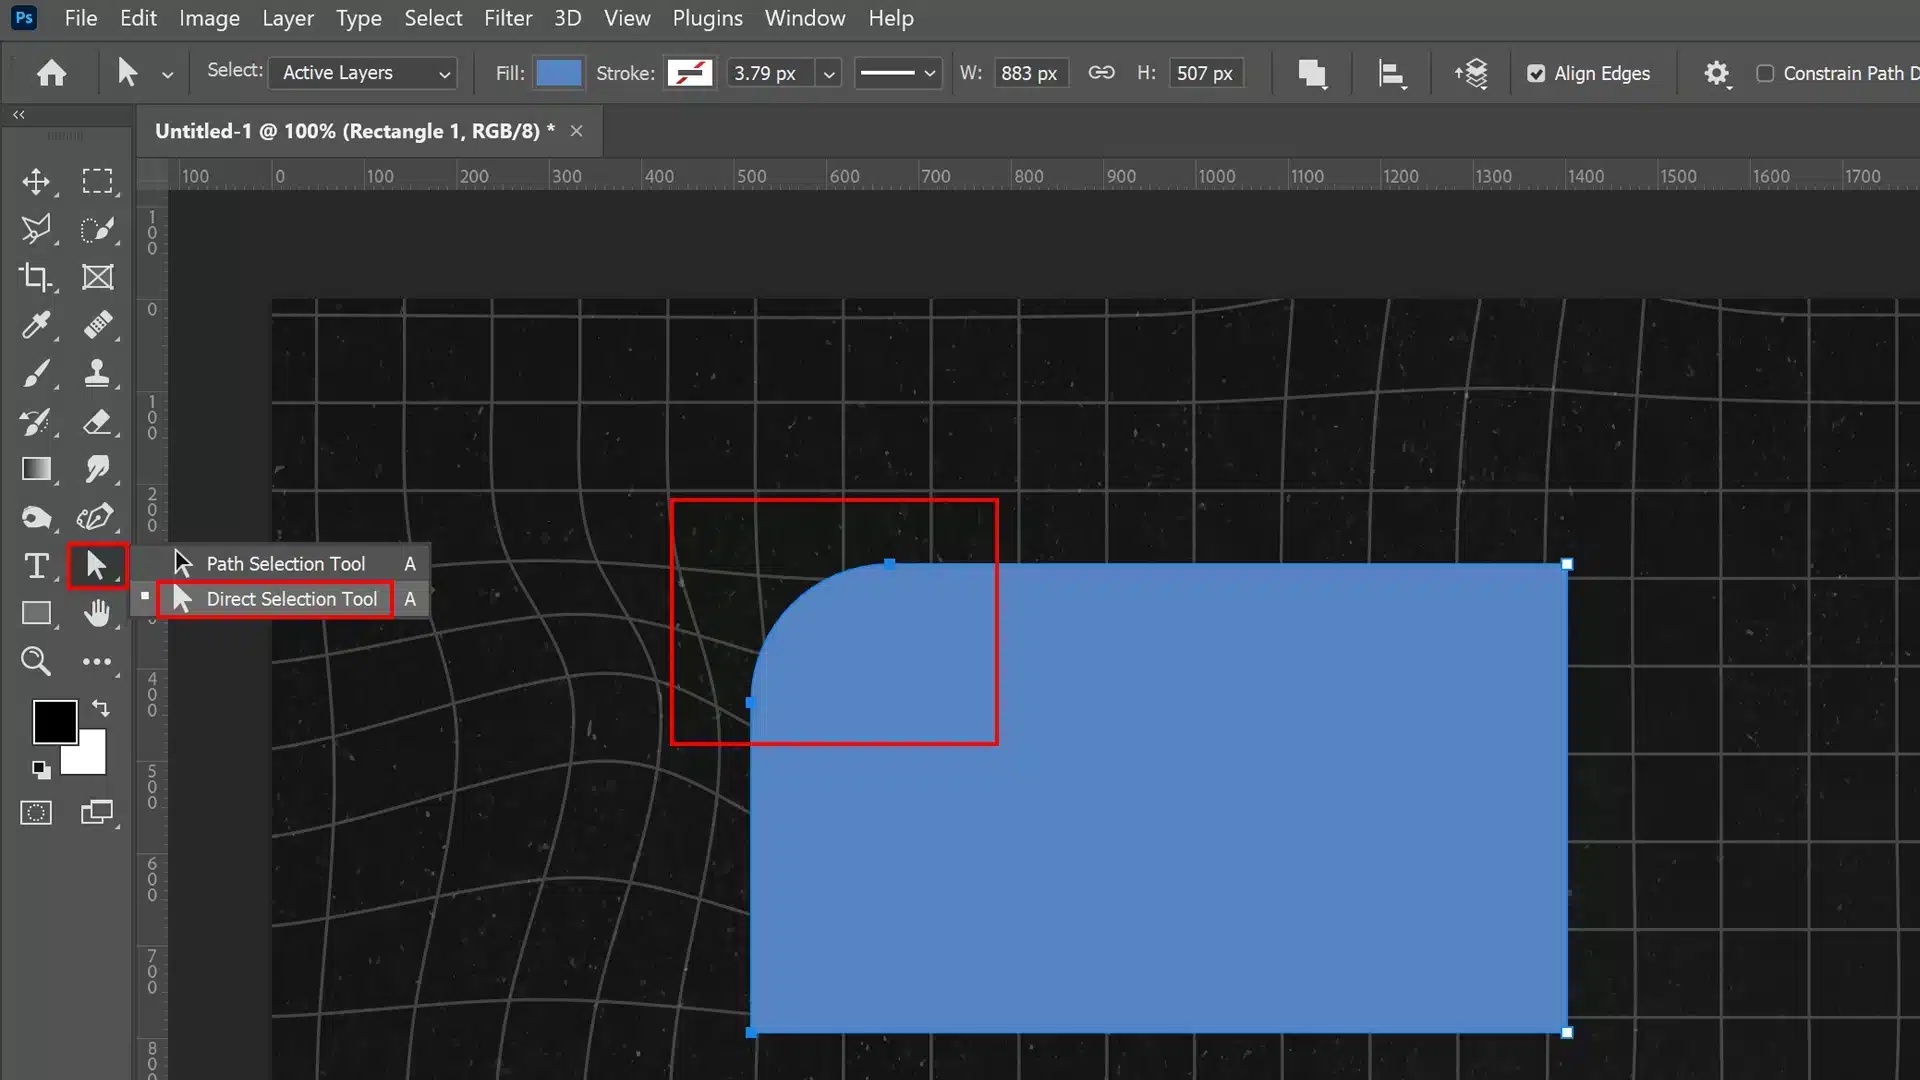
Modifying Corners with Direct Selection
Alright, let’s get hands-on with those corners. The direct selection tool aids in adding that extra bit of flair.
Using the Direct Selection Tool:
Choose this tool, and click on the shapes you've crafted.
You'll notice little squares along the edges - each represents a corner you can morph. Yes, even each left corner can be manipulated separately!
If precision is your jam, check out the properties panel. It stores settings for more granular tweaks.
Adjust individual corners to unlock unique shapes. This is where you turn creative visions into sharp digital realities.
Applying Round Corners to Complex Shapes
This step is a tiny bit trickier but stay with me. When dealing with complex shapes, the same principles apply.
Steps for Complex Shapes:
Once you've drawn your complex shapes and accessed its path, the properties panel holds further tools.
Add rounded corners here to smooth out sharp corners.
While adjusting roundedness, hold "Alt" for isolated control over one corner. Talk about flexible!
Knowing when and how to use the link icon will also guide you in syncing or desyncing the four corners to behave as one unit or independently.
So, don’t shy away from experimenting. The vector mask can refine your designs further after applying those round corners.
Complex doesn’t have to mean complicated in Photoshop.
Pro Tip: Dive into the width and height fields in the options bar for perfect proportions while setting your shape. This cuts down on any mismatches right from the start.
Advanced Techniques for Round Corners
Now, I’ll walk you through some advanced methods.
Let’s dive right into our digital toolbox!
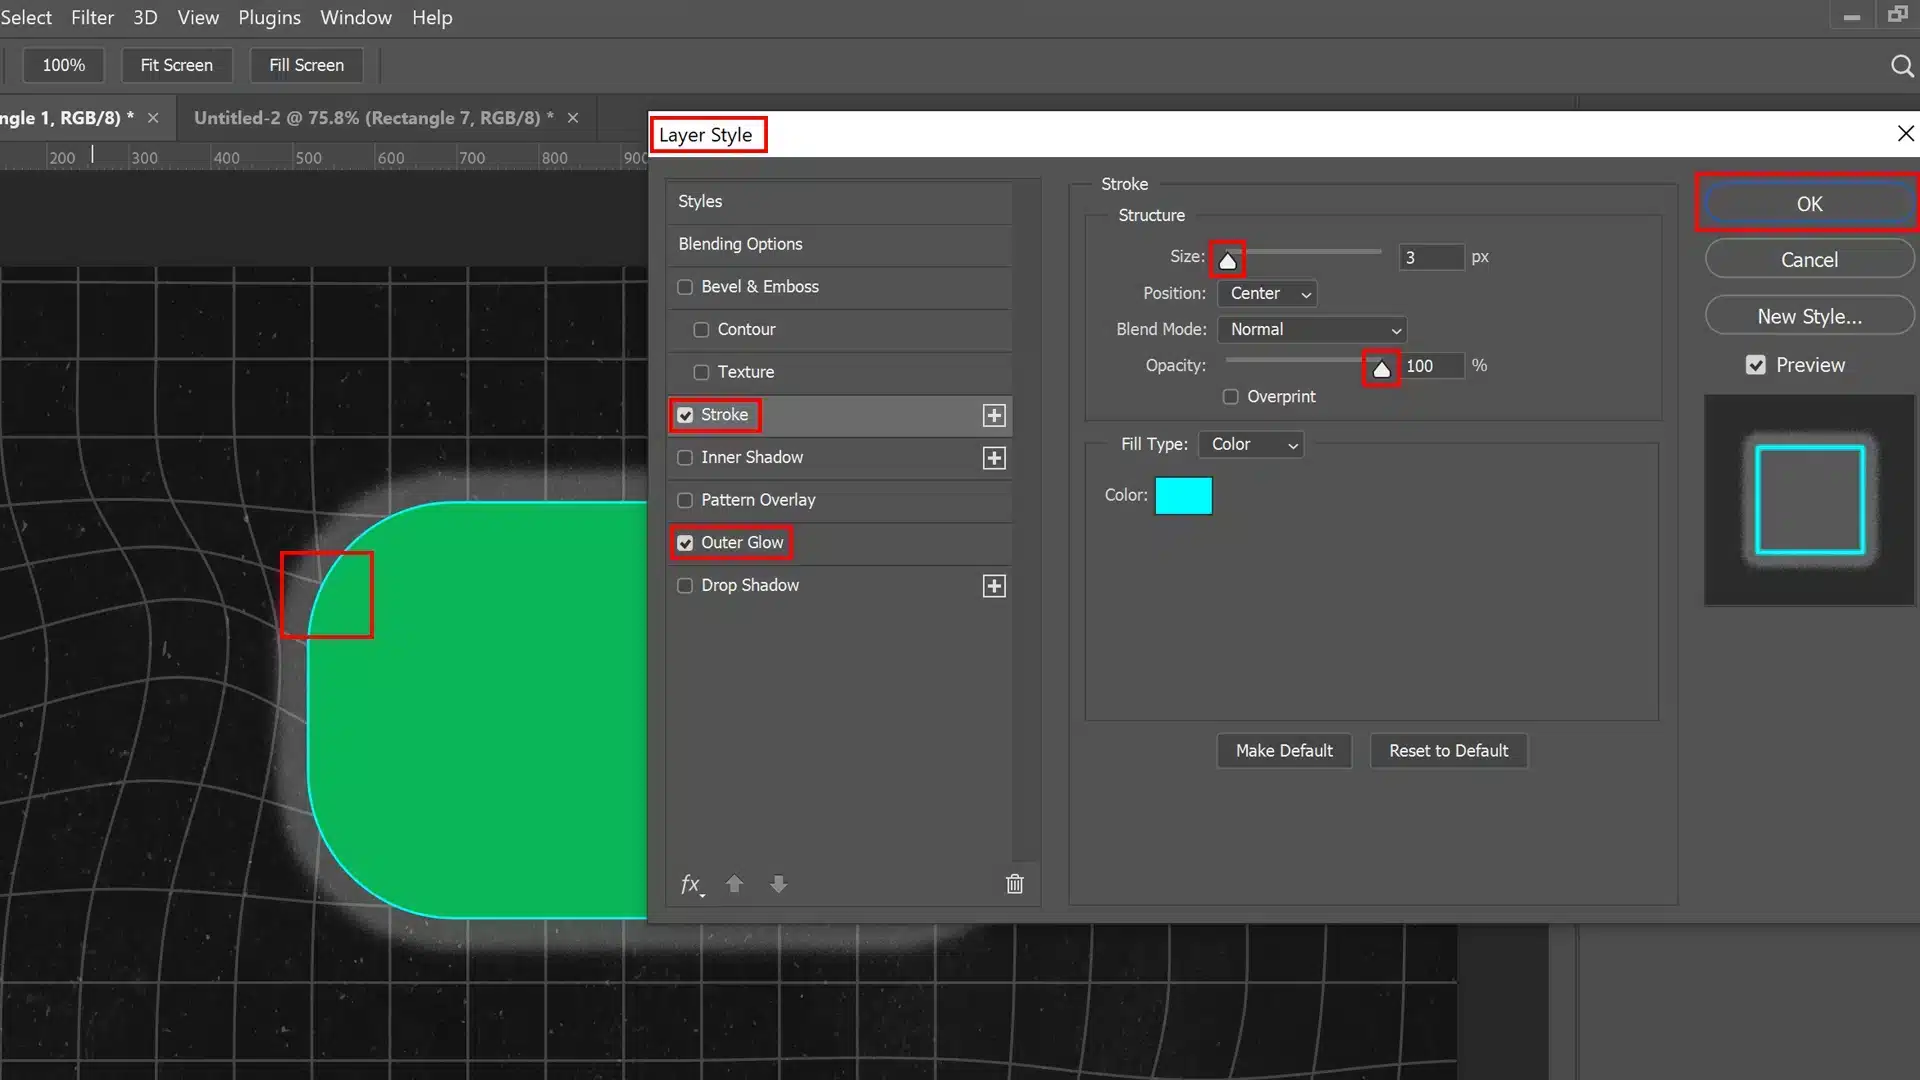
Layer Styles for Rounded Edges
If you’re like me, using layer styles brings to life those crisp rounded corners. Here’s how you can do it:
First, open up your layers panel, all the magic starts here.
Select the shape layer of choice from the layers panel. You have drawn this shape with the rectangle tool, right?
Access the blending options to add a bit of flair. This is your playground! Explore options available to manifest those round corners.
Adjust the corner radius settings you'll find. The shape options seem endless, don’t they?
Simple, isn’t it? Layer styles give an edge-up when adding rounded corners seamlessly.
Using Filters for Corner Effects
Filters aren’t just for selfies, folks. Let’s use them on corners too:
After you've set up your image layer from the layers panel, head over to the filter menu. It lies peacefully awaiting your command.
Various options let you adjust shapes and corners, each transform can be unique.
Your left corner not behaving? Isolate it and work your magic. One corner at a time.
The trusty alt key will prove invaluable when honing individual corners, trust me.
Once you master these techniques, don’t lose them! Here’s an idea:
Within the properties panel, save your favorite styles. It saves future hassle.
Utilize the lock icon to keep everything intact. Don't let settings stray away!
Reuse these styles across projects; think of them as your special recipe for artistic corners.
You’ll find it like baking cookies but just with a rounder finish!
Efficiency elevates your workflow, reinforcing that learning matters.
Pro Tip: Experiment with the vector mask command to refine your corners more. The precision of the vector mask ensures you won’t miss any angular details, maintaining the creative integrity in your projects.
For those looking to enhance their skills further, exploring Photoshop shortcuts can significantly speed up your editing process, making tasks like adjusting corner radii more efficient.
Additionally, understanding the difference between Photoshop and Lightroom can help you decide which software best suits your editing needs, especially when dealing with intricate designs.
Common Mistakes and How to Avoid Them
Now, let’s delve into some common mistakes when editing in Photoshop, as well as Lightroom, and how to sidestep them gracefully.
Don’t worry, it’s easier than remembering where you left your keys!
Overlapping Corners
Ah, the saga of overlapping corners. You sit there, conjuring up a shape with the rectangle tool, and boom, the corners overlap.
Ever been there? Me too. It’s a common hiccup.
Ensure that your layers in the layers stack are separate. This way, the rectangles mind their own business and don’t encroach on each other's turf.
Don’t merge them prematurely. Keep each shape layer from the layers panel distinct until you're absolutely certain about your cornering mastery.
Maintaining Proportions
You probably know this struggle.
The rectangle you drew looked great at first, but resize it and it’s a funhouse mirror effect!
This is where the corner radius comes into play.
Always use the corner radius option twofold. First, it ensures rounded corners don't lose their charm.
The second step is adjusting with precision. Take that small circle technique, for instance; familiarize yourself with this in the properties panel. It gives you control over the shape.
Balance proportions by looking out for the link icon. Keep the four corners talking to each other systematically!
Pro Tip: To enhance your workflow, consider learning some essential Lightroom Shortcuts. These can significantly speed up your editing process and help you avoid common mistakes by providing quick access to tools and functions.
Frequently Asked Questions
How to Make a Round Corner in Photoshop?
Open your image or shape in Photoshop.
Select the image layer of the object you want to modify.
Click on the 'Rectangular Marquee Tool' from the toolbar or press 'M'.
Right-click on the selected area and choose 'Select and Mask' and use a vector mask.
Adjust the 'Smooth' and 'Feather' sliders to round the corners.
Click 'OK' to apply the changes.
Repeat for all four corners
How Do You Do a Corner Effect in Photoshop?
Open the image or shape in Photoshop.
Select the 'Ellipse Tool' from the toolbar.
Hold 'Shift' and drag to draw a circle on a new layer above the object.
Resize the circle to cover the corner radius you want to modify; you will have to do this for all four corners.
Right-click on the circle layer and select 'Create Clipping Mask' or a vector mask.
Adjust the position and size as needed to create the desired corner effect.
How Do I Make a Round Shape in Photoshop?
Select the 'Ellipse Tool' from the toolbar.
For a perfect circle, hold down 'Shift' while dragging your mouse.
Release the mouse once you have achieved the desired size.
To fill the shape, set the foreground color before drawing or use the 'Paint Bucket Tool' after drawing.
How Do You Round the Corners of Text in Photoshop?
Create your text using the 'Text Tool.'
Right-click on the text layer and choose 'Convert to Shape.'
Select the 'Direct Selection Tool' (shortcut 'A').
Click on the points of the text box corners while holding 'Shift' to select multiple points.
Drag the corner points to manually round them or use the 'Properties' panel to adjust the corner radius.
In my journey as a designer, mastering the ability to round corners in Photoshop has been a game-changer. It not only adds a professional touch to my projects but also enhances the overall aesthetic appeal.
As I began incorporating rounded corners, I noticed how it softened the look of my designs, making them more visually inviting. This simple technique can transform a standard image into something extraordinary, giving it a polished and modern feel.
If you’re eager to elevate your design skills, I highly recommend exploring more about this and other techniques. Check out the Photoshop course and the Lightroom course to enhance your creativity and workflow. These courses offer valuable insights that helped me refine my skills and produce outstanding work.
Embrace the power of rounded corners and see how it can make a difference in your designs.
If this article has helped you, then Like and Share it with your friends
$2,061.00Original price was: $2,061.00.$1,061.00Current price is: $1,061.00. 27582
Download Your Free Guide Now!
Discover the secrets of photography with our printable guide! Master essential techniques like aperture, shutter speed, and ISO to create stunning images. Get your free printable PDF now and start turning your snapshots into masterpieces!