How to Use Lightroom to Edit Photos: Essential Tips
How to Use Lightroom to Edit Photos: Essential Tips
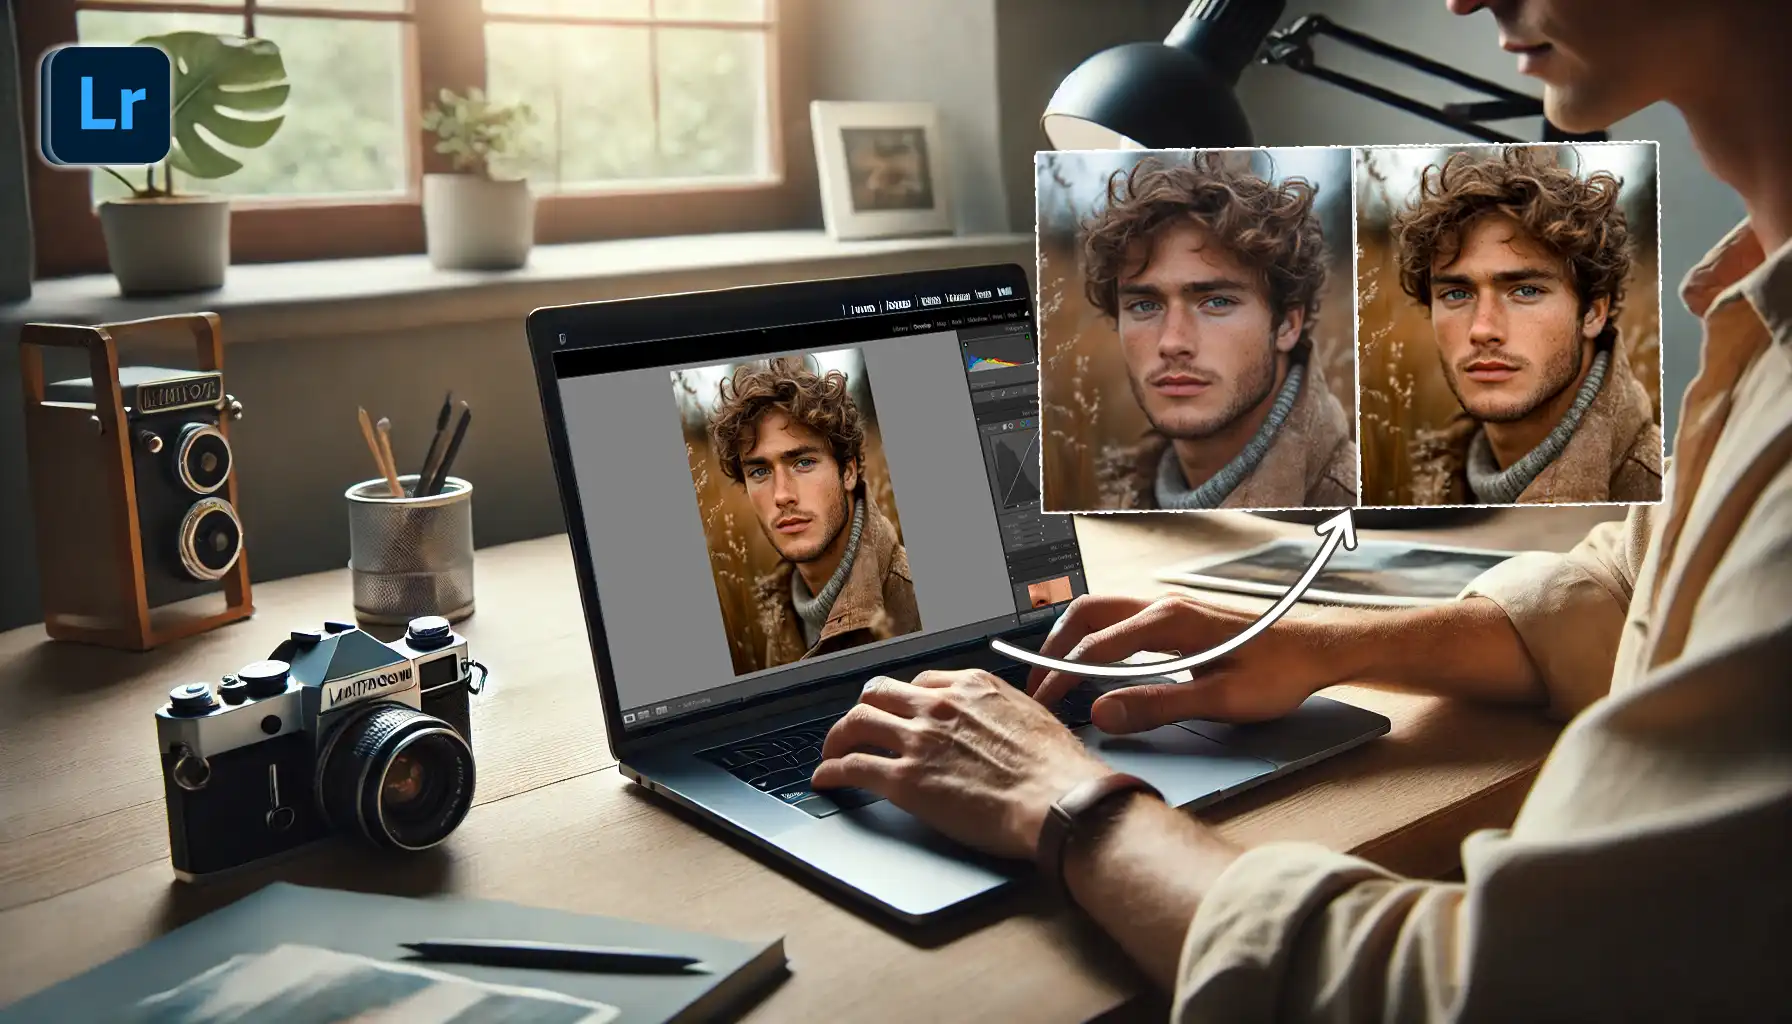
Are you curious about how to use Lightroom to edit photos like a pro?
Let me take you on a journey that will not only capture your interest but also ignite your passion for photo editing. Imagine having the power to transform ordinary snapshots into breathtaking masterpieces with just a few clicks.
Intrigued?
Good, because you’re about to discover tips and techniques that will elevate your editing skills and inspire you to get creative with your photography. By the end of this article, you’ll be well-equipped to turn your image editing hobby into an art form.
Ready to dive in and unlock your potential?
Let’s get started!
Table of Contents
How to Use Lightroom to Edit Photos
Opening Adobe Lightroom may seem intimidating, but trust me, it’s more user-friendly than it appears.
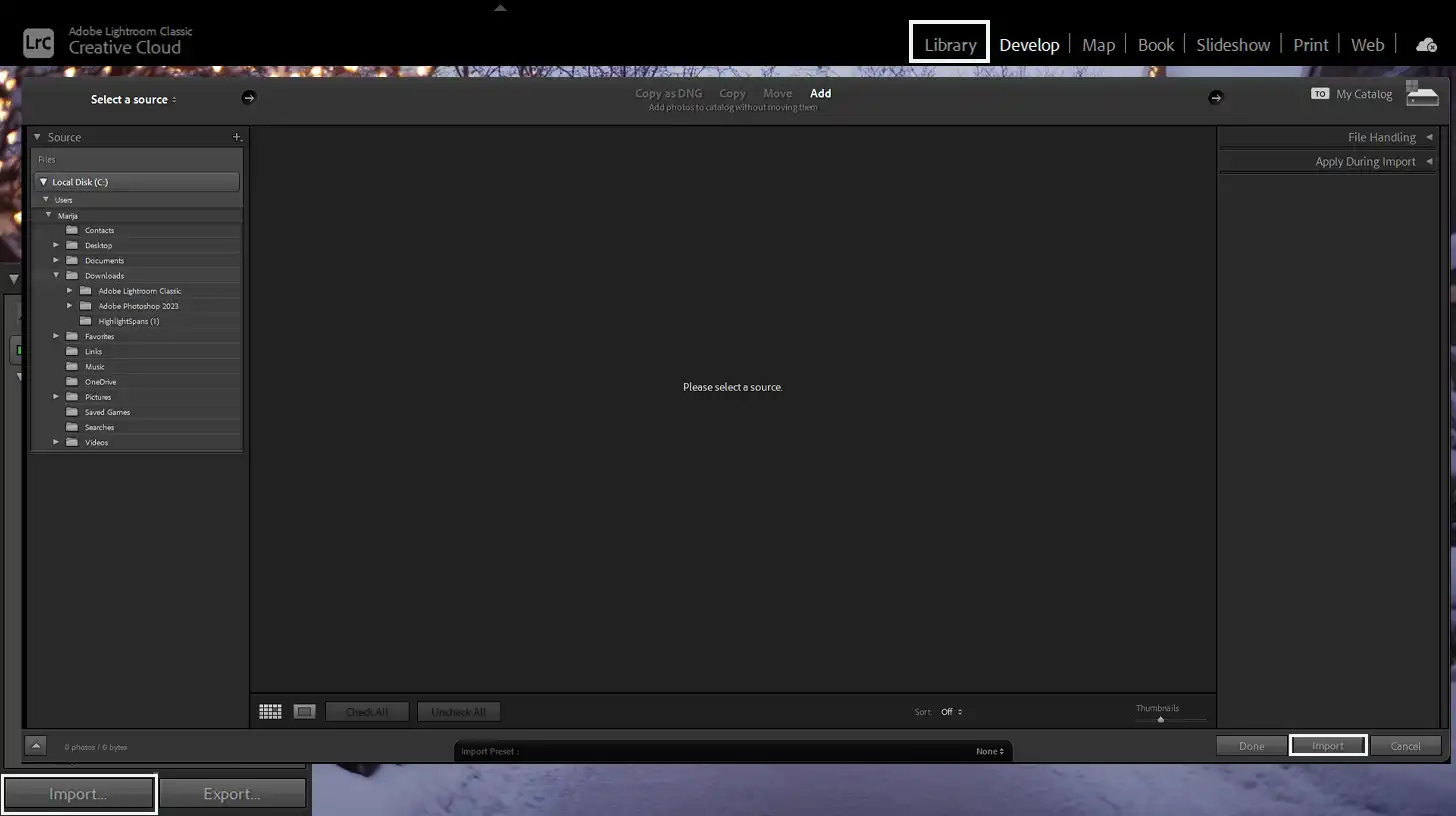
First, you need to import photos into the library. This tool lets you organize your images effortlessly.
So, click on ‘Import’ and select your photo files from your computer.
That’s your first step towards mastering how to use Lightroom to edit images.
Basic Editing Tools
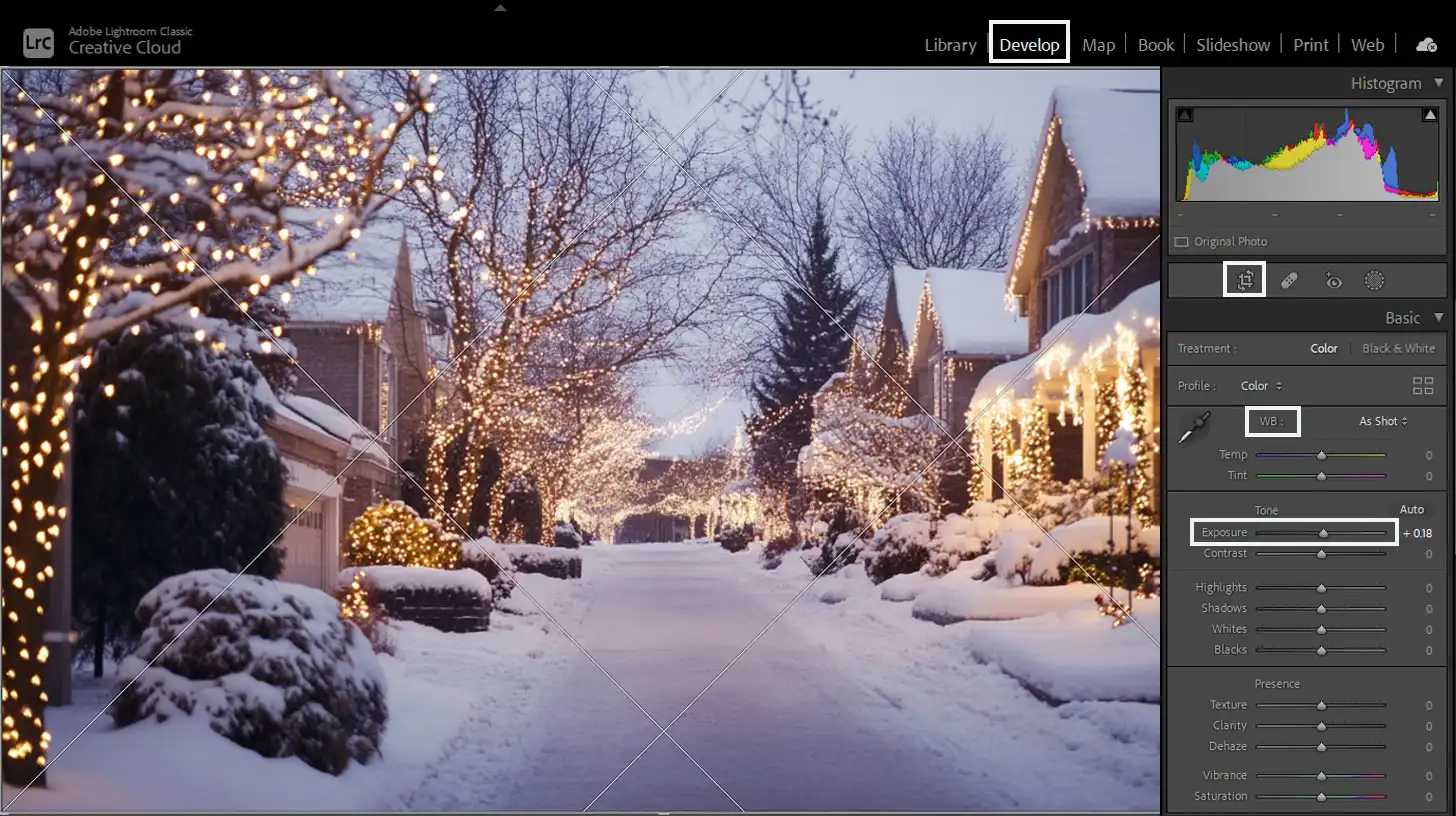
Once your photos are loaded, explore the Develop Module to initiate your editing process. This is where the magic happens.
Start with basic adjustments.
Adjust the exposure slider for brighter or darker images.
Enhance the white balance to correct color tone.
Think of these as essential aspects of your basic editing steps. Consider tailoring them to match your editing style.
Next, move on to cropping. The crop tool gives you the power to reframe your image.
Whether fixing a tilted horizon or removing distractions, this helps achieve a composition that complements your vision. Many folks start with basic edit tasks like cropping or adjusting exposure.
It makes a big difference in your final outcome.
Advanced Editing Features
Now, let’s take a look at some advanced features at your disposal
Using Presets
If you’re feeling lazy, presets are a lifesaver. They apply pre-defined edits instantly, creating a consistent look across your photos without the hassle.
Tone Curve Adjustments
For those wanting to fine-tune their images, dive into the Tone Curve.
It manipulates contrast like no other tool, adjusting highlights and shadows efficiently.
With practice, it can become your secret weapon to enhance the dynamics of an image. These adjustments are key to picture editing and can adjust skin tones smoothly.
Don’t forget about noise reduction and lens corrections.
Reducing noise helps clean the grainy appearance in your photos, especially in low light conditions.
Lens corrections fix any lens distortions, ensuring every photo looks as its original image intended. Understanding how to use lens correction in Lightroom can significantly improve your photo quality.
The Lightroom Classic version supports professional processes like batch edit, editing raw files, and more. For those leaning towards mobile editing, the ease of the Lightroom mobile application shouldn’t be underestimated.
Pro Tip: Always trust your eye. There’s no right or wrong way when it comes to editing images. Every edit panel offers various options. Experiment until you find what clicks with your vision.
Practicing these skills means soon you’ll easily edit photos. Whether you’re a complete newbie or aiming to edit photos in Lightroom like a professional photographer, these tips set you on the right track.
Editing Process
Here, we will take a more in-depth look at just how the process is done.
Importing Photos
The first step in the editing process is importing photos into Adobe Lightroom. Importing photos helps keep everything organized, so I never lose track of a good photo that begs for a bit of love and care.
To smoothly start the journey with your photos, use the “Import” button on Lightroom’s main interface. This step lays the foundation for all subsequent editing, and don’t forget to utilize Lightroom shortcuts to streamline your workflow.
Organizing Your Library
This is where we tidy up our space, much like cleaning a room before bringing friends over.
With thousands of photos waiting to shine, keeping them in the right folders ensures I don’t waste time sifting through an avalanche of pixels.
Here, I’ll create folders and use keywords to categorize every image based on themes like vacations, family, or nature.
A clean library makes it easier to apply essential tools in Lightroom efficiently.
Applying Edits
Now the real fun begins! The excitement of transforming a dull photo into a masterpiece never gets old.
Lightroom offers a myriad of features to fine-tune images, and my favorites are right under the Basic Panel. Wonderful tools like the clarity slider make details pop.
But let’s take it slowly, shall we?
Getting basic adjustments like exposure or white balance right is crucial. Once that’s in place, jumping into color adjustments, noise reduction, and exploring transform panels becomes a breeze.
It’s about making sure each photo has the same look or unique vibe that fits the story it tells.
Pro Tip:
Don't bother editing every image you've taken. Select only those which truly speak to you. Quality over quantity remains my guiding light.
When working on something like a night sky shot, highlight its beauty using noise reduction to get that star-spangled canvas DNA.
You can easily edit pictures by balancing creativity with technical precision.
Edit Images Like a Pro
Now, let’s dig into the basics of editing pictures.
Color Correction Techniques
Color correction is the magic that breathes life into any photo. It’s like adjusting the volume on a song until you hear it just right.
Start by tweaking exposure and white balance to correct the colors in the photos.
These adjustments might seem small, but they make a world of difference.
Use the warmth slider for a sunny look or cool things down with blues if that's more your style.
Explore and experiment; trial and error lead to great discoveries.
The best part? You can’t really mess it up because you can always reset!
Remember to keep your photos consistent in tone. You don’t want one photo standing out like a sore thumb.
That’s why sticking to a palette helps.
Enhancing Details
Once color correction works its magic, enhancing details takes your image to the next level.
Use clarity sliders to focus on parts you want to stand out in your photos. It sharpens areas, making them more defined.
Don’t go overboard, though!
Cranking up clarity too much can make photos look unnatural. Balance is key.
Lightroom offers tools to bring out these details gradually and subtly. Like reading the fine print, the devil is in the details.
Add just enough flair to make viewers say “wow.”
Creating a Cohesive Style
Now, let’s talk style. You know how some people always seem to look great together in group photos? That’s because their styles align.
The same concept applies here! Develop a signature look for your photos.
Whether it’s vintage or modern, consistency in your photos brings harmony.
Copy settings across photos if you're editing a series. This saves time and gives every image a unified look.
It’s like wearing matching socks to complete an outfit. Make sure each photo follows the theme you’ve chosen.
Remember, cohesion looks professional!
Pro tip: Presets are your best allies. Think of them as ready-made recipes for success. They speed up your process and give your photos a polished finish instantly!
For those looking to refine their skills further, consider learning essential tools in Lightroom or exploring Lightroom shortcuts to enhance your workflow efficiency.
Lightroom Mobile App
So, why bother with Lightroom’s mobile app? Well, it’s pretty handy.
You can edit pictures anywhere, even while waiting in line for coffee. With the app, you’re not stuck at a desk.
All you need is your phone, and voilà, editing on-the-go. This makes your workflow more flexible and efficient.
Not to mention, it brings a little fun into what might be a lazy editing routine.
Features of Lightroom Mobile
Snap photos directly through the app, skipping extra steps.
Edit your photos using intuitive tools like crop, rotate, and basic adjustments.
Try presets to add flair with just a tap.
Non-destructive editing ensures your original photo stays intact, allowing you to play without commitment.
Syncing with Desktop
Got a desktop? Good news!
The Lightroom mobile app syncs seamlessly with your desktop version. This means all your photos, and edits, are available on any device.
Start an edit on your phone and finish it on your computer. It’s that simple.
Syncing keeps everything in harmony. This aids productivity and keeps your project flowing smoothly.
You don’t have to worry about losing your work.
Pro Tip: Use cloud storage to save your edited photos. This way, they’re accessible from both mobile and desktop without hassle.
Lightroom Shortcuts
To make your editing even more efficient, consider learning some Lightroom shortcuts.
These can significantly speed up your workflow, allowing you to focus more on the creative aspects of editing rather than getting bogged down by repetitive tasks.
Difference Between Photoshop and Lightroom
While both Photoshop and Lightroom are powerful tools for image editing, they serve different purposes.
Lightroom is excellent for organizing and batch editing large numbers of photos, making it ideal for photographers who need to manage extensive photo libraries; or those who want to create graphics.
On the other hand, Photoshop offers more advanced editing capabilities for detailed retouching and creative manipulations.
Tips and Tricks for Efficient Editing
Now, let’s take a look at some tips at tricks to make your editing life even easier.
Keyboard Shortcuts
Keyboard shortcuts save time when editing images.
Learning common shortcuts is beneficial for quick actions, as they streamline tasks and make editing more efficient. Customizing shortcuts is also possible in Lightroom and Photoshop.
Practice regularly to remember shortcuts, and consider exploring Lightroom shortcuts to enhance your workflow.
Batch Editing Techniques
Batch editing allows you to apply settings across multiple photos at once, making it perfect for maintaining a consistent look in photo series.
Use presets to apply the same edits to a group of images and take advantage of the ‘Sync’ feature in Lightroom. Batch editing speeds up your workflow and increases productivity.
Maintaining Consistency
Consistency in editing ensures the photos tell a cohesive story.
Pre-established presets assist in achieving a uniform aesthetic. Review the lighting and color balance across all photos for uniformity.
Keep an eye on details that might distract from your main subject, and always double-check your work before finalizing.
Finalizing and Exporting Your Photos
Select the appropriate format based on the purpose of the photo.
JPEG is optimal for web use, balancing quality and file size, while TIFF is ideal for high-quality prints, prioritizing detail. Consider client needs when choosing formats, as understanding format differences enhances export decision-making.
Knowing whether to use RAW or JPEG format can significantly impact the final quality of your images.
Export Settings
Set the correct dimensions and resolution for final output.
Export settings impact how your photos will appear on different platforms. Use export presets for consistent output settings, and adjust settings based on whether photos are for print or digital use.
Remember, lower resolutions are suited for online platforms.
Pro Tip: Stay organized with a folder system and consistently name your files. This will save headaches later when you need to find specific photos amidst several edited collections.
Frequently Asked Questions
Is Lightroom Good for Editing Photos?
Yes, Lightroom is highly recommended for image editing. It’s user-friendly and packed with powerful tools that cater to both beginners and professionals.
What is the Four-Step Process for Editing Photos in Lightroom?
Import and Organize: Start by importing your photos into Lightroom and organizing them into albums or collections.
Basic Adjustments: Use the Develop module to adjust exposure, contrast, and color balance to enhance your photos.
Advanced Editing: Apply local adjustments, such as gradient filters or brush tools, to fine-tune specific areas of your image.
Export: Once you're satisfied with your edits, export your photos in the desired format and settings for sharing or printing.
How to Use the Lightroom App to Edit Photos?
Install the App: Download and install the Adobe Lightroom app on your mobile device.
Import Photos: Open the app and import the photos you want to edit from your device.
Edit Images: Tap on a photo to open the editing tools. Experiment with different adjustments and presets to achieve your desired look.
Save and Share: After editing, save your photo and share it directly from the app to social media or with friends.
How Do I Edit More Photos in Lightroom?
To edit more photos efficiently in Lightroom, utilize batch editing. This allows you to apply the same set of adjustments to multiple photos at once. Simply adjust one photo as desired, then sync these settings across other selected images in your catalog.
Mastering how to use Lightroom to edit photos has been a game-changer for my photography.
Its intuitive interface and powerful tools make editing efficient and enjoyable, allowing me to enhance images with ease and precision. From adjusting exposure to fine-tuning details, Lightroom has simplified the process and boosted my confidence.
If you want to improve your photo editing skills, I highly recommend my Photoshop course and Lightroom course. These courses guide you step-by-step, whether you’re a beginner or looking to refine your skills.
By investing time in learning Lightroom, you’ll unlock endless possibilities and see remarkable improvements in your work, transforming your photos into true works of art.
If this article has helped you, then Like and Share it with your friends
$2,061.00Original price was: $2,061.00.$1,061.00Current price is: $1,061.00. 27584
Download Your Free Guide Now!
Discover the secrets of photography with our printable guide! Master essential techniques like aperture, shutter speed, and ISO to create stunning images. Get your free printable PDF now and start turning your snapshots into masterpieces!